
User's Manual

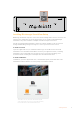
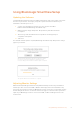
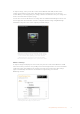
Table Of Contents
- Getting Started
- Using Blackmagic SmartView Setup
- Using SmartView 4K
- Using SmartScope Duo 4K
- Connecting to a Network
- Adjusting Network Settings
- Using Tally
- Optimizing the Viewing Angle
- Developer Information
- Help
- Regulatory Notices and Safety Information
- Warranty
- English
- 日本語
- Français
- Deutsch
- Español
- 中文
- 한국어
- Русский
- Italiano
- Português
- Türkçe
- はじめに
- Blackmagic SmartView Setupの使用
- SmartView 4Kの使用
- SmartScope Duo 4Kの使用
- ネットワークに接続
- ネットワーク設定の調整
- タリーの使用
- ビューアングルの最適化
- デベロッパーの皆様へ
- ヘルプ
- 規制に関する警告および安全情報
- 保証
- Mise en route
- Utiliser le Blackmagic SmartView Setup
- Utiliser le SmartView 4K
- Utiliser SmartScope Duo 4K
- Connexion à un réseau
- Modifier les paramètres réseau
- Utilisation du tally
- Optimiser l'angle de vision
- Developer Information
- Assistance
- Avertissements et informations de sécurité
- Garantie
- Erste Schritte
- Blackmagic SmartView Setup im Einsatz
- Der SmartView 4K im Einsatz
- Der SmartScope Duo 4K im Einsatz
- Anschließen an ein Netzwerk
- Anpassen von Netzwerkeinstellungen
- Arbeiten mit Tally
- Optimieren des Betrachtungswinkels
- Informationen für Entwickler (Englisch)
- Hilfe
- Gesetzliche Vorschriften und Sicherheitshinweise
- Garantie
- Primeros pasos
- Uso del programa SmartView Setup
- SmartView 4K
- SmartScope Duo 4K
- Conexión a redes
- Ajustes de red
- Sistemas de señalización
- Mejora del ángulo de visión
- Información para desarrolladores
- Ayuda
- Información sobre normativas y seguridad
- Garantía
- 入门
- 使用Blackmagic SmartView Setup
- 使用SmartView 4K
- 使用SmartScope Duo 4K
- 连接到网络
- 调整网络设置
- 使用Tally
- 调整最佳监看角度
- Developer Information
- 帮助
- 监管告知与安全信息
- 保修
- 시작하기
- Blackmagic SmartView Setup 소프트웨어 사용하기
- SmartView 4K 사용하기
- SmartScope Duo 4K 사용하기
- 네트워크에 연결하기
- 네트워크 설정 조정하기
- 탈리 사용
- 시야각 최적화하기
- 지원
- 규제 사항 및 안전 정보
- 보증
- Подготовка к работе
- Работа с утилитой Blackmagic MultiView Setup
- Работа со SmartView 4K
- Работа со SmartScope Duo 4K
- Подключение к локальной сети
- Изменение сетевых настроек
- Индикация состояния
- Регулировка угла обзора
- Информация для разработчиков
- Помощь
- Соблюдение нормативных требований и правила безопасности
- Гарантия
- Operazioni preliminari
- Utilizzare Blackmagic SmartView Setup
- Utilizzare SmartView 4K
- Utilizzare SmartScope Duo 4K
- Collegarsi ad una rete
- Regolare le impostazioni di rete
- Utilizzare la funzione tally
- Ottimizzare l’angolo di visuale
- Informazioni per gli sviluppatori (English)
- Assistenza
- Normative e sicurezza
- Garanzia
- Instruções Preliminares
- Usar Blackmagic SmartView Setup
- Usar SmartView 4K
- Usar SmartScope Duo 4K
- Conectar a uma Rede
- Ajustar Configurações de Rede
- Usar Sinalização
- Otimizar o Ângulo de Visualização
- Informações para Desenvolvedores
- Ajuda
- Informações Regulatórias e de Segurança
- Garantia
- Başlarken
- Blackmagic SmartView Setup Yazılımının Kullanımı
- SmartView 4K’nın Kullanımı
- SmartScope Duo 4K Kullanımı
- Bir Ağa Bağlanırken
- Ağ Ayarlarının Değiştirilmesi
- Tally Özelliğinin Kullanılması
- İzleme Açısının Optimize Edilmesi
- Yazılım Geliştirici Bilgileri
- Yardım
- Düzenleyici Bildirim ve Güvenlik Bilgileri
- Garanti

To adjust settings, select your monitor connected via Ethernet and USB, and click on the
settings icon below the monitor name. This will open the settings page for your selected
monitor. When you are happy with your settings, click the save button to save your settings and
return to the SmartView setup home page.
See the next section for information on settings that are available for Blackmagic monitors and
how to apply them. For information on how to configure network settings using Blackmagic
SmartView setup, turn to the section “adjusting network settings”.
Blackmagic SmartView setup automatically searches for any
SmartView and SmartScope units connected locally via USB
or over a network. When updating your monitor’s internal
software make sure your monitor is connected via USB or
Ethernet. A USB icon will appear next to your monitor’s name.
Monitor Settings
To adjust settings and displays for each monitor, they must be connected via Ethernet or USB.
Select the monitor you wish to set by clicking on the left and right arrow icons on the SmartView
setup home page, then clicking on the settings icon under your monitor name. The settings
page is automatically customized to suit the features supported by your selected
Blackmagic monitor.
With SmartScope you can select between scopes or video
monitoring from the ‘display’ drop down menu
9Using Blackmagic SmartView Setup