Installation and Operation Manual HyperDeck Disk Recorders March 2020 English, 日本語, Français, Deutsch, Español, 中文, 한국어, Русский, Italiano, Português and Türkçe.
Languages To go directly to your preferred language, simply click on the hyperlinks listed in the contents below.
English Welcome We hope you share our dream for the television industry to become a truly creative industry by allowing anyone to have access to the highest quality video. Our range of HyperDeck disk recorders have made it easier and more affordable than ever to record and play back full 10 Bit uncompressed video and now Ultra HD! HyperDeck records directly to removable 2.5" Solid State Disks (SSDs) and SD cards that are getting bigger, faster and more affordable every day.
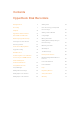
Contents HyperDeck Disk Recorders Getting Started 5 Adding Titles 44 Recording 7 Color Correcting your Clips with the Color Page 45 Playback 10 HyperDeck Status Indicators 13 About SSDs and SD Cards 14 Adding a Power Window 48 Using Plugins 50 Blackmagic HyperDeck Setup 21 Mixing Your Audio 51 Selecting Your Video Format 22 Adding VFX and Compositing on the Fusion Page 55 Choosing a Codec 23 Control Panel Display Menu 26 Trigger Recording 27 RS-422 Control 29 Transf
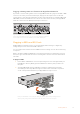
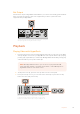
Getting Started Getting Started with Blackmagic HyperDeck Getting started with your HyperDeck disk recorder is as easy as connecting power, plugging in your video sources and destination equipment to your HyperDeck’s inputs and outputs and inserting your SSDs or SD cards. Plugging in Power Simply plug a standard IEC cable to your HyperDeck’s power input on the rear panel.
UT B Plugging in Analog Audio and Timecode on HyperDeck Studio Pro If you want to connect analog audio sources to HyperDeck Studio Pro, plug into the XLR or RCA connectors. To select your desired audio input, simply press the ‘input’ button on the front control panel to cycle through combinations of video and audio inputs. For example, SDI + XLR, SDI + RCA, and more. External timecode can also be connected to and from your HyperDeck Studio Pro via the timecode XLR input and output connectors.
To plug in an SD card: 1 Hold the SD card with the gold connectors facing your HyperDeck’s LCD and align it with the media slot. Now gently push the card into the slot until you feel it lock firmly into place. 2 Your HyperDeck will verify the SD card. This is shown by an illuminated green indicator above the SD card slot. When the indicator turns off and the stop button on the control panel is illuminated, your HyperDeck is ready to record.
216 2160p30 01:23 Card 2 01:23:47:08 The indicator above the SD card slot illuminates red when recording video Recording Video with HyperDeck Studio SSD Models 1 Insert your formatted SSD into either SSD slot. The LED strip surrounding the drive will illuminate green as HyperDeck reads the disk. When the slot light turns off, your HyperDeck is ready to record. 2 Press the input button on the control panel to cycle through your HyperDeck’s inputs.
When there is less than 3 minutes of record time remaining on your SD card or SSD, the timecode counter on your HyperDeck’s LCD will turn red and the ‘stop’ button will flash slowly. This also means there is no second disk with space that recording can continue onto. In this case, you simply need to insert a disk with space so recording can continue.
Ref Output The reference output on HyperDeck Studio Mini lets you connect an internally generated black burst or tri-level sync signal to other video equipment if you want to synchronize other equipment with your HyperDeck.
If the play button flashes on HyperDecks that record on SSDs, this means the disk is not fast enough and playback cannot keep up. We recommend you change to a compressed recording format such as ProRes or DNxHD, or use a faster recommended SSD for uncompressed or Ultra HD recording. SSD 2 INPUT DISP SET REM 01:42:56:12 JOG SSD 2 DISP INPUT SET REM 01:42:56:12 JOG SSD slots have rotating LEDs to show the unit is in playback mode TIP If you play back a video clip that has an associated .
If your HyperDeck has ‘reverse’ or ‘fast forward’ buttons, you can press these buttons to play through the clip at 2x speed. Press the ‘reverse’ or ‘fast forward’ buttons again and the speed will increase to 4x and then 8x. Once you’ve found the section you want to review, press ‘play’ to resume normal playback.
Rec.2020 SDR This setting is used for Ultra HD video using standard dynamic range. HLG HLG stands for ‘hybrid log gamma’. This format allows HDR video to be played back on HDR capable TVs and monitors, including those that support up to Rec.2020 SDR. The following settings support the Rec.2020 color gamut, plus PQ, or perceptual quantizer published as SMPTE ST2084. PQ is the function of wide gamut HDR that allows for the display of brighter images.
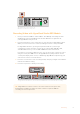
Control Panel LCD HyperDeck Disk Recorders feature an LCD that not only shows your video but also displays status information such as video format and frame rate, record, playback and jog modes, the active media slot as well as timecode and audio levels.
Brand Crucial Digistor Intel Kingston OCZ OWC PNY SSD Name/Model Number Storage Supported Formats 10-bit uncompressed HD and Ultra HD ProRes or DNxHR HD ProRes and DNxHD M4 (firmware 009 only) CT512M4SSD2 512GB No Yes M4 (firmware 000F only) CT256M4SSD2 256GB No Yes 4K Professional Video Series (DIG-PVD1000, preformatted ExFat) 1TB Yes Yes Professional Video Series (DIG-PVD240S, preformatted ExFat) 240GB Yes Yes Professional Video Series (DIG-PVD480S, preformatted ExFat) 480GB
Brand Samsung Sandisk Sony Transcend SSD Name/Model Number Storage Supported Formats 10-bit uncompressed HD and Ultra HD ProRes or DNxHR HD ProRes and DNxHD 850 Pro MZ-1T0BW, spacer required) - not compatible with HyperDeck Shuttle 1TB Yes Yes 850 Pro MZ-7KE256BW, spacer required 256GB Yes Yes 850 Pro MZ-7KE512BW, spacer required 512GB Yes Yes 860 EVO - not compatible with HyperDeck Shuttle 2TB Yes Yes 860 EVO - not compatible with HyperDeck Shuttle 4TB Yes Yes 860 EVO V-NAND MZ-
Brand Card Name Storage Max Read/Write Speed Supported Formats Ultra HD ProRes or DNxHR HD ProRes, DNxHD or H.
To format using your HyperDeck: 1 Insert the media you want to format into either of the SD card or SSD slots. 2 Press the ‘disp’ or ‘menu’ button on your HyperDeck’s control panel. 3 On HyperDecks that record on SSDs, turn the jog/shuttle wheel and press the set button to select ‘format SSD’ on the LCD menu. On HyperDeck Studio Mini, turn the jog/shuttle wheel and use the set button to enter the ‘record’ menu on the LCD and select ‘format card’.
Formatting Media on a Mac OS Computer The Disk Utility application included with Mac OS can format a drive in the HFS+ or exFAT formats. Make sure you back up anything important from your disk as you will lose everything on it when it is formatted. To format on a Mac OS computer: 1 Connect an SSD to your computer with an external dock or cable adapter and dismiss any message offering to use your SSD for Time Machine backups.
Formatting Media on a Windows computer The format dialog box can format a drive in the exFAT format on a Windows PC. Make sure you back up anything important from your SSD or SD card as you will lose everything on it when it is formatted. To format on a Windows computer: 1 Connect an SSD to your computer with an external dock or cable adapter. For SD cards, insert the card into your computer’s SD card slot, or connect it to your computer via an external card reader.
Blackmagic HyperDeck Setup Using HyperDeck Setup Blackmagic HyperDeck Setup is used to change settings and update the internal software in your HyperDeck. In addition to installing HyperDeck Setup, uncompressed 10 bit codecs are installed for Mac and Windows. The home page of HyperDeck Setup.
Selecting Your Video Format All HyperDecks record compressed HD video using Apple ProRes and Avid DNxHD 220x codecs. HyperDeck models that record on SSDs can also record uncompressed HD video. HyperDeck Studio Pro records Ultra HD using ProRes codecs. HyperDeck Studio Mini and HyperDeck Studio 12G support ProRes and DNxHR HQX for Ultra HD recording. HyperDeck Studio Mini also records HD video using the H.
Use HyperDeck Setup to select your desired recording and playback format All subsequent clips will be recorded in the chosen format. Setting the recording format also sets the playback format. For example, if you want to play back an uncompressed 10-bit QuickTime file, set the recording format to Uncompressed 10-bit QuickTime. Setting Avid DNxHD as the recording format lets you play DNxHD 220x QuickTime and MXF clips, and by selecting Apple ProRes you can play clips using any of the ProRes codecs.
For YouTube delivery from HyperDeck Studio Mini, you have the flexibility of three H.264 options, ‘high’, ‘medium’ and ‘low’. When recording H.264, your audio compression will default to 2 channels of AAC audio so you can simply upload your recorded files to YouTube. If you want the benefits of smaller file size but also the flexibility of additional audio channels, you can also record up to 16 channels of PCM audio instead. It’s worth noting that H.
H.264 on the HyperDeck Studio Mini Video Format 1080p30 1080i60 1080p25 1080i50 1080p24 720p60 720p50 525i59.94 NTSC 625i50 PAL Bit Rate Setting Bit Rate (Mb/s) High 45 Medium 29 Low 13 High 45 Medium 30 Low 15 High 40 Medium 25 Low 11 High 40.5 Medium 27 Low 14 High 38 Medium 24 Low 10.5 High 40 Medium 26 Low 12 High 33 Medium 21 Low 9.5 High 10 Medium 7.5 Low 4 High 10 Medium 7 Low 4 HyperDeck Studio Mini will play back H.
Control Panel Display Menu Using the Display Menu Use your HyperDeck’s control panel display menu to change your video and audio inputs and outputs as well as any settings changes you would make in HyperDeck Setup such as trigger recording, timecode output and your chosen recording codec.
To set this using the display menu: 1 Press the ‘display’ or ‘menu’ button to display the main menu. 2 Scroll to the ‘timecode’ menu and press ‘set’. 3 Press ‘set’ to enter the ‘timecode input’ menu and select ‘input’. 4 Press ‘set’ to confirm your selection. It might be necessary to turn on the RP 188 setting in your camera before HyperDeck will be able to record the timecode.
You can use the control panel LCD menu on HyperDeck, or use HyperDeck Setup to enable Start/Stop recording INPUT DISP Codec Record Trigger Record Trigger SDI Start/Stop REM None Timecode Run SET JOG Codec DISP INPUT REM Record Trigger Record Trigger None SDI Start/Stop Timecode Run SET JOG The ‘record trigger’ settings let you set your HyperDeck to start and stop recording triggered by data received over an HD-SDI connection Timecode Run Recording HyperDeck also supports timecode run rec
Now whenever your HyperDeck detects the timecode running via HD-SDI it will start recording. Recording will stop whenever the timecode stops. Be careful if your HyperDeck is connected to the SDI output of a video router, as any change to the video source might cause HyperDeck to start recording unexpectedly due to a change in timecode being detected via HD-SDI.
Using an External RS-422 Controller All current HyperDeck models feature an industry standard Sony™ compatible RS-422 deck control port, which has the correct pin connections for a direct connection to any remote controller with RS-422. You can use pre-manufactured 9 pin cables as long as each end of the cable is wired ‘pin for pin’ where the same pin numbers on each end of the cable are connected together. If you would like to make custom cables, please refer to the accompanying wiring diagram.
Supported RS-422 Commands Command Reply No Remote NTSC: 0xF0E0 PAL: 0xF1E0 24P: 0xF2E0 Enabled Notes 0 - System Control 0x00 0x11 DeviceTypeRequest 1 - Slave Response 0x20 0x00 Stop Acknowledge Disabled 0x20 0x01 Play Acknowledge Disabled 0x20 0x02 Record Acknowledge Disabled 0x20 0x04 StandbyOff Acknowledge Disabled 0x20 0x05 StandbyOn Acknowledge Disabled 0x20 0x0F Eject Acknowledge Disabled 0x20 0x10 FastFwd Acknowledge Disabled 0x21 0x11 JogFwd1 Acknowledge
Command Reply No Remote 0x20 0x61 FullEEOn Acknowledge Disabled 0x20 0x63 SelectEEOn Acknowledge Disabled Notes 4 - Preset/Select Control 0x40 0x10 InEntry Acknowledge Disabled 0x22 0x23 ShuttleRev2 Acknowledge Disabled 0x20 0x30 Preroll Acknowledge Disabled 0x24 0x31 CueData Acknowledge Disabled 0x20 0x34 SyncPlay Acknowledge Disabled 0x21 0x38 ProgSpeedPlayPlus Acknowledge Disabled 0x21 0x39 ProgSpeedPlayMinus Acknowledge Disabled 0x40 0x11 OutEntry Ackn
Command Reply No Remote Notes 0x78 0x00 Timer1Data — — Current Time and 00:00:00:00 0x78 0x04 LTCUserBitsTimeData — — Current Time and 00:00:00:00 0x78 0x06 VITCUserBitsTimeData — — Current Time and 00:00:00:00 0x74 0x06 VITCTimeData — — Current Time 0x74 0x07 UserBitsVITCTimeData — — 00:00:00:00 0x74 0x08 GenTCData — — Current Time 0x78 0x08 GenTCUBData — — Current Time and 00:00:00:00 0x74 0x09 GenUBData — — 00:00:00:00 0x74 0x10 InData — — 0x74 0x
Command 0x4f 0x16 Reply AppendPreset No Remote Notes Acknowledge Disabled 2 Bytes for the length N of the clip name N Bytes for each character of the clip name 4 Byte in point timecode (format is FFSSMMHH) 4 Byte out point timecode (format is FFSSMMHH) Blackmagic Extensions 0x08 0x02 BmdSeekToTimelinePosition Acknowledge Disabled 16-bit little endian fractional position [0..
Variables Cassette Out Set if no SSD is present Local Set if Remote is disabled (local control) Standby Set if a disk is available Direction Clear if playback is forwarding, set if playback is reversing Still Set if playback is paused, or if in input preview mode Auto Mode Set if in Auto Mode Select EE, Full EE Set if in input preview mode Lamp Still/Fwd/Rev Set according to playback speed and direction Near EOT Set if total space left on available SSDs is less than 3 minutes EOT Set if t
You can find your HyperDeck Studio Mini’s IP address in the smart panel’s ‘network’ screen 3 Enter your HyperDeck Studio Mini’s IP address into your TCP application’s connection dialog. The naming and position of this box can vary between applications, but it is usually labeled ‘server’ or ‘host.’ If your FTP program includes an ‘anonymous login’ checkbox, make sure this is checked. When connecting to HyperDeck Studio Mini, you don’t need to enter a username or password.
Connecting to an ATEM Switcher If you’re using an ATEM switcher, you can plug in up to 4 Blackmagic HyperDeck disk recorders and control them using the ATEM software control panel. This is a very powerful feature that effectively gives you an entire videotape department at your fingertips.
SSD 2 INPUT REM JOG DISP SET INPUT REM 01:42:56:12 SSD 2 01:42:56:12 JOG Make sure your HyperDeck has remote set to ‘on’ in the LCD menu, or via the control panel remote button, to enable Ethernet control with an ATEM switcher Understanding Post Production Workflows Accessing Your Clips To access your clips, simply plug the SD card or SSD into your computer via an SD card slot, external reader, or SSD dock.
Using DaVinci Resolve Recording clips with your HyperDeck Disk Recorder is only part of the process of creating film and television content, and just as important is the process of media backup and management as well as editing, color correction and encoding final master files.
Using the ‘cut’ page, you can start working on your edit immediately. The project manager shows all projects belonging to the current user For more information about the Project Manager, refer to the DaVinci Resolve manual which is available to download on the Blackmagic Design website support page. Editing with the Cut Page The ‘cut’ page gives you a fast, dynamic editing workflow that lets you quickly assemble, trim and edit clips efficiently.
For more information on the Cut page, see the ‘Using the Cut Page’ chapter in the DaVinci Resolve manual. Media Tabs At the top left corner of the user interface you will see five tabs. Click on these tabs to open the media toolsets you will use when creating your edit. For example, the first tab is the media pool and you can see it is already selected. The other tabs are for the sync bin, media transitions, titles and effects.
Source Clip The source clip viewer displays a single clip from the media pool and you can set in and out points along the entire length of the viewer timeline. This gives you greater control. Select a source clip to view by double clicking on a clip in the media pool, or dragging it into the viewer. Source Tape Source tape lets you view all the source clips in the media pool. This powerful feature is helpful if you want to quickly search through all your clips to find a specific event.
Adding Clips to the Timeline Now that you are familiar with the media tabs and viewer mode buttons, you can open the media pool and quickly start adding clips to your timeline. The timeline of the cut page, comprising the upper timeline and the zoomed in timeline below The timeline is where you will build your edit and is like a board with tracks you can attach clips to, move them around and trim their edits.
3 Now click the ‘append’ icon underneath the media pool. Your first clip will be placed at the head of the timeline. Repeat steps 1 to 3 to keep adding more clips and they will automatically append, ensuring there are no gaps in the timeline. Appending clips ensures there are no gaps between them on the timeline TIP You can speed up the process further by assigning a keyboard shortcut to the ‘append’ icon.
To do this: 1 Click on the ‘text’ title and drag it onto the timeline. It doesn’t matter which timeline, but for greater accuracy we recommend using the detailed timeline. The title will automatically create a new video track for the title and will snap to the playhead. 2 Release the mouse and the title will appear on the new track. You can now move it or change its duration like you would another video clip.
Using Scopes Most colorists make creative color choices by focusing on the emotion and the look they want their program to have and then simply work using the monitor to achieve that look. You can look at everyday objects and how different types of light interact with them to generate ideas on what you can do with your images and a little practice. The parade scope helps you optimize highlights, mid tones and shadows Another way to color grade is to use the built in scopes to help you balance shots.
Adjusting the ‘gain’: Click on the ‘gain’ dial and slide it back and forth. This adjusts the highlights which are the brightest areas of your clip. The highlights are shown on the top section of the waveform on the parade scope. For a brightly lit shot, these are best positioned just below the top line of the waveform scope. If the highlights rise above the top line of the waveform scope, they will clip and you will lose details in the brightest regions of your image.
Using the HSL qualifier to select colors in your image is helpful when you want to make areas of your image ‘pop’, to add contrast, or to help draw the audience’s attention to certain areas of your shot To qualify a color: 1 Add a new serial node. 2 Open the ‘qualifier’ palette and make sure the ‘selection range’ picker tool is selected. 3 Click on the color in your clip you want to affect.
For example, you can track a window on a person in order to make color and contrast changes just to that person without affecting his or her surroundings. By making corrections like this you can influence the audience’s attention on areas you want them to notice. To add a power window to your clip: 1 Add a new serial node. 2 Open the ‘window’ palette and select a window shape by clicking on a shape icon. Your selected window shape will appear on the node.
To track a window to a moving object: 1 Create a new serial node and add a power window. 2 Go to the start of your clip and position and size the window to highlight just the object or area you want. 3 Open the ‘tracker’ palette. Select the pan, tilt, zoom, rotate, and perspective 3D settings appropriate for the movement in your clip by checking or unchecking the relevant ‘analyze’ checkboxes. 4 Click on the ‘forward’ arrow to the left of the checkboxes.
Mixing Your Audio Mixing Audio in the Edit Page Once you have edited and color corrected your project, you can begin to mix your audio. DaVinci Resolve has a helpful set of features for editing, mixing and mastering audio for your project directly in the ‘edit’ page. For projects requiring more advanced audio tools, the Fairlight page provides you with a full audio post production environment.
The Fairlight Page The ‘Fairlight’ page in DaVinci Resolve is where you adjust your project audio. In single monitor mode, this page gives you an optimized look at the audio tracks of your project, with an expanded mixer and custom monitoring controls that make it easy to evaluate and adjust levels in order to create a smooth and harmonious mix. Don’t feel overwhelmed by the vast array of features in front of you, they are all there to help you deliver the best audio quality for your project.
What is a Bus? A bus is essentially a destination channel to which you can route multiple audio tracks from the timeline, so that they are mixed together into a single signal that can be controlled via a single channel strip. Main Bus: ‘Main busses’ are typically the primary output of a program and each new project you create starts out with a single ‘main bus’, to which all tracks are routed by default.
DaVinci Resolve provides EQ filters that can be applied at a clip level to each individual clip or at the track level to affect entire tracks. Each audio clip in the timeline has a four band equalizer in the inspector panel, and each track has a 6 band parametric equalizer in the mixer panel. The graphical and numeric controls for boosting or attenuating different ranges of frequencies, and different filter types allow you to define the shape of the EQ curve.
To add EQ to a track: 1 Double click in the EQ section for one of your tracks in the mixer to open the equalizer for that track. 2 Select the band filter type from the dropdown menu for the band you want to adjust. The EQ section in the mixer panel indicating an EQ curve has been applied to track one The 6 Band parametric equalizer that can be applied to every track Once you have added EQ to your clip or track, you can adjust the EQ for each band.
The Fusion Page The Fusion page features 2 viewer windows across the top with transport controls to view your media, an inspector window to the right to access tool settings, and a nodes window at the bottom where you build your composition.
Viewers: The viewers are always visible and let you see the different views of your composition, for example an overall 3D perspective via the merge 3D node, a camera output, or your final render output. These viewers also let you see how your changes are affecting a specific element. You can choose which nodes to view by clicking on a node and typing ‘1’ for the left viewer or ‘2’ for the right viewer. White button icons appear beneath the node to let you know which viewer it is assigned to.
The text inspector contains additional tabs for text, layout, transform, shading, image and settings. Getting Started with Fusion To get started with Fusion, simply position your playhead over any clip on your timeline and click on the ‘Fusion’ tab to open the Fusion page. On the Fusion page, your clip is immediately available in a media input node labelled ‘MediaIn’. Every composition will begin with a ‘mediain’ and a ‘mediaout’ node.
Multiple outputs on nodes means a single node can connect to many different nodes in your composition, so you don’t have to duplicate clips as you would in layer based software. Arrows on the line between connected nodes are a great visual indicator to show you which direction the image data is flowing. Adding Nodes to the Node Editor Adding effects is as simple as placing nodes on the line between the ‘mediain’ and ‘mediaout’ nodes. There are a few ways you can do this.
Selected nodes appear with a red border. Here the inspector panel is displaying the layout tab controls for the text node. There are different parameters and settings you can adjust for every node depending on its task, from sizing and center positions to changing the number of particles in an emitter node. Setting keyframes and changing the settings over time will animate the effect.
Using the Motion Tracker and Adding Text To get a better idea of how to use Fusion, we have included the following examples to show how to use the tracker tool to track an element in a clip, plus add text and attach it to the element using the tracking data. The ‘tracker’ tool tracks pixels over time on the x & y axis, and generates data you can use to attach other elements.
5 Click on the ‘tracker’ node and type ‘1’ so you can see the merged results on your left hand viewer. In the ‘tracker’ inspector panel, click on the ‘operations’ tab. You can see the tab’s name by hovering the mouse pointer over it. Click the dropdown menu next to operation and select ‘match move’. 6 Click the ‘text’ node to reveal the properties in the inspector. Type your text into the text box and change the font, color and size to suit your composition.
7 Click on the keyframes tab above the inspector to open the keyframes editor. Any nodes with keyframes applied will have a small arrow next to the node label, and only the parameter with keyframes added will appear in the list below. Click on the magnify icon and drag a box around the area you want to edit. This will zoom into that area so you can see the keyframes easier. 8 Move the playhead to the location of the last keyframe you want.
Mastering Your Edit Now you’ve edited, graded, added vfx and mixed your audio, you’ll want to share it with others. You can use the Quick Export button, or menu selection, to output the contents of the Timeline as a self contained file in one of a variety of different formats, or use the additional features of the ‘deliver’ page. The ‘deliver’ page is where you export your edit.
The Deliver Page This page lets you select the range of clips you want to export, plus the format, codec and resolution you want. You can export in many types of formats such as QuickTime, AVI, MXF and DPX using codecs such as 8-bit or 10-bit uncompressed RGB/YUV, ProRes, DNxHD, H.264 and more. To export a single clip of your edit: 1 Click on the ‘deliver’ tab to open the deliver page. 2 Go to the ‘render settings’ window on the top left of the page.
Developer Information Blackmagic HyperDeck Ethernet Protocol The Blackmagic HyperDeck Ethernet Protocol is a text based protocol accessed by connecting to TCP port 9993 on HyperDeck Studio models that have a built in Ethernet connection. If you are a software developer you can use the protocol to construct devices that integrate with our products.
Command Command Description record record from current input record: name: {name} record named clip record spill record: spill: slot id: {n} spill current recording to next slot spill current recording to specified slot use current id to spill to same slot stop stop playback or recording clips count query number of clips on timeline clips get query all timeline clips clips get: clip id: {n} query a timeline clip info clips get: clip id: {n} count: {m} query m clips starting from n query cli
Command Command Description notify: dynamic range: {true/false} set dynamic range settings notifications goto: clip id: {start/end} goto first clip or last clip goto: clip id: {n} goto clip id {n} goto: clip id: +{n} go forward {n} clips goto: clip id: -{n} go backward {n} clips goto: clip: {n} goto frame position {n} within current clip goto: clip: +{n} go forward {n} frames within current clip goto: clip: -{n} go backward {n} frames within current clip goto: clip: {start/end} goto start
Command Command Description configuration: audio input channels: {n} set the number of audio channels recorded to {n} configuration: record trigger: {none/ recordbit/timecoderun} change the record trigger configuration: record prefix: {name} set the record prefix name (supports UTF-8 name) configuration: append timestamp: {true/false} append timestamp to recorded filename uptime return time since last boot format: prepare: {format} prepare a disk formatting operation to filesystem {format} for
Response syntax Simple responses from the server consist of a three digit response code and descriptive text terminated by a new line: {Response code} {Response text}↵ If a response carries parameters, the response text is terminated with a colon, and parameter name and value pairs follow on subsequent lines until a blank line is returned: {Response code} {Response text}:↵ {Parameter}: {Value}↵ {Parameter}: {Value}↵ ...
Connection response On connection, an asynchronous message will be delivered: 500 connection info:↵ protocol version: {Version}↵ model: {Model Name}↵ ↵ Connection rejection Only one client may connect to the server at a time.
Getting help The "help" or "?" commands return human readable help text describing all available commands and parameters: help↵ Or: ?↵ The server will respond with a list of all supported commands: 201 help:↵ {Help Text}↵ {Help Text}↵ ↵ Switching to preview mode The "preview" command instructs the deck to switch between preview mode and output mode: preview: enable: {"true", "false"}↵ Playback will be stopped when the deck is switched to preview mode.
Changing timeline position The "goto" command instructs the deck to switch to playback mode and change its position within the timeline. To go to the start of a specific clip: goto: clip id: {Clip ID}↵ To move forward/back {count} clips from the current clip on the current timeline: goto: clip id: +/-{count}↵ Note that if the resultant clip id goes beyond the first or last clip on timeline, it will be clamp at the first or last clip.
Retrieving device information The "device info" command returns information about the connected deck device: device info↵ The server will respond with: 204 device info:↵ protocol version: {Version}↵ model: {Model Name}↵ unique id: {unique alphanumeric identifier}↵ ↵ Retrieving slot information The "slot info" command returns information about a slot.
Retrieving timeline information The "clips get" command returns information for each available clip, for a given range in timecode, on the current timeline.
File Formats All HyperDeck models currently support the following file formats: QuickTimeUncompressed QuickTimeProResHQ QuickTimeProRes QuickTimeProResLT QuickTimeProResProxy QuickTimeDNxHD220 DNxHD220 HyperDeck Studio Mini and HyperDeck Studio 12G additionally support the following file formats: QuickTimeDNxHR_HQX DNxHR_HQX HyperDeck Studio Mini also supports the following file formats: H.264Low H.264Medium H.
Selecting active slot and video format The "slot select" command instructs the deck to switch to a specified slot, or/and to select a specified output video format. To switch to a specified slot: slot select: slot id: {slot ID}↵ To select the output video format: slot select: video format: {video format}↵ Either or all slot select parameters may be specified. Note that selecting video format will result in a rescan of the disk to reconstruct the timeline with all clips of the specified video format.
Help Getting Help The fastest way to obtain help is to go to the Blackmagic Design online support pages and check the latest support material available for your Blackmagic HyperDeck Disk Recorder. Blackmagic Design Online Support Pages The latest manual, software and support notes can be found at the Blackmagic Design support center at www.blackmagicdesign.com/support.
Regulatory Notices Disposal of Waste of Electrical and Electronic Equipment Within the European Union. The symbol on the product indicates that this equipment must not be disposed of with other waste materials. In order to dispose of your waste equipment, it must be handed over to a designated collection point for recycling.
Safety Information For protection against electric shock, the equipment must be connected to a mains socket outlet with a protective earth connection. In case of doubt contact a qualified electrician. To reduce the risk of electric shock, do not expose this equipment to dripping or splashing. Product is suitable for use in tropical locations with an ambient temperature of up to 40oC. Ensure that adequate ventilation is provided around the product and that it is not restricted.
Warranty 12 Month Limited Warranty Blackmagic Design warrants that this product will be free from defects in materials and workmanship for a period of 12 months from the date of purchase. If a product proves to be defective during this warranty period, Blackmagic Design, at its option, either will repair the defective product without charge for parts and labor, or will provide a replacement in exchange for the defective product.