
User Manual


Now when switching your live production, you can press the ‘bank’ soft button to swap
between banks A and B, which lets you instantly access camera control for cameras
that have been assigned to dedicated CCUs. This is a faster and more organized way of
controlling cameras compared to swapping between multiple cameras on each CCU
during production.
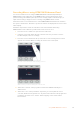
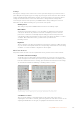
SETTINGS RECALL ALLBANK A
CAMERA CONTROL
Camera 1
1
CAMERA
Press the bank soft button
to cycle between camera
banks A and B, or hold the
button down to disable or
enable camera banks
You can also disable the banks by holding down the bank soft button until the ‘bank off’ setting
appears on the LCD.
Turning the banks off lets you change the CCUs to other cameras when needed, with a defined
set of cameras ready on each bank you can access at any time. To enable banks, simply press
the bank button again.
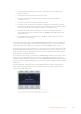
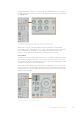
SETTINGS BANK A RECALL ALL
CAMERA CONTROL
Camera 1
1
CAMERA
CAMERA CONTROL
Camera 2
2
CAMERA
CAMERA CONTROL
Camera 3
3
CAMERA
CAMERA CONTROL
Camera 4
4
CAMERA
SETTINGS BANK B RECALL ALL
CAMERA CONTROL
Camera 5
5
CAMERA
CAMERA CONTROL
Camera 6
6
CAMERA
CAMERA CONTROL
Camera 7
7
CAMERA
CAMERA CONTROL
Camera 8
8
CAMERA
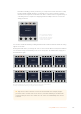
The bank setting lets you assign 2 banks of cameras to the four CCUs and then
instantly swap between them by pressing the ‘bank’ soft button
TIP Any camera can be selected on each CCU in both banks. For example, imagine
you want to have constant control over camera 1, even after switching to another bank
of cameras. All you need to do is make sure one CCU in each bank always has camera
1 selected.
168Using ATEM Camera Control Panel