
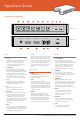
Specifications

DISP
VIDEO
+12V POWER HDMI IN HDMI OUT SDI IN SDI OUT
DISP
VIDEO
+12V POWER HDMI IN HDMI OUT SDI IN SDI OUT
Buttons
1. Record
HyperDeck Shuttle will instantly record
the moment you press the Record
button, even if you’re playing back
a clip. This means you’ll never miss a
good take that’s happening.
2. Previous Clip
If you hold down the Previous Clip,
the clip will rewind at 2x speed. Pressing
the button again will increase the speed
to 4x and 8x. If you want to resume
playing back at normal speed, just press
the Play button. Or you can press the
Stop button to pause when rewinding.
3. Stop
The Stop button also switches
HyperDeck Shuttle between playback
and video loop through mode.
4. Play
When a clip is playing, pressing
Play again will loop it continuously.
5. Next Clip
If you hold down Next Clip, the clip will
fast forward at 2x speed. Pressing the
button again will increase the speed
to 4x and 8x. If you want to resume
playing back at normal speed, just press
the Play button. Or you can also press
the Stop button to pause when fast
forwarding.
6. DISP
This button isn’t currently used but will
soon be enabled by a software update.
You will be able to download this for free
at www.blackmagic-design.com/
7. Power
The Power button turns the HyperDeck
Shuttle on or off. To prevent someone
from accidentally switching off the unit,
you must hold the Power button down
for 2 seconds to turn it off. If you’re
running off the built-in batteries, the
unit will turn itself off after 8 minutes
if you’re not recording to conserve
power.
Status Indicators
8. VIDEO
The VIDEO indicator lights up
when a video signal is detected by
HyperDeck Shuttle.
9. SSD
The SSD indicator lights up in
green when it is accessing a correctly
formatted SSD and lights red when an
incorrectly formatted SSD is detected.
During recording or playback, the SSD
indicator illuminates as data is being
written to the SSD.
10. Battery
The four green battery indicators
display the internal battery charge
level. When all the LEDs go off, there’s
approximately 4 minutes of battery
power left. So you should plug in your
external power source or switch to
another charged HyperDeck Shuttle.
Connectors
11. +12V POWER
You can use the power adapter
supplied with HyperDeck Shuttle or
power it off an external camera battery
as the connector supports an input
range of 12V to 18V. When a power
source is connected, the built-in
internal battery will also be charged.
12. HDMI IN
You can connect your HDMI video
sources to this input – such as a camera,
games console and the output of an
ATEM switcher.
13. HDMI OUT
Connect an HDMI display or TV to
this output to monitor your video while
recording or playing back clips. You can
also connect this output to the HDMI
input of capture cards, production
switchers and other recording devices.
14. SDI IN
You can connect your SDI video
sources, such as cameras, routers,
capture cards, switcher outputs or
decks to this input.
15. SDI OUT
Connect this output to monitors,
routers, production switchers, decks
or other recording devices.
16. USB
Use the USB port for software
configuration and updates.
Front View
Back View
4
31 52 6 7
8
9 10
11 12 13 14 15 16
Connections and Control
Learn more at www.blackmagic-design.com/products/hyperdeckshuttle
HyperDeck Shuttle