Table of Contents Introduction to the Manual 4 5 Getting Started Cautions for Safety 8 Checks for External GPS 8 Checks for the microSD Card 9 Product Features 10 Package Components 11 Names of Each Part 12 How to Attach & Detach the Mounting Bracket How to Install the BlackVue 13 Checking Installation Position 13 How to Insert & Remove the microSD Card 14 Installation Video Recording 16 Normal Recording 16 Parking Mode Recording 17 Event Recor
Introduction to the Manual Thank you for purchasing a BlackVue by Pittasoft Co., Ltd. This instruction manual contains information on how to operate your BlackVue. Before using the product, make sure to read through this manual so as to use the product in the correct way. To enhance the performance of the product, the contents of this instruction manual may be changed without prior notice.
Getting Started Cautions for Safety The purpose of these cautions is to maintain user safety and avoid damage to property. Please make sure to read through this manual so as to use the product in the correct way. DANGER Death or property damage can be caused for users if the following directions are not followed: yy Do not disassemble, repair, or modify the product yourself. It can cause fire, electric shock, or malfunction. For internal inspection and repair, call the sales headquater.
WARNING Death or serious injury can be caused for users if the following directions are not followed: yy Do not leave the product where infants, children, or pets can reach it. They might swallow small components, or their saliva could get into it and cause an explosion due to a short circuit. yy While cleaning the inside of the car, do not spray water or wax directly onto the product. It can cause fire, electric shock, or malfunction.
CAUTION Injury or property damage can be caused for users if the following directions are not followed: yy Do not spray cleaning products directly onto the outside of the product. It can cause discoloration, cracks, or malfunction. yy If the product is used outside the optimal temperature range (0°C ~ 60°C), performance can decline or malfunction can be caused. yy Make sure that the product is installed properly. The product can fall as a result of vibration, and may cause physical injury.
Checks for External GPS Even if the GPS isn't working, video is recorded, but position coordinates and driving speed are not recorded. When used for the first time, or when the product is not used for 3 consecutive days, it will take some time for the GPS to find the current position. If there is an error with the GPS time when checking recorded video with a viewer program or the BlackVue application, turn the GPS off and on after a signal is received.
Product Features Q Ultra-high quality and smooth video Full HD (1920x1080) 30-frame ultra-high quality video High-class design with functionality Simple, luxurious design in matt black Megapixel lens & CMOS sensor Clearer vision with high-resolution megapixel lens during both day/night-time driving High-quality wide-angle lens (120°) Maximized viewing angle to record accurate video of any accident ul w Diverse recording options (Normal/Event/Parking) Event recording and automatic conversion & d
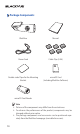
Package Components BlackVue Manual Power Cord Cable Clips (5 EA) Double-sided Tape for the Mounting Bracket microSD Card (Including BlackVue Software) microSD Card Reader Note yy Pictures of the components may differ from the actual ones. yy To enhance the performance of the product, components may be changed without prior notice. yy The package components and accessories can be purchased separately from the BlackVue homepage (www.blackvue.com).
Names of Each Part Camera Lens LOCK Button Mounting Bracket Speaker GPS LED REC LED Power Socket External GPS IN microSD Card Slot Function Button (Press: MIC On/Off, Press and hold: Format the microSD card) DR3500-FHD 11
How to Attach & Detach the Mounting Bracket 1 2 12 Pull the unit out of the mounting bracket with the LOCK button pressed. Insert the unit into the mounting bracket until you hear clicking sound, to attach it.
How to Install the BlackVue Checking Installation Position 1 It is recommended to install it at the back of rear view mirror. Clean any foreign matter and moisture from the place where the product will be installed. Note yy Do not install the product where it can interfere with the driver's vision. yy It is recommended to install the product at the designated BlackVue installation center.
Caution yy Do not remove the microSD card while it is saving or reading data. The data may be damaged or malfunction caused. yy Copy important data to other storage media to store. Pittasoft Co., Ltd. will not be held responsible for data loss due to user negligence. Note yy Insert or remove the microSD card only when the product is turned off. yy microSD cards are consumables. Replace them after prolonged use.
4 Use the cable clip to organize the power cord so that it doesn't interfere with the driver's vision. 5 Adjust the lens angle of the camera. 6 Start the engine and check if the product works properly. Caution yy Do not remove the microSD card while it is saving or reading data. The data may be damaged or malfunction caused. yy Set the time (time zone) when you use BlackVue for the first time. (31 page) Note yy After a test drive, check if video was correctly recorded.
Video Recording Normal Recording 1 2 When the engine is started, the BlackVue is turned on automatically. When the BlackVue is turned on, normal recording is automatically started. Note yy If Power Magic (the Battery Discharge Prevention Device) is connected, the BlackVue is not turned off. yy The normal recording function can be disabled in the BlackVue software configuration.
Event Recording 1 2 If an impact is detected in normal or parking mode recording, event recording is started. It records video for 5 seconds before and 55 seconds after the impact. Note yy Sensitivity to impact can be adjusted in the BlackVue software configuration. (33 page) yy Event recording time can be adjusted in the BlackVue software configuration. (31 page) If you set the event recording time for 2 minute, it records video for 5 seconds before and 115 seconds after the impact.
Simple Video Playback How to Playback using a microSD Card Playback Using a Smartphone With a smartphone that supports microSD cards video can be played back. 1 Turn off the BlackVue and remove the microSD card. Note yy For the details on how to remove the microSD card, refer to How to Insert & Remove the microSD Card. (13 page) 2 3 Insert the microSD card into the smartphone. Open an application to play back recorded videos and select the movie you want to play back.
How to Playback using a PC Recorded videos can be played back with a PC. 1 Insert the provided microSD card into a microSD card reader. 2 Connect the microSD card reader to the PC. 3 Open an application to play back recorded videos and select the movie you want to play back from the removable drive. Note yy When trying to play back a recorded video with a movie playback program on a PC, install the H.264 and AAC audio codecs.
How to use the BlackVue Software Installation & Execution How to Install Dedicated BlackVue software can be installed in a PC. 1 Insert the provided microSD card into a microSD card reader. 2 Connect the microSD card reader to the PC. 3 4 5 Execute the 'BlackVueSetup(HD).exe' file in the 'BlackVue\Software' folder. Install the program according the installation program instruction. When the installation is finished, the BlackVue software icon is displayed on the desktop.
How to Execute Without Installation It is possible to execute the dedicated BlackVue program without installation. 1 Insert the provided microSD card into a microSD card reader. 2 Connect the microSD card reader to the PC. 3 Double-click 'BlackVue.exe' in the 'BlackVue\Application' folder.
Screen Description 2 3 4 1 5 7 6 No. Name Description 1 Playback Screen for Recorded Videos Videos can be played back using this screen. The mouse can be used to zoom in/out. 2 Language Setting If you change the language on playback screen, the language for BlackVue Viewer can be changed. details about language configuration for BlackVue, refer to the Basic Configuration. (31 page) 3 G-Sensor Information G-sensor information can be checked, at the time the video was recorded.
No. Name Description 5 Recorded Video List Using the file list and map tab, the recorded video list, and where a video was recorded can be checked. : This is an normal recording file and marked with green in the timeline. : This is an event recording file and marked with orange in the timeline. : This is a parking mode recording file and marked with blue in the timeline. 6 Timeline Video can be explored with the date, hr, min, and sec of when a video was recorded.
Video Playback How to Control the Playback of Recorded Video The recorded video can be played back in full screen mode and be reversed upside down. The playback speed can be adjusted. Frame Move (Previous) Frame Move (Next) Play Previous File View Upside-Down Full Screen View Play Next File Playback Speed Control Playback/Pause Stop Playback Time Volume Control Note yy While a recorded video is played back, double-click the screen to switch to full screen view.
Magnifying Glass Some parts of a recorded video can be zoomed in while playing back. Left-click the screen while a recorded video is being played back to see a partial zoom-in window and to use it to identify the number plate of a car while moving it. Note yy You can use the Magnifier function only in BlackVue Viewer for Windows. Timeline Video can be explored with the date, hr, min, and sec of when a video was recorded.
How to Manage Files With the recorded video list, a file can be deleted or saved with a different name. 1 2 3 4 5 26 Select a file from the recorded video list and right-click it. To delete a file, click Delete. To save it with different name, click Export and select the option you want. Press the OK button and select the file name you want, together with the path. Press the Save button to finish.
How to Verify Files With the recorded video list, a file can be verified forgery. 1 Select a file from the recorded video list and right-click it. 2 Click Verification and click OK button.
How to Check the Map Where a video was recorded can be checked with the map. 1 2 3 Select a file from the recorded video list and play it back. Press the Map tab. With the +/- button or mouse wheel, the map can be zoomed in/out. Speed Unit Change Map Type Selection Map Zoom-In/Out Car Location Note yy To use the map service, an Internet connection is required. yy Only for the recorded file with GPS information, the data can be checked.
How to Check MyWay Viewer The driving route of a recorded video can be checked. 1 2 3 Select a file from the recorded video list and play it back. Press the button. The driving route will be displayed on the map. Double-click the map to play back the recorded video of the nearest driving route from the clicked point.
How to Save as an Image While playing back a recorded video, some parts can be saved as images if you want. 1 2 Select a file from the recorded video list and play it back. From the image to be saved, press the button. Note yy Using the timeline or press the images. 3 4 Press the G / button to explore detailed button. Select the file name you want, together with the path, and click the Save button. Note yy JPG and BMP formats are supported for image files.
Configuration Basic Configuration Time, video, and recording configurations can be changed. 1 2 Click the G button and click the Basic tab. After changing the configuration, click Save & Close. 4 1 3 2 No. Function Description 1 Time Zone (Timezone Configuration) The time zone can be configured for where it is used. The configured time zone is used as information for recorded video. For the details, refer to the How to Configure the Time.
Note yy With the normal recording function disabled, only event and parking mode recording videos are saved. yy With the speed display unit disabled, the vehicle speed is not displayed when the recorded videos are played back. yy On microSD cards, older files are deleted first to mark space for newly-recorded videos. Copy and store important files such as even recording files to other storage media.
How to Configure Sensitivity It is possible to configure the G-sensor sensitivity to start event recording during normal recording and the G-sensor & motion detection sensitivity to start event recording during parking mode recording, respectively. 1 2 Click the G button and click the Sensitivity tab. After changing the configuration, click Save & Close. Note yy For details about advanced sensitivity configuration, refer to Advanced Sensitivity Configuration. (34 page) 1 2 No.
Advanced Sensitivity Configuration The sensitivity can be configured while watching a recorded video. 1 2 3 4 Click the G button and click the Sensitivity tab. Click the Advanced Setting button of the configuration you want. Play back a recorded video. Saved G-sensor information is displayed at the bottom of the recorded video which is played back. Move the control bar up/down to adjust the sensitivity range. If the range is wide, it is less sensitive, and if the range is narrow, it is more sensitive.
Other Configuration Configurations for LED indication and voice direction can be changed. 1 No. 1 Function Description Etc. For video recording status, normal recording mode, and parking mode recording, the LED indicators can be turned on/off. Voice direction item or the volume can be changed. How to Apply Configuration The user's configuration can be applied to the product. 1 2 Insert the microSD card into the product.
Firmware Upgrade You can upgrade the firmware version by connecting the microSD card into the PC. 1 2 3 4 Connect the microSD card to the PC. For details on how to connect, refer to How to Playback using a PC. (19 page) Format the microSD card, and connect to BlackVue website (www.blackvue. com). Then, download the firmware upgrade file, in the form of a zip file. Unzip the file, and copy the BlackVue folder to the microSD card. Insert the microSD card in BlackVue, and turn on the power.
Product Specifications & Standards Product Specifications Model Name Color/Size/Weight Memory Recording Mode Camera Viewing Angle Resolution/Frame Video Compression Mode DR3500-FHD Matt Black / Width 102.8mm x Height 32mm / 86g microSD Card (8GB / 16GB / 32GB) Normal Recording, Event Recording (Impact Detection), and Parking Mode Recording (Motion+Impact Detection) ❈ For parking mode recording, a battery discharge prevention device is required. CMOS Sensor (Approx.
LED Indicators LED State Boot-up Recording GPS Red Light Green Light Security Blue Light Normal Red Blinking Blue Blinking Event Red Blinking Blue Blinking Parking Red Blinking GPS ON/OFF 38 Recording (REC) Blue Blinking Green Light
Recording Time Memory Capacity 8GB 16GB 32GB Image Quality Full HD Full HD HD HD (1920x1080) (1920x1080) (1280x720) (1280x720) 30fps 15fps 30fps 15fps Highest 1 HR 40 MIN 2 HR High 2 HR 20 MIN 2 HR 50 MIN 2 HR 50 MIN 4 HR 20 MIN 5 HR 40 MIN Normal 3 HR 30 MIN 4 HR 20 MIN 4 HR 20 MIN 5 HR 40 MIN 8 HR 30 MIN Normal (low-end compatible) 2 HR 20 MIN 3 HR 30 MIN 3 HR 30 MIN 5 HR 40 MIN 8 HR 30 MIN Highest 3 HR 20 MIN 4 HR 10 MIN 4 HR 10 MIN 5 HR 40 MIN 8 HR 30 MIN High 4 HR 30 MIN 5 HR
Before Requesting A/S Service It is required for users to back up important data regularly from the storage device (to other separate media). Depending on the situation, it will be necessary to delete the data from the internal storage device (component). It might be necessary to delete all the data from the product for A/S Service. So it is required for users to back up important data by themselves before requesting A/S Service.
FCC Compliance Information THIS DEVICE COMPLIES WITH PART 15 OF THE FCC RULES. Operation is subject to the following two conditions; (1) This device may not cause harmful interference, and (2) This device must accept any interference received, including interference that may cause undesired operation. CAUTION : Changes or modifications not expressly approved by the party responsible for compliance could void the user’s authority to operate the equipment.
Name Car Dashcam | Manufacturer Address | | Pittasoft Co., Ltd. / Korea (Gasan-dong, BYC HIGHCITY), A-7th floor, 131, Gasan digital 1-ro, Geumcheon-gu, Seoul, 153-718, Republic of Korea Sales Headquater | | e-mail | Tel: +82-2-6947-4670(#3) Fax: +82-2-6947-4699 sales@pittasoft.