Instruction Manual Bedienungsanleitung Manuel d’utilisation Manuale di Istruzioni RTF
NOTICE All instructions, warranties and other collateral documents are subject to change at the sole discretion of Horizon Hobby, LLC. For up-to-date product literature, visit horizonhobby.com and click on the support tab for this product.
Table of Contents Box Contents .................................................................... 3 First Flight Preparation ...................................................... 4 Flying Checklist ................................................................ 4 Charging Warnings............................................................ 4 Battery Charging............................................................... 4 Installing the Transmitter Batteries (RTF) ...........................
First Flight Preparation Flying Checklist • • • • ❏ Always turn the transmitter on first ❏ Plug the flight battery into the lead from the ESC ❏ Allow the receiver and ESC to initialize and arm properly ❏ Fly the model ❏ Land the model ❏ Unplug the flight battery from the ESC ❏ Always turn the transmitter off last Remove and inspect contents Begin charging the flight battery Program your computer transmitter (BNF only) Install the flight battery in the helicopter (once it has been fully charged) • Bind your t
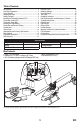
Installing the Transmitter Batteries (RTF) The LED indicator flashes and the transmitter beeps progressively faster as the battery voltage drops. Replace the transmitter batteries when the transmitter begins to beep. Transmitter Control (RTF) Bind/panic switch Flight mode switch Throttle Hold Power LED/ Rate Indicator Dual rate switch F E A B D C ON/OFF Switch Adjusting Flight Trims The transmitter beeps each time the trim buttons are pressed.
Transmitter Setup (BNF) Program your transmitter before attempting to bind or fly the helicopter. Transmitter programming values are shown below for the Spektrum DX6i, DX7s, DX6, DX7, DX8, DX9, DX18 and DX20. The files for models using Spektrum™ transmitters with AirWare™ software are also available for download online at www.spektrumrc.com. DXe To use the Spektrum™ DXe transmitter, download the Blade® 130 S DXe model setup available at www.spektrumrc.
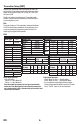
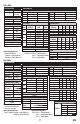
DX7s, DX8 FUNCTION LIST SYSTEM SETUP Model Type Swash Type HELI 1 servo Normal F-Mode Setup Flight Mode F Mode Hold Hold SW Select Trainer F Mode Gyro Mix Hold Knob Aux 2 Gear INH INH INH INH Frame Rate 11ms DSMX Servo Setup Chan Travel THR 100/100 AIL 100/100 ELE 100/100 RUD 100/100 D/R & Expo Switch Pos Chan (Ail D/R) 0 AILE 1 2 0 ELEV 1 2 0 RUDD 1 2 Reverse Normal Normal Normal Normal D/R 100/100 75/75 75/75 100/100 75/75 75/75 100/100 75/75 75/75 Expo +25 +25 +25 +25 +25 +25 +25 +25 +25 Chan G
DX7G2, DX8G2, DX9, DX18, DX20 FUNCTION LIST SYSTEM SETUP Model Type Swash Type HELI Normal F-Mode Setup Switch 1 Switch B Switch 2 Inhibit Hold Switch Switch H 1 0 Channel Assign Channel Input Config 1 Throttle 2 Aileron 3 Elevator 4 Rudder 5 Gear Switch B 6 Collective 7 AUX 2 Switch I Frame Rate 11ms DSMX Servo Setup Chan Travel THR 100/100 AIL 100/100 ELE 100/100 RUD 100/100 GER 100/100 D/R & Expo Chan Sw (F) Pos 0 AILE 1 2 0 1 ELEV 2 0 RUDD 1 2 Reverse Normal Normal Normal Normal Normal D/R 100/100 7
Transmitter and Receiver Binding This product requires an approved Spektrum DSM2®/DSMX® compatible transmitter. Visit www.bindnfly.com for a complete list of approved transmitters. Your RTF transmitter comes prebound to the model. If you need to re-bind, follow the directions below. General Binding Procedure 1. Disconnect the flight battery from the helicopter. 2.
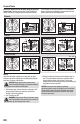
Control Tests Ensure the throttle hold is ON when doing the direction control tests. Test the controls prior to the first flight to ensure the servos, linkages and parts operate correctly. If the controls do not react as shown in the illustrations below, confirm the transmitter is programmed correctly before continuing on to the Motor test.
Understanding the Primary Flight Controls If you are not familiar with the controls of your 130 S, take a few minutes to familiarize yourself with them before attempting your first flight.
Rate Selection Change rates by moving the two-position dual rate switch. • Low rate reduces the control rates, providing an easier to fly model. Beginners should use low rate for initial flights. • High rate provides full control and should be used by intermediate and experience pilots. Flight Mode Description In Stability Mode the helicopter flies similarly to a fixed pitch helicopter. The bank angle is limited. When the cyclic stick is released the model will return to level.
After you become comfortable hovering, you can progress into flying the model to different locations, keeping the tail pointed towards you at all times. You can also ascend and descend using the throttle stick. Once you’re comfortable with these maneuvers, you can attempt flying with the tail in different orientations. It is important to keep in mind that the flight control inputs will rotate with the helicopter, so always try to picture the control inputs relative to the nose of the helicopter.
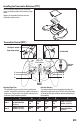
Entering Gain Adjustment Mode 1. Lower the throttle stick to the lowest position. 2. Power ON the transmitter. 3. Install the flight battery on the helicopter frame, securing it with the hook and loop strap. 4. Connect the battery connector to the ESC. 5. Place the helicopter on a flat surface and leave it still until the orange receiver LED glows solid, indicating initialization is complete. 6. Move and hold both transmitter sticks to the bottom right corner as shown. 7.
Servo Adjustment Your helicopter was setup at the factory and test flown. The servo adjustment steps are usually only necessary in special circumstances, such as after a crash or if a servo or linkage is replaced. WARNING: To ensure your safety, always disconnect the motor wires from the ESC before performing the following steps. After you have completed the adjustments, reconnect the motor wires to the ESC before attempting to fly the model. Entering Servo Adjustment Mode 1.
Trim Flight Perform this procedure if the model is not performing well or has been recently rebuilt from a crash. The trim flight procedure was performed during the factory test flight and only needs to be performed if you notice the model is not returning to level consistently or if the model does not remain still during stationary pirouettes. The trim flight is used to determine the optimal settings for SAFE® technology during flight. The trim flight must be performed in calm conditions.
Calibration Procedure If the Blade 130 S is experiencing drift issues after completing the trim flight procedure located at www.bladehelis.com, perform the following calibration. The calibration procedure may also be needed following crash repairs. To perform the calibration procedure below, the Spektrum™ AR636 receiver installed in the Blade 130 S must have the most recent firmware. Receiver firmware updates and instructions are available under “PC Firmware Updates” at www.spektrumrc.com/technology/AS3X.aspx.
Post-Flight Inspection and Maintenance Checklist √ Make sure the plastic ball link holds the control ball, but is not tight (binding) on the ball. When a link is too loose on the ball, it can separate from the ball during flight and cause a crash. Replace worn ball links before they fail. Make sure the battery is not connected before cleaning. Remove dust and debris with a soft brush or a Cleaning dry, lint-free cloth.
Problem Possible Cause Solution The bind plug was not removed from the receiver after binding Less than a 5-second wait between first powering on the transmitter and connecting the LED on the receiver flashes flight battery to the helicopter rapidly and the helicopter The helicopter is bound to a will not respond to the different model memory transmitter (after binding) (ModelMatch™ transmitters only) Flight battery or transmitter battery charge is too low Aircraft or transmitter is too close to large metal
Exploded View 16 5 9 4 3 8 9 4 8 6 9 7 25 16 14 18 15 23 29 11 28 10 29 20 24 21 1 3 27 17 9 12 19 22 26 2 25 11 13 29 Parts Listings 1 2 3 4 5 6 7 8 9 10 11 12 13 14 15 Part # BLH9300 BLH9350 BLH2020 BLH9318 BLH3401 BLH3403 BLH3404 BLH3405 BLH3406 BLH3438 BLH3439 BLH3440 BLH9301 BLH9302 BLH9303 BLH9304 BLH9305 EN Description 130 S RTF 130 S BNF Tail Rotor Hub Set Dual Brushless ESC Apache AH-64 Main Blade Grips: 180 CFX Feathering Spindle Set: 180 CFX Main Rotor Head Block
Optional Parts Part # Description SPMA3065 AS3X Programming Cable - USB Interface DXe DSMX 6-Channel Transmitter Only DX6e DSMX 6-Channel Transmitter Only DX6 DSMX 6-Channel Transmitter Only DX7 DSMX 7-Channel Transmitter Only Part # Description DX8 DSMX 8-Channel Transmitter Only DX9 DSMX 9-Channel Transmitter Only DX18 DSMX 18-Channel Transmitter Only DX20 DSMX 20-Channel Transmitter Only Limited Warranty What this Warranty Covers Horizon Hobby, LLC, (Horizon) warrants to the original purchaser that
Warranty Requirements For Warranty consideration, you must include your original sales receipt verifying the proof-of-purchase date. Provided warranty conditions have been met, your Product will be serviced or replaced free of charge. Service or replacement decisions are at the sole discretion of Horizon.
FCC Information This device complies with part 15 of the FCC rules. Operation is subject to the following two conditions: (1) This device may not cause harmful interference, and (2) this device must accept any interference received, including interference that may cause undesired operation. CAUTION: Changes or modifications not expressly approved by the party responsible for compliance could void the user’s authority to operate the equipment.
©2017 Horizon Hobby, LLC. Blade, E-flite, Bind-N-Fly, BNF, the BNF logo, DSM, DSM2, DSMX, AS3X, SAFE, the SAFE logo and ModelMatch are trademarks or registered trademarks of Horizon Hobby, LLC. The Spektrum trademark is used with permission of Bachmann Industries, Inc. Futaba is a registered trademark of Futaba Denshi Kogyo Kabushiki Kaisha Corporation of Japan All other trademarks, service marks and logos are property of their respective owners. Patents pending. Created 1/17 50836.