® Quick-Start Guide Schnellanleitung Guide de démarrage rapide Guida rapida
NOTICE All instructions, warranties and other collateral documents are subject to change at the sole discretion of Horizon Hobby, Inc. For up-to-date product literature, visit horizonhobby.com and click on the support tab for this product.
® Box Contents • Blade 350 QX • Camera mount • 3S 11.1V 2200mAh Li-Po Battery Pack • 2-3S DC Li-Po Balancing Charger • DX5e DSMX 5-Channel Transmitter (RTF only) • 4 AA Batteries (RTF only) Charging the Flight Battery E-flite® 2-3S LiPo Balancing Charger Specifications • Input power: 10.5–15.0V DC, 3-amp • Charges 2- to 3-cell Li-Po packs with minimum capacity of 500mAh E-flite 3S 11.
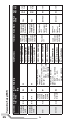
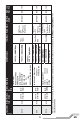
EN 4 Acro DX7/7SE FLAP-R (6) N/A Others-N ACT Acro THRO-N ELEV-N GEAR-R AILE-N RUDD-N FLAP-N DX6i N/A N/A DX5e (New)* w/3-position N/A switch N/A Travel Adj: Gear (0)↑100%; F MODE (1) ↓40% FLAPS: Norm ←↑100; LAND ↓100 MIX 1: ACT; Gear → Gear ACT RATE D 0%; U + 100% SW MIX TRIM INH Travel Adj: GEAR (0)↑100%; GEAR (1) ↓40% MIX 1: FLAP → Gear OFF/ON RATE → -50% 0% SW: MIX OFFSET: 0 N/A N/A Throttle Mode Setup Cut Setup N/A Model Reverse Type Setup DX4e (New)* w/3-position N/A switch Transmi
EN AUX1-R Others-N AUX1-R Others-N Set To: I (BIND) Set To: Trainer Channel Assign: NEXT 1-4: N/A 5 Gear: B 6 AUX1: D 7 AUX2: I 8-10: INH Switch Select: F-Mode to Gear; Flap to Aux 1 All Others to INH Throttle Mode Setup Cut Setup Channel Assign: Move Gear to F MODE (F MODE:GEAR) Leave FLAPS as AUX1 Set To: Set All Others to INH Trainer MIX 1: GER > GER RATE: 0% -100% OFFSET: 0%; TRIM: INH; SW: Mix0 B (2) = Agility Mode B (1) = Stability Mode B (0) = SMART Mode F MODE (2) = Agility Mode F MOD
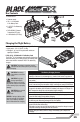
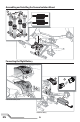
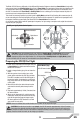
Assembling and Installing the Camera Isolation Mount 1 2 Connecting the Flight Battery 3 4 3 2 2 1 1 Remove the battery cover Install the battery EN 6
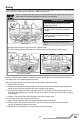
Binding If you purchased the ready-to-fly (RTF) model, the transmitter is bound to the model at the factory. If for any reason the model needs to be re-bound, follow the Bind-N-Fly ® (BNF) directions below. ® To bind or re-bind your 350 QX to your chosen DSM2/DSMX transmitter, please follow the directions below along with the binding instructions included with your transmitter: Bind switch (Trainer switch) The Binding Process 1. With the transmitter powered off, connect the battery to the 350 QX. 1 2.
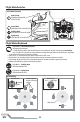
Flight Mode Switches GPS Enabled Functions Return Home (Rapid Red flashing LED on the 350 QX) TRAINER Smart Mode (Solid Green LED on the 350 QX) Stability Mode (Solid Blue LED on the 350 QX) Agility Mode (Solid Red LED on the 350 QX) Flight Modes Explained • • • • Flight Mode 0- Smart Mode (Default) (solid green LED indicator) • Stick Relativity- With a solid GPS lock there is no orientation for the pilot to deal with (in Smart Mode only).
The Blade 350 QX flies very differently in the different flight modes. Beginners should use Smart Mode to begin with, and progress slowly into Stability Mode. When flying in Smart Mode, the quadcopter follows stick input based on the set pilot location. When flying in Stability Mode, the quadcopter follows stick inputs based on the orientation of the aircraft.
Flying the 350 QX Takeoff Smart Mode Altitude Control Increase the throttle Maximum altitude Mode 2 shown slightly above low stick. (approximately The 350 QX altitude in 45 meters) Smart Mode corresponds with throttle position. Low throttle is on the ground, slightly raising the throttle will produce a low hover, and the higher the throttle position, the higher the Full throttle 350 QX will ascend until it reaches its maximum Half throttle altitude (approximately 45 meters).
Return Home • When this feature is activated, the 350 QX will fly back to its assigned home location and land. After landing the motors will disarm. • To restart the props after landing in Return Home fully lower the throttle and ensure throttle trim is neutral, quickly move the rudder stick fully left and then fully right. Activating Return Home Press and hold. Releasing the switch will stop the Return Home program. TRAINER WARNING: The 350 QX will not recognize the SAFE Circle when Return Home is used.
Audible Alerts and LED Codes On the 350 QX Flight Mode All Smart Mode Stability Mode Agility Mode LED Code Function Rapid flashing blue Rapid flashing red, green, blue at 3 second intervals Rapid flashing red Solid green Slow, continuous flashing green Green– Flash, flash, flash, pause, flash, flash, flash, pause Solid blue Slow, continuous flashing blue Blue– Flash, flash, flash, pause, flash, flash, flash, pause Solid red Slow, continuous flashing red Red– Flash, flash, flash, pause, flash, flash, flash, pause Bind Mo
Limited Warranty What this Warranty Covers Horizon Hobby, Inc., (Horizon) warrants to the original purchaser that the product purchased (the “Product”) will be free from defects in materials and workmanship at the date of purchase.
Warranty and Service Contact Information Country of Purchase United States of America Horizon Hobby Horizon Service Center (Repairs and Repair Requests) Horizon Product Support (Product Technical Assistance) Contact Information Address servicecenter.horizonhobby.com/ RequestForm/ www.quickbase.com/db/ bghj7ey8c?a=GenNewRecord 4105 Fieldstone Rd Champaign, Illinois, 61822 USA 888-959-2304 sales@horizonhobby.com 888-959-2304 Service/Parts/Sales: sales@horizonhobby.co.
Compliance Information for the European Union AT EE IE PL IS BE ES IT PT LI BG FI LT RO NO CZ FR LU SE CH CY GR LV SI DE HR MT SK DK HU NL UK Declaration of Conformity Declaration of Conformity (in accordance with ISO/IEC 17050-1) No.
©2013 Horizon Hobby, Inc. Blade, E-flite, Celectra, DSM, DSM2, DSMX, AirWare, ModelMatch and the Horizon Hobby logo are trademarks or registered trademarks of Horizon Hobby, Inc. The Spektrum trademark is used with permission of Bachmann Industries, Inc. US 7,391,320. Other patents pending.