INSTRUCTION ® MANUAL
NOTICE All instructions, warranties and other collateral documents are subject to change at the sole discretion of Horizon Hobby, LLC. For up-to-date product literature, visit horizonhobby.com and click on the support tab for this product.
I N S T R U C T I O N M A N U A L Table of Contents Box Contents ......................................................................................................4 Charging Warnings..............................................................................................4 Low Voltage Cutoff (LVC) .....................................................................................4 Charging the Flight Battery .................................................................................
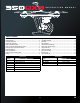
Box Contents • Blade 350 QX3 • CGO2 3-Axis Camera/Gimbal (AP Combo) • 3000mAh 3S 11.1V 20C Li-Po Battery • 3S DC Li-Po Balancing Charger with 5A AC Power Supply • Spektrum DX4 DSMX 4-Channel Transmitter (RTF, AP Combo) • 4 AA Batteries (RTF, AP Combo) • Cell Phone Mount Charging Warnings WARNING: Failure to exercise caution while using this product and comply with the following warnings could result in product malfunction, electrical issues, excessive heat, FIRE, and ultimately injury and property damage.
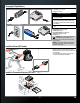
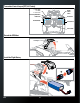
Charging the Flight Battery 1a Charger Specifications • Input Voltage: 10.5–15V DC • Charge Current: 3.5A 1b The Battery Charging Process 2 1. Connect the AC power supply to the charger. 2. Connect the AC power supply to an AC power source. The green LED blinks. 3. Connect the battery to the charger. The red LED blinks, indicating charging. When the battery nears full charge, the red and green LEDs blink, indicating cell balancing. 4. Disconnect the battery when the green LED glows solid.
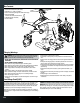
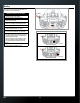
Transmitter Control Layout (RTF, AP Combo) Mode Switch 0 - Smart Mode 1 - AP Mode 2 - Return Home Gimbal control switch Motor Stop/Bind Button Rudder/Yaw Aileron/Roll Throttle/Altitude Elevator/Pitch Power Switch Extend the GPS Mast Install the Flight Battery c b d a EN 6
Transmitter Setup (BNF) Transmitter Model Type acro Switch Select Reversing Throttle Cut Model Setup Switch Position n/a gear - R All others - N act Travel Adj: Flap ↑ 120 ↓ 100 Throttle Subtrim: ↑ 10 Flaps: FLAP Norm ↑ 100 land ↓ 100 Mix 1: gear → gear act rate: D –60%, U 0% SW: ele d/r Smart Mode = F Mode ( POS. 0) Return Home = F Mode (POS.
Binding The RTF/AP combo transmitter is bound to the model at the factory. If for any reason the model needs to be re-bound, follow the directions below. Binding the 350 QX3 To Your Transmitter 1. With the transmitter and quadcopter powered OFF, connect the battery to the 350 QX3. 2. Place the 350 QX3 on a flat level surface. 3. Power the 350 QX3 ON and let it initialize. The status LED will remain off. 4. Hold the 350 QX3 upside down until the status LED flashes blue, indicating it has entered bind mode. 5.
Flight Mode Switch (RTF, AP Combo) Smart Mode (Solid Green LED on the 350 QX3) AP Mode (Solid Purple LED on the 350 QX3) Return Home (Red flashing LED on the 350 QX3) Flight Modes Explained Smart Mode Stick Relativity Control Inputs Right transmitter stick Away from the pilot = Toward the pilot Stick commands move the 350 QX3 relative to the pilot location Pilot location Smart Mode This flight mode is intended for the beginner pilot.
LED Codes CAUTION: If you see the LED signal for low battery (10.6V), immediately land your aircraft and recharge the battery. CAUTION: Do not attempt to use Return Home with a low battery. Startup Codes Radio off or not bound to the quad ....................................... No LED Initialization failed ................................................................ IMU initialization .................................................................. Fully charged battery ............................
Flight Guidelines and Warnings • • • • • • • • • Always inspect the model before flight. • Always keep aircraft in sight and under control. • Always keep people and pets at least 35 feet (10 meters) away when the battery is connected. • Keep children out of the vicinity of this product at all times. • Always use fully charged batteries. • Always keep transmitter powered on while aircraft is powered. Preparing the 350 QX3 For Flight Smart Mode Flying Always remove batteries before disassembly.
Landing To land the 350 QX2 AP there are two options: • Guide the aircraft to where you wish to land. Slowly reduce the throttle below half to descend and land. When the quadcopter has landed, lower the throttle completely and press the bind button to stop the motors. • Activate the Return Home function to return the 350 QX3 to the assigned home location and land automatically. CAUTION: Do not activate the Return Home function if the 350 QX3 is showing the low battery indication.
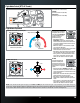
Calibration Procedures Compass calibration procedure: NOTICE: The following procedure has to be completed within 30 seconds after entering compass calibration mode. 4X a b c d North 1. Power the transmitter. 2. Power on the 350 QX3 and face the quadcopter pointing North. 3. Cycle the top left transmitter switch completely 4 times as shown at the left. 4. The 350 QX3 indicates it has entered compass calibration mode by slowly flashing the LED orange. 5.
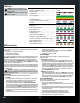
Graphic User Interface GPS Screen • See number of available satellites and signal strength • Verify latitude, longitude and altitude indications • Verify GPS accuracy Device Information Screen • See programming software version • See quad firmware version and vehicle ID • Update firmware *Requires USB Interface (BLH7840) sold separately. If you need to update the firmware in your quadcopter, download the PC user interface* at http://www.bladehelis.com/ProdInfo/Files/350_QX_PC_Interface.
Parts of the 350 QX3 Front GPS Antenna Mast Camera LED CGO2 Camera/Gimbal (AP Combo) Camera Lens Wi-Fi Antenna Back Flight Battery Door LED Indicator Power Switch Bottom LED Indicator Power Switch 15 EN
©2015 Horizon Hobby, LLC. Blade, SAFE Circle, the SAFE logo, the BNF logo, E-flite, Celectra, DSM, DSMX, EC3 and the Horizon Hobby logo are trademarks or registered trademarks of Horizon Hobby, LLC. The Spektrum trademark is used with permission of Bachmann Industries, Inc. US 7,391,320. Other patents pending. Created 11/14 46736.