Instruction Manual Bedienungsanleitung Manuel d’utilisation Manuale di Istruzioni RTF
NOTICE All instructions, warranties and other collateral documents are subject to change at the sole discretion of Horizon Hobby, LLC. For up-to-date product literature, visit horizonhobby.com and click on the support tab for this product.
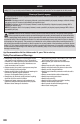
Table of Contents Box Contents .................................................................... 3 First Flight Preparation ...................................................... 4 Flying Checklist ................................................................ 4 Charging Warnings............................................................ 4 Battery Charging............................................................... 4 Installing the Transmitter Batteries (RTF) ...........................
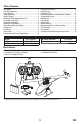
First Flight Preparation Flying Checklist • • • • ❏ Always turn the transmitter on first ❏ Plug the flight battery into the lead from the ESC ❏ Allow the receiver and ESC to initialize and arm properly ❏ Fly the model ❏ Land the model ❏ Unplug the flight battery from the ESC ❏ Always turn the transmitter off last Remove and inspect contents Begin charging the flight battery Program your computer transmitter (BNF only) Install the flight battery in the helicopter (once it has been fully charged) • Bind your t
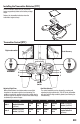
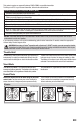
Installing the Transmitter Batteries (RTF) The LED indicator flashes and the transmitter beeps progressively faster as the battery voltage drops. Replace the transmitter batteries when the transmitter begins to beep. Transmitter Control (RTF) Flight mode switch Panic Recovery Power LED/flight mode indicator Bind switch F E A B D C Dual rate switch ON/OFF Switch Adjusting Flight Trims When pressed down, trim buttons make a sound that increases or decreases in pitch at each pressing.
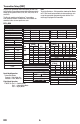
Transmitter Setup (BNF) DXe Program your transmitter before attempting to bind or fly the helicopter. Transmitter programming values are shown below for the Spektrum DX7s, DX6, DX7, DX8, DX9, DX18 and DX20. The files for models using Spektrum™ transmitters with Spektrum AirWare™ software are also available for download online at www.spektrumrc.com. To use the Spektrum™ DXe transmitter, download the Blade® mCP S DXe model setup available at www.spektrumrc.
DX6, DX6e SETUP LIST FUNCTION LIST Model Type HELI Servo Setup Chan Travel THR 100/100 AIL 100/100 ELE 100/100 Swash Type 1 servo Normal F-Mode Setup Flight Mode F Mode Hold Hold Channel Assign Channel Input Config 1 Throttle Throttle 2 Aileron Aileron 3 Elevator Elevator 4 Rudder Rudder 5 Gear Switch B 6 AUX 1 INH Frame Rate 11ms* DSMX * The DX6e operates at 22ms frame rate and cannot be changed.
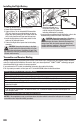
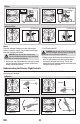
Installing the Flight Battery 1 2 4 5 1. Lower the throttle stick to the lowest position. 2. Power ON the transmitter. 3. Center all trims. For the included MLP6 transmitter (RTF only), the trims are centered when you hear a longer tone while pressing the trim button. Move the trim in both directions until you hear the long tone. 4. Install the flight battery in the battery holder on the bottom of the helicopter frame. 5. Connect the flight control power lead to the battery connector. 6.
This product requires an approved Spektrum DSM2®/DSMX® compatible transmitter. To bind your mCP S to your chosen transmitter, follow the directions below: Binding Procedure for Computer Radios (BNF) 1. Disconnect the flight battery from the helicopter. 2. If you are not using the transmitter included with the RTF version of the helicopter, refer to the Transmitter Setup Table to correctly program your transmitter. 3. Lower the throttle stick to the lowest position.
Aileron Rear View Rear View Aileron left Aileron right Collective Pitch Left Side View Left Side View Collective pitch up Collective pitch down Motor Place the helicopter outdoors on a clean, flat and level surface (concrete or asphalt) free of obstructions. Always stay clear of moving rotor blades. 2. Turn Throttle Hold OFF. WARNING: Stay at least 30 feet (10 meters) away from the helicopter when the motor is running. Do not attempt to fly the helicopter at this time.
Elevator Left Side View Left Side View Forward Backward Elevator forward Elevator back Aileron Rear View Rear View Left Right Aileron left Aileron right Flight Mode Description In Stability Mode the helicopter flies similarly to a fixedpitch helicopter (the bank angle is limited). When the cyclic stick is released, the model will return to level. In Intermediate Mode the bank angle is not limited. When the cyclic stick is released the model will not return to level.
with these maneuvers, you can attempt flying with the tail in different orientations. It is important to keep in mind that the flight control inputs will rotate with the helicopter, so always try to picture the control inputs relative to the nose of the helicopter. For example, forward will always drop the nose of the helicopter. The average flight time of the helicopter using the recommended battery is approximately 4 minutes, depending on how aggressively the aircraft is flown.
Problem Possible Cause Flight battery charge is low Flight battery is damaged Flight conditions might be too cold Solution Completely recharge the flight battery Helicopter has reduced flight time Replace the flight battery and follow the flight battery instructions or is underpowered Make sure the battery is warm (room temperature) before use Power off the transmitter. Move the transmitter a larger Transmitter too near aircraft during distance from the aircraft.
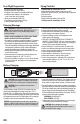
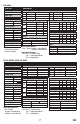
Exploded View 11 8 10 12 12 13 7 15 5 14 6 9 1 18 17 19 3 20 16 17 19 18 4 2 Parts Listings 1 2 3 4 5 6 7 Part # BLH3503 BLH3504 BLH3505 BLH3506 BLH3507 BLH3508 BLH3509 8 BLH3510 9 BLH3511 10 BLH3512 11 BLH3513 Description Main Motor with Pinion Landing Skid & Batt Mount Main Frame with Hardware Main Gear Main Shaft w/Collar & Hardware Pushrod Set w/Ball Link:3pcs Complete Precision Swashplate Hi-Performance Main Rotor Blades w/Hardware Fast Flight Main Rotor Blades w/Hdwe Main Rotor Hub w/H
Limited Warranty What this Warranty Covers Horizon Hobby, LLC, (Horizon) warrants to the original purchaser that the product purchased (the “Product”) will be free from defects in materials and workmanship at the date of purchase.
Warranty and Service Contact Information Country of Purchase United States of America European Union Horizon Hobby Contact Information Horizon Service Center (Repairs and Repair Requests) servicecenter.horizonhobby.com/RequestForm/ productsupport@horizonhobby.com Horizon Product Support (Product Technical Assistance) 877-504-0233 websales@horizonhobby.com Sales 800-338-4639 Horizon Technischer Service service@horizonhobby.
©2017 Horizon Hobby, LLC. Blade, E-flite, Bind-N-Fly, BNF, the BNF logo, DSM, DSM2, DSMX, AS3X, SAFE, the SAFE logo and ModelMatch are trademarks or registered trademarks of Horizon Hobby, LLC. The Spektrum trademark is used with permission of Bachmann Industries, Inc. Futaba is a registered trademark of Futaba Denshi Kogyo Kabushiki Kaisha Corporation of Japan All other trademarks, service marks and logos are property of their respective owners. Patents pending.