Instruction Manual Bedienungsanleitung Manuel d’utilisation Manuale di istruzioni RTF
NOTICE All instructions, warranties and other collateral documents are subject to change at the sole discretion of Horizon Hobby, LLC. For up-to-date product literature, visit horizonhobby. com and click on the support tab for this product.
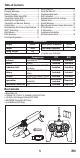
Table of Contents Flying Checklist ........................................ 11 Flying the Nano S2.................................... 11 Troubleshooting Guide .............................. 12 Drift Calibration......................................... 13 Exploded View and Parts Listings .............. 14 Optional Parts ........................................... 15 Limited Warranty ...................................... 16 Warranty and Service Contact Information 17 FCC Information .........................
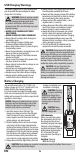
USB Charging Warnings The Battery Charger (EFLC1008) included with your hovercraft has been designed to safely charge the Li-Po battery. • Always monitor the charging area and have a fire extinguisher available at all times. • Always end the charging process if the battery becomes hot to the touch or starts to change form (swell) during the charge process. • Always connect the positive leads (+) and negative leads (–) correctly.
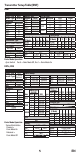
Transmitter Setup Table (BNF) DX6i SETUP LIST Model Type HELI Swash Type 1 servo 90 REVERSE Channel Direction THRO N AILE N ELEV N RUDD N GYRO N PITC R Modulation Type AUTO DSMX-ENABLE D/R COMBI D/R SW AILE ADJUST LIST TRAVEL ADJ Channel Travel THRO 100/100 AILE 100/100 ELEV 100/100 RUDD 100/100 GYRO 100/100 PITC 100/100 D/R & Expo Chan Sw Pos 0 AILE 1 0 ELEV 1 0 RUDD 1 Throttle Curve Switch Pos Pos Pos Pos Pos Pos (F Mode) 1 2 3 4 5 NORM 0 25 50 75 100 STUNT 100 100 100 100 100 HOLD 0 D/R 100 100 100 1
DX6 SYSTEM SETUP FUNCTION LIST Model Type HELI Servo Setup Travel Reverse Swash Type Normal Chan THR 100/100 Normal F-Mode Setup AIL 100/100 Normal Switch 1 Switch B ELE 100/100 Normal Hold Switch Switch H 0 1 D/R & Expo Chan Sw (F) Pos D/R Expo Channel Assign 0 100/100 0 AILE Channel Input 1 100/100 0 1 Throttle Throttle 0 100/100 0 ELEV 2 Aileron Aileron 1 100/100 0 3 Elevator Elevator 0 100/100 0 RUDD 4 Rudder Rudder 1 100/100 0 5 Gear Switch B Mixing 6 AUX 1 INH GER -> GER 7 AUX 2 Rate 100% 100% Offse
Transmitter Control (RTF) Flight mode switch Pa Panic Recovery R Bind switch Dual rate D switch Power LED/flight mode indicator F E A B ON/OFF Switch D C When pressed down, trim buttons make a sound that increases or decreases in pitch at each pressing. The middle or neutral trim position is heard as a middle tone in the pitch range of the sounds. The end of the control range is sounded by a series of beeps.
Transmitter and Receiver Binding Binding is the process of programming the receiver of the control unit to recognize the GUID (Globally Unique Identifier) code of a single specific transmitter. You need to ‘bind’ your chosen Spektrum™ DSM2 ®/ DSMX ® technology equipped aircraft transmitter to the receiver for proper operation. If you purchased an RTF model, the transmitter is bound to the model at the factory.
Aileron Rear View Rear View Aileron left Aileron right Collective Pitch Left Side View Left Side View Collective pitch up Collective pitch down Understanding the Primary Flight Controls If you are not familiar with the controls of your Nano S2, take a few minutes to familiarize yourself with them before attempting your first flight.
Aileron Rear View Rear View Left Right Aileron left Aileron right Flight Modes The Nano S2 RTF comes with the Blade MLP6DSM transmitter. This transmitter has a flight mode switch that lets the pilot change among the following flight modes. Throttle Hold (switch position 0) Throttle hold is used to turn off the helicopter motors if the helicopter is out of control, in danger of crashing or both.
Panic Recovery If you get into distress while flying in any mode, push and hold the Bind/Panic Switch and move the control sticks to their neutral position. SAFE technology will immediately return the aircraft to an upright level attitude, if the aircraft is at a sufficient height with no obstacles in its path. Return the collective stick to 50% and release the Panic Switch to turn off Panic Recovery and return to the current flight mode.
Low Voltage Cutoff (LVC) Landing LVC decreases the power to the motors when the battery voltage gets low. When the motor power decreases and the red LED on the ESC flashes, land the aircraft immediately and recharge the flight battery. LVC does not prevent the battery from overdischarge during storage. To land, slowly decrease the throttle while in a low-level hover. After landing, disconnect and remove the battery from the aircraft after use to prevent trickle discharge.
Problem Possible Cause Solution Power off transmitter, move transmitter a larger distance from Transmitter is too near aircraft aircraft, disconnect and reconnect during binding process flight battery to aircraft and follow LED on receiver binding instructions flashes rapidly and Bind switch or button was not aircraft will not bind to Power off transmitter and repeat held while transmitter was transmitter bind process powered on (during binding) Aircraft or transmitter is too Move aircraft and transmitter
Exploded View and Parts Listings 15 17 15 18 17 17 16 18 17 12 20 2 5 14 13 12 19 6 3 19 1 11 7 10 EN 14 5
9 8 4 21 22 Description Nano S2 Main board nCP S Main motor Nano S2 Main plastic frame Nano S2 Tail Fin DSV40LBC-35 Servo *1 DSV40LBC-50 Servo *1 Nano S2 Canopy nCP S Tail Boom Tail Rotor Landing Skid & Battery mount Main Gear Carbon Fiber Main Shaft with Collar & 12 BLH3307 Hardware 13 BLH3308 Servo Pushrod set with Ball Links 14 BLH3309 Complete Precision Swashplate 15 BLH1305 Main Rotor Blade Set: Nano S2 16 BLH3312 Main Rotor Hub with Hardware Feathering Spindle with O-rings and 17 BLH3313 Hardware
Limited Warranty What this Warranty Covers Horizon Hobby, LLC, (Horizon) warrants to the original purchaser that the product purchased (the “Product”) will be free from defects in materials and workmanship at the date of purchase.
address and phone number where you can be reached during business hours. When sending product into Horizon, please include your RMA number, a list of the included items, and a brief summary of the problem. A copy of your original sales receipt must be included for warranty consideration. Be sure your name, address, and RMA number are clearly written on the outside of the shipping carton. NOTICE: Do not ship Li-Po batteries to Horizon.
FCC Information FCC ID: BRWDXMTX10 FCC ID: BRWBLH1301 This equipment has been tested and found to comply with the limits for a Class B digital device, pursuant to part 15 of the FCC Rules. These limits are designed to provide reasonable protection against harmful interference in a residential installation. This equipment generates, uses and can radiate radio frequency energy and, if not installed and used in accordance with the instructions, may cause harmful interference to radio communications.
©2019 Horizon Hobby, LLC. Blade, the Blade logo, E-flite, the BNF logo, DSM, DSM2, DSMX, Safe, the SAFE logo, ModelMatch and the Horizon Hobby logo are trademarks or registered trademarks of Horizon Hobby, LLC. The Spektrum trademark is used with permission of Bachmann Industries, Inc. All other trademarks, service marks and logos are property of their respective owners.