
BLH02150 Theory XL FPV Drone Manual


5
EN
Installing the Flight Battery
CAUTION: Always disconnect the Li-Po battery from the quadcopter when not fl ying to avoid over-discharging the
battery. Batteries discharged to a voltage lower than the lowest approved voltage may become damaged, resulting
in loss of performance and potential fi re when batteries are charged.
To bind or re-bind your quadcopter to your chosen transmitter, follow the directions below.
Transmitter and Receiver Binding
If you encounter problems, obey binding instructions and refer to the
troubleshooting guide for other instructions.
If needed, contact the appropriate Horizon Product Support offi ce. For a
list of compatible DSM
®
transmitters, please visit www.bindnfl y.com.
Failsafe
The included receiver does not have failsafe capabilities. Failsafe is detected at the fl ight controller. In the event of a loss of signal
to the receiver the fl ight controller will cut power to the motors to prevent a fl y-away situation.
1. Set the motor arm switch to OFF
(position 1).
2. Lower the throttle.
3. Power on the transmitter.
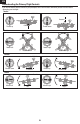
4. Attach hook material to the quadcopter frame and loop
material to the battery.
5. Install the fl ight battery on the quadcopter frame and
secure it with the hook and loop strap.
6. Connect the battery cable to the aircraft power lead,
noting correct polarity. Do not move the quadcopter until
the receiver initializes.
CAUTION: Connecting the battery to the aircraft
power lead with reversed polarity will cause dam-
age to the power distribution board, ESCs and the battery.
Damage caused by incorrectly connecting the battery is
not covered under warranty.
7. The quadcopter motors will emit initialization tones,
indicating the ESC is armed.
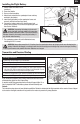
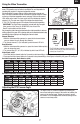
Binding Procedure
1. Select the correct model in your transmitter.
2. Power off your transmitter.
3. Lower the throttle fully.
4. Power the quadcopter on while pressing the bind button located on the
left side of the ight control board, as shown in the illustration. Do not
press the button on the right side of the ight board.
5. Follow the procedures of your speci c transmitter to enter Bind Mode.
6. The receiver LED glows solid orange indicating binding was successful.