BLAZED TABLE OF CONTENTS Title Page Introduction 03 Warning Labels 04 Safety Information 05 Exercise Instruction 06 Training Guidelines 07 Suggested Stretches 11 Assembly Instructions 13 Notice and Inspection 16 Exploded View Drawing 17 Parts List 18 Console Overview 19 Maintenance & Cleaning 21 Warranty 22
INTRODUCTION Congratulations on your purchase of Blazed Fitness equipment. We hope you appreciate the style, quality, and value that exercisers across North America have come to expect from Blazed Fitness. If you have any questions, concerns or product issues, do not return the equipment to the real store. Instead, please call our Customer Service at 1-866-325-2339 or email us at Carefully read through the instructions contained in this manual.
SAFETY INFORMATION PRECAUTIONS The machine has been designed and constructed to provide maximum safety. Nevertheless, certain precautions should be taken when using exercise equipment. Read the whole manual before assembling and using the machine. Please observe the following safety precautions: 1. Keep children and perch away from this equipment at all dimes. DO NOT leave them unsupervised in the room where the the machine is kept.
EXERCISE INSTRUCTION Use of the machine offers various benefits; ic will improve fitness, muscle tone and when used in conjunction with a calorie controlled diet, it will help you lose weight. 1. Consult your doctor before starting any exercise program. lc is advisable to undergo a complete physical examination. 2. Work at the recommended exercise level. Do not over exert yourself. 3. If you feel any pain or discomfort, stop exercising immediately and consult your doctor. 4.
TRAINING GUIDELINES Exercise is one of the most important factors in the overall health of an individual. Listed among its benefits are: # Increased capacity for physical work (strength endurance) * Increased cardiovascular (heart and arteries/veins) and respiratory efficiency # Decreased risk of coronary heart disease + Changes in body metabolism, e.g.
OXYGEN UPTAKE The effort that you can exert over a prolonged period of time is limited by your ability to deliver oxygen to the waking muscles. Regular vigorous exercise produces a training effect that can increase your aerobic capacity by as much as 20 to 30%. An increased VO2 Max indicates an increased ability of the heart to pump blood, of the lungs to ventilate oxygen, and of the muscles to take up oxygen.
HEART RATE As you exercise, your heart beat increases. This is often used as a measure of the required intensity of an exercise. You need to exercise hard enough to condition your circulatory system, and increase your pulse rate, but not enough w strain your heart. Your initial level of fitness is important when developing an exercise program for you.
MUSCLE SORENESS For the first week or so. muscle soreness may be the only indication you have that you are on an exercise program. This, of course, does depend on your overall fitness level. A confirmation that you are on the correct program is a very slight soreness in most major muscle groups. This is quite normal and will disappear in a matter of days. If you experience major discomfort, you may be on a program that is too advanced, or you have increased your program too rapidly.
SUGGESTED STRETCHES Head Rolls Rotate your head to the right for one count while feeling the stretch up the left side of your neck. Next, rotate your head back for one count, stretching your chin w the ceiling. Rotate your head to the left for one count. and finally, drop your head to your chest for once count. Shoulder Lifts Lift your left shoulder up toward your ear for one count. Then lift your right shoulder up foe one count as you lower your left shoulder.
SUGGESTED STRETCHES Inner Thigh Stretch Sit with the soles of your feet together with your knees pointing outward, Pull your feet as close into your groin as possible. Bendy push your knees towards the floor. Hold for 15 counts. Tae Touches Slowly bend forward from your waist, letting your back and shoulders relax as you stretch toward your toes. Reach down as far as vou can and hold for 15 counts. Hamstring Stretches Sie with your right leg extended.
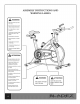
ASSEMBLY INSTRUCTIONS STEP 1: Assemble Front & Rear Stabilizer Bars Attach Front Stabilizer (65) to main frame (1) and secure it with 2 Hex Bolts (71) and washers (70). Attach Back Stabilizer (66) to main frame (1) and secure with 2 Hex Bolts (71) and washers (70). STEP 2: Install Left/Right Pedals Thread the Left Pedal (50) onto the left crank arm and tighten counter clockwise, Thread the Right Pedal (51) onto the right crank arm and tighten clockwise.
STEP 3: Assemble the Handlebar Post Loosen the Pop Pin (4), and slide the Handlebar Post (3) into the Handlebar Post Housing on the Main Frame (1), Secure by tightening Pop Pin (4). STEP 4: Attach the Handlebar Attach the Handlebar (2) to the Handlebar Post (3) to desired adjustable position. Tighten using Adjustment Knob (5) and Large Washer (34).
STEP 6: Seat Assembly Loosen the Pop Pin (4) and slide the Seat Slider (9) into the Seat Post (8) at desired height. Tighten the Pop Pin (4) Secure the Seat (12) to the Seat Slider (9). STEP 7: Water Bottle Holder Installation Attach the Water Borden Holder (78) onto the right fork of the frame there are two holes in the fork to align the water bore holder. Align the Water Bottle Holder to the holes and secure with 2 washers (80) and 2 Umbrella Screws (79).
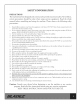
NOTICE AND INSPECTION 1. Inspect the equipment periodically including the Nuts, Nut Caps and Pedals regularly. If you find any defective pars, replace them immediately. Don't exercise unl they have been replaced. 2. Pay extra attention to areas that can wear over time. The figure ro the right show the brake pad (20), please inspect before exercising, if Jt has fallen off please replace it before you begin exercising. 3.
PARTS LIST NO.
CONSOLE OVERVIEW SPECIFICATIONS: TIMEKEEPER) Minutes ODOMETER(F HAVE} KM or M SPEEDUP) KM/H PULSE(IF HAVE) 40-240 BPM DISTANCE(DST) KM CALORIES(CAL) CAL KEY FUNCTION: 1. MODE: Lets you select a particular faction. 2. PAUSE: Press to start or stop the functions. 3. SET: Allows you to choose a target value for TIME DISTANCE, CALORIES, ODOMETER & PULSE, 4. RESET: Resets the value to zero. OPERATION PROCEDURES: 1.
* ODOMETER: Press the MODE Burton uni the pointer advance ro ODO, the total accumulated distance will be shown. « PULSE: The current heart rate is displayed in beats per minute (BPM) by pressing MODE until PULSE appears on the console. + CALORIES: The calories burned will be displayed by pressing the MODE burro undo CAL appears on the console.
MAINTENANCE & CLEANING 1. Care has been taken to assure that your bike has been properly adjusted and lubricated at the factory. It Is not recommended their the user attempt service on the internal components; instead seek service from an authorized service center. 2. From time-to-time the outer surfaces may appear dull or dirty. Following the instructions listed below will restore and preserve the original finish. 3.
WARRANTY LIMITED RESIDENTIAL WARRANTY BH North America will repair or replace, free of charge, at its option, parts that are defective as a testicle of material or workmanship. Lifetime replacement warranty coverage on frame and one (1) year on other parts. Labor warranty coverage is on (1) year. Warranty covers the original consumer purchaser only. THIS WARRANTY DOES NOT COVER » Pr-delivery set-up. «Components that require replacement due ro dire or lack of regular maintenance.