
Service manual


www.tanaka-usa.com 20 custsvc@tanaka-ism.com
Service Manual
Moby XL, SE-803
Steering Head Components
Service to the steering head components requires the removal of the front wheel, and the forks that the front wheel
mounts to.
NOTE: If it is not necessary to disassemble the wheel, the entire front wheel assembly can be removed from the frame
with the forks attached.
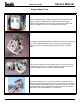
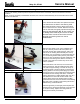
First, remove the two bolts, four spacers and lock
nuts that secure the forks to the steering head.
This requires either a 5mm or 6mm hex wrench,
and a 13mm wrench or socket. Remove the lock
nuts on the bolts, and gently tap them through the
steering head assembly (Fig. 9). Use caution not
to damage the threads as you remove the bolts.
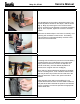
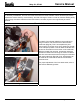
With the entire front wheel and forks removed
(Fig. 10), the steering head can now be
disassembled.
Figure 9
Figure 10
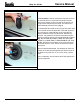
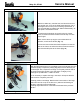
Figure 11
Slide the upper plastic cover up the handlebar stem,
and out of the way. Remove the lower plastic cap.
Removal of these caps reveals the large, 40mm nuts
that secure the steering head assembly from the top
and bottom. It is not necessary to remove the large top
nut. The steering head is held in place by two bottom
40mm nuts. One is intended to provide adjustment, and
is closest to the steering head, and the one directly
beneath it is a jamb nut to ensure they do not come
loose in operation.
With these bottom nuts removed, remove the lower
bearing and spacer. This will enable the entire down-
tube, with the upper bearing, to be slid out the top of
the steering head. It will be necessary to fold the front
steering handle to the down position (Fig. 11) to allow
enough slack in the control cables for the steering stem
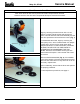
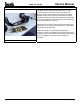
to be lifted from the steering head. Note – within the
steering head there is a rubber bushing that acts as a
shim between the down-tube and the inside of the
steering head. Remove the bushing and thoroughly
grease both the inner and outer surfaces of the bushing
(Fig. 12). A lack of grease on this bushing will result in
difficult turning of the handle bars.
Take the opportunity to thoroughly clean all parts with
cleaning solvent, and inspect bearings. If they feel worn
or do not turn freely, replace them. Re-grease the
bearings and carefully re-assemble.
Figure 12