Powered Personal Transportation Electric Power Board Product Handbook FOR THE BLADEZ XTR Street II ELECTRIC POWER BOARD Model: PB-SM1816 PLEASE BE SAFE WHEN RIDING . . .
IMPORTANT BATTERY MAINTENANCE and CHARGING INSTRUCTIONS: 1. You MUST Charge completely prior to initial use. (Follow charging instructions in your Product Handbook). 2. Charge immediately after every use. 3. Charge before storage – min. of every 30 days if not in use. 4. Charge the unit for 4-6 hours after the light on the charger turns green. 5. DO NOT allow your unit to Deep Discharge. 6. For safety purposes, DO NOT charge for over 24 hours. 7. Turn the unit OFF when not in use.
IMPORTANT PLEASE READ THIS BEFORE USING THIS PRODUCT READ THIS FIRST! WARNING This product does not conform to Federal Motor Vehicle Standards and is not intended for operation on public streets, roads or highways. Serious injury can result from the unsafe operations of this product. Operator can minimize these risks by using certain safety equipment such as: safety helmet, goggles, gloves, elbow and kneepads and appropriate footwear.
DO NOT TAKE YOUR BLADEZ POWERBOARD BACK TO THE STORE! CONTACT US FIRST IF YOU HAVE ANY QUESTIONS OR NEED ASSISTANCE, PLEASE CALL BLADEZ, TOLL FREE AT: (866) EBLADEZ (866) 325-2339 MONDAY thru FRIDAY, 8am to 5pm PST or visit us on the web at: www.ebladez.
TABLE OF CONTENTS BATTERY MAINTENANCE ………………………………………………………………….. 2 CHARGING INSTRUCTIONS………………………………………………………………… 2 GETTING TO KNOW YOUR BLADEZ POWER BOARD………………………………….6 GETTING STARTED…………………………………………………………………………... 6 UNFOLDING INSTRUCTIONS………………………………………………………………..7 QUICK RELEASE DECK………………………………………………………………………8 INTERGRADED SEAT BASE…………………………………………………………………8 BATTERIES……………………………………………………………………………………. 8 MULTI-FUNCTION LED………………………………………………………………………..9 RIDING………………………………………………………………………………………….
GETTING TO KNOW YOUR BLADEZ POWER BOARD Before operating your BLADEZ Power Board, please get acquainted with all of the features: 1. 2. 3. 4. 5. 6. 7. Accelerator Lever (Variable Speed) Brake Lever Folding Handle Disc Brake Kick Stand Quick Release Deck Integrated Seat Base 8. 9. 10. 11. 12. 13. 14.
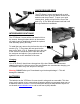
Place handle bar onto the Billet cap with the hole facing down towards the threaded bolt as shown with arrow in (FIG. 2) 2 Fig. 3 Place the Billet Stem on top of the handle bar and the cap and tighten the bolts to secure the handle bar onto the cap as shown in (Fig. 3) Unfolding Instruction Fig. 4 1. To unfold the XTR-Street II, begin by pressing down on the FOLDING HANDLE with one hand (Fig. 4), while gently pulling up on the handlebar with the other hand. 2.
QUICK RELEASE DECK The XTR-Street II comes equipped with a quick release deck which gives you better access to the batteries and the pc board. To open your quick release deck, simply pull up from the rear of the deck. (Fig. 6) The deck will release itself and it will fold up towards the handlebars. INTERGRADED SEAT BASE The XTR-Street II comes with a seat base built in to the scooter.
Charging Instructions Charging 1. Make sure the unit is turned OFF. 2. Open the charging plug by rotating the safety cover clockwise as shown by arrow in (Fig. 9) 3. Locate the AC CHARGER and plug it into wall. Insert the charger (the end with the prongs inside of it) into the charging plug. Fig. 6 4. A red light (Charging Status Light) will come on the charger indicating that charging is in process. (Fig. 10) 5.
RIDING Before going for a joy ride, makes sure that all of the bolts and screws are tightened. Put switch to the ON position, green light will come on indicating the unit is turned on with full charge. (Fig. 11) NOTE: If the unit is at the ON position for over 1015 minutes without moving, Smart Power will shut the unit OFF. To reset, turn the unit OFF, wait a few seconds and then switch it back ON again. Fig.12 Fig. 8 Put one foot on the deck of the XTR-Street II.
CHARGING SYSTEM This unit comes standard with a regulated 24V charger, this means that the power can be left switched on for a long period of time without harm to the batteries. NOTE: It is not advisable to leave your Powerboard plugged in for more than 24 hours. ALWAYS CHARGE YOUR POWERBOARD PRIOR TO STORAGE To re-charge your XTR-Street II, simply connect the small round plug on the CHARGER to CHARGING PLUG as described in GET STARTED Charging section.
Adjusting the Brakes The Brakes on the XTR-Street II should come fully adjusted from the factory. However, it may be necessary to adjust the brake from time to time. To adjust the brakes: Loosen the tension screw on the Brake Lever by rotating it counter-clockwise until the wheel spins freely, with some For further adjustment: 1. With one hand, depress the brake calliper using your thumb and forefinger. (Fig. 13) 2. With the other hand, adjust the tension screw on the brake line. a.
Adjusting the Head Unit The head unit should come adjusted from the factory. However, riding on rough terrain and general use may cause the head unit to become loose over time. It may be necessary to adjust the head unit from time to time. To adjust the head unit: 1. Rotate the handle bar as far right as it will go to expose the HEAD UNIT. 2. Using a large adjustable wrench, gently turn the BEARING LOCK clockwise to tighten.
Fig.12 TROUBLESHOOTING GUIDE The following guide will help assist you in identifying and correction common problems with your XTRStreet II: Symptoms Potential Causes: Solutions: The charger light turns green right away No action needed. Batteries do not hold a charge. Unit does not have specified travel range. This indicates the batteries are adequately charged. Most units come charged in the box. Batteries have reached the end of their useful life or poor polarity between batteries.
Page 15
www.ebladez.com Bladez, Corp.