PHILADELPHIA 845 Multimedia Navigation Enjoy it.
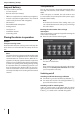
Controls – Device 18 17 16 15 14 13 12 11 10 1 2 9 3 8 4 7 5 6 1 RADIO button Start radio mode In radio mode: Select waveband/memory bank 2 PHONE button Starting Bluetooth mode In telephone mode: Call up menu of last source 3 NAVI button Call up navigation In navigation mode: Call up menu of active source 4 SRC button Short press: Select source Long press: Call up main menu 5 Left rotary/pushbutton Short press: Switch on device In operation: Mute audio source Long press: Switch off devic
Controls – Remote control M 19 20 52 21 51 N 49 O 50 22 23 24 48 25 26 47 46 27 28 P 45 29 Q 44 43 30 42 31 32 R S 41 T 33 U 34 35 40 V 36 37 38 W 39 X Y Z [ C SRC button D E F G H I J K L Select source button Eject a DVD/CD INFO button Show information on the display MENU button Call up DVD menu ZOOM button Zoom in on image area PIC button Adjust the display brightness button Slow-motion playback button Quit playback BAND button Select waveband/memory bank button Call up main
Contents Safety notes ................................................................ 5 Symbols used ...........................................................................5 Road safety ................................................................................5 General safety notes ..............................................................5 Declaration of conformity....................................................5 Cleaning notes ...........................................................
Safety notes | Cleaning notes | Disposal notes Safety notes The car sound system was manufactured according to the state of the art and established safety guidelines. Even so, dangers may occur if you do not observe the safety notes in these instructions. These instructions are intended to familiarise you with the most important functions. Detailed information can be found on the Internet under www.blaupunkt.com. • Read these instructions carefully and completely before using the car sound system.
Scope of delivery | Startup Scope of delivery Theft protection The scope of delivery includes: • Car sound system • Remote control (incl.
Startup | Radio mode Volume Adjusting the volume You can adjust the volume in steps from 0 (off ) to 50 (maximum). 쏅 Turn the left rotary/pushbutton 5 to change the volume. Muting the car sound system (Mute) 쏅 Briefly press the left rotary/pushbutton 5 to mute the device or to reactivate the previous volume. Main menu In the main menu, you press the buttons on the touchscreen to call up the different sources and operating modes. 쏅 Press the SRC button 4 for approx. 2 seconds.
Radio mode Select memory bank Different memory banks and wavebands are available. Up to 6 stations can be stored in each memory bank. 쏅 Press the [ ] button repeatedly until the desired memory bank is displayed. - or 쏅 Press the RADIO button 1 repeatedly until the desired memory bank is displayed. Tuning into a station Tuning into stations manually ] or [ ] button once or sev쏅 Briefly press the [ eral times to change the frequency in increments.
Radio mode Switching RDS time signal on/off The time can be synchronised with the time data transmitted via RDS. 쏅 In the radio menu, press the [ ] button. 쏅 In the options menu, press the RDS CT button to change the setting. 쏅 Press the [ ] button. The radio menu is displayed again. Optimising radio reception The HICUT function causes a reception improvement in case of poor radio reception (in FM radio mode only). If reception interferences exist, the interference level is automatically decreased.
Navigation Navigation (only for devices with navigation) Loading navigation data The navigation software and map data are located on a microSD card. For devices with navigation, the device is delivered with the microSD card in the microSD card slot. To be able to use the navigation, the microSD card must be inserted in the card slot. 쏅 Open the MAP cover of the card slot 8. 쏅 Insert the microSD card with the printed side up into the slot until it engages. 쏅 Close the cover of the slot.
Navigation 쏅 Press Find Address. The menu for the address entry is displayed. 쏅 Enter the country, city and street in succession as well as the intersection or house number. To do so, press the corresponding entry in the address entry menu. A menu for text entry is displayed. 쏅 Enter the desired destination via the keyboard. With every character entered, the entry in the input line is automatically completed. 쏅 If the name of the desired destination is displayed in the address line, press the [ ] button.
Navigation A list of petrol stations in the vicinity of the vehicle is displayed. The petrol stations are sorted by distance to vehicle. 쏅 Select a petrol station from the list by pressing on the list entry. The petrol stations is displayed on the map. 쏅 Press Next. The route course and the route data are displayed. 쏅 Press Go! to start the route guidance.
Navigation | DVD/CD/USB/SDHC/iPod media playback Map Settings With the map settings, you can adjust the view mode (2D or 3D), the viewing angle of the map, the colours and the display of buildings and points of orientation on the map. In addition, you can specify for categories of points of interest whether they should be displayed on the map, e.g. car dealerships, cafés, restaurants. 쏅 Call up the navigation menu. 쏅 Press the [ ] button. The settings menu for the navigation is displayed.
DVD/CD/USB/SDHC/iPod media playback DVD/CD mode Inserting a DVD/CD Risk of severe damage to the DVD/CD drive! Noncircular contoured DVDs/CDs and DVDs/ CDs with a diameter of 8 cm (mini DVDs/CDs) must not be used. We accept no responsibility for any damage to the drive that may occur as a result of the use of unsuitable DVDs/CDs. 쏅 Insert the DVD/CD with its printed side up into the DVD/CD tray ? until you feel a slight resistance. The drive automatically draws in the DVD/CD and checks its data.
DVD/CD/USB/SDHC/iPod media playback 쏅 Briefly touch the touchscreen once to display the playback menu again. The playback menu is shown. [ [ [ ] Define range for repeat function. ] Switch camera viewing angle (Angle) (only if supported by the DVD). ] Call up keypad for direct selection of titles, chapters or playing time. Audio playback of DVD/CD, USB, SDHC or iPod/iPhone [ [ [ [ [ [ [ [ ] ] ] ] ] ] ] ] Display the second page of the menu. End playback, call up DVD menu. Select previous chapter.
DVD/CD/USB/SDHC/iPod media playback After starting a title, the playback menu is displayed. Audio playback from iPod®/iPhone®: [ ] Start and end REPEAT function. The REPEAT mode changes each time the [ ] button is pressed. Display REPEAT mode Repeat current track Repeat current selection [ [ [ [ / [ ] Display folder view. ] Short press: Title selection. Long press: Fast searching. ] Interrupt playback and continue playback. ] Short press: Title selection. Long press: Fast searching.
DVD/CD/USB/SDHC/iPod media playback | Bluetooth mode 쏅 Briefly touch the touchscreen once to display the playback menu again. The playback menu is shown. Note: You can play back video files stored on an iPod®/ iPhone® with this device. For this purpose, the iPod®/ iPhone® must be connected with the device using a special cable (USB - AV) that is commercially available. Image playback from DVD/CD, USB or SDHC [ [ [ [ [ [ [ [ ] ] ] ] ] ] ] ] Display the second page of the menu.
Bluetooth mode Starting Bluetooth mode 쏅 Press the PHONE button 2. - or 쏅 Press the SRC button 4 repeatedly until the Bluetooth source is selected. - or 쏅 In the main menu, press the Bluetooth button. The Bluetooth® menu is displayed. It contains the list of known Bluetooth® devices. Other audio sources are switched off. 쏅 The car sound system appears as "BP 845" in the list of Bluetooth® devices.
Bluetooth mode If a call is coming in, the call menu is displayed. Audio playback - Android cell phone With the "Android Music Player" app from Blaupunkt, music files stored on an Android cell phone can be divided into certain categories with the help of ID3 tag information. This allows you to quickly and conveniently select and play back music tracks across different categories. For this purpose, the app must be installed on the Android cell phone.
Bluetooth mode | Rear Seat Entertainment Bluetooth settings Rear Seat Entertainment (RSE) In the options menu for Bluetooth®, you can make the basic settings for the Bluetooth® mode. 쏅 In the Bluetooth® menu, press the [ ] button. The options menu is displayed. The device features outputs to connect two external monitors and audio outputs for the rear area of the vehicle.
External audio/video sources | Sound settings External audio/video sources The menu for fader and balance is displayed. This device features two external AV inputs for audio and video playback: • AV-IN 1 is located under the cover at the front of the device. • AV-IN 2 is implemented as a cinch socket on a cable at the rear of the device. You can specify the installation location of the port during the installation of the device. Danger! Increased risk of injury from connector.
Basic settings Basic settings In the settings menu, you can adjust the basic settings for the different functions of the device to your requirements. 쏅 Press the SETUP button 7. - or 쏅 In the main menu, press the Settings button. The settings menu is displayed, the General submenu is activated. 쏅 Call up the submenus with the buttons in the lower area of the settings menu.
Basic settings Time Language The following settings are possible: Date – Set the date Clock mode – Selection between 12 and 24-h mode Time – Set the time The following settings are possible: On screen display – Language for the user interface of the device. DVD audio – The audio playback of DVDs is started in the language defined here. DVD subtitle – The subtitles of DVDs are shown in the language defined here. Disc menu – The DVD menu is displayed in the language defined here.
Basic settings | Useful information DVD Useful information Warranty We provide a manufacturer's warranty for products bought within the European Union. For devices purchased outside the European Union, the warranty terms issued by our respective responsible domestic agency are valid. The warranty terms can be called up from www.blaupunkt.com. Service The following settings are possible: Set password – Define a password if you want to use the parental controls.
Connection diagram 25
Appendix Supported iPod/iPhone devices Our product can support below listed iPod/iPhone generations: • iPod nano (7th generation) • iPod nano (6th generation) • iPod nano (5th generation) • iPod classic • iPod touch (5th generation) • iPod touch (4th generation) • iPhone 5s • iPhone 5c • iPhone 5 • iPhone 4s • iPhone 4 • iPhone 3GS "Made for iPod" and "Made for iPhone" mean that an electronic accessory has been designed to connect specifically to iPod, iPhone respectively, and has been certified by the dev
Blaupunkt Technology GmbH Robert-Bosch-Straße 200 D-31139 Hildesheim http://www.blaupunkt.