Radio / CD / MP3 Bremen MP74 7 644 820 310 Operating instructions http://www.blaupunkt.
Open here 2
SVENSKA NEDERLANDS ITALIANO 4 5 6 7 13 12 11 10 9 ESPAÑOL 3 PORTUGUÊS 1 DANSK FRANÇAIS 2 8 3 ENGLISH DEUTSCH
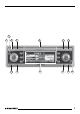
CONTROLS 1 2 3 4 5 6 7 8 58 Button, to switch the device on/ off, and mute the device’s volume Volume control button, to unlatch the detachable control panel NEXT button to display the next pages of a menu, and switch memory banks in radio mode Softkeys, the function of the softkeys depends on what is currently being displayed DIS•ESC button to change the display content and close menus button to open the detachable control panel (flip-release panel) Joystick and OK button 9 : ; < = MENU button to
Sound and volume distribution settings ............... 67 Adjusting the bass ......................... 67 Adjusting the treble ....................... 67 Adjusting the right/left volume distribution (balance) ..................... 67 Adjusting the front/back volume distribution (fader) ......................... 67 X-BASS .................................. 68 Adjusting the display settings 68 Radio mode ............................ 71 Adjusting the tuner settings ...........
CONTENTS MP3 mode .............................. 86 Preparing an MP3-CD ................... 86 Switching to MP3 mode ................ 87 Selecting a directory ...................... 88 Selecting tracks ............................ 88 Fast searching (audible) ................ 89 Scanning tracks (SCAN) ............... 89 Random track play (MIX) ............... 89 Repeating individual tracks or whole directories (REPEAT) ........... 89 Configuring the display .................. 90 CD-changer mode (optional) .
Road safety has absolute priority. Only operate your car sound system if the road and traffic conditions allow you to do so. Familiarise yourself with the device before setting off on your journey. You should always be able to hear police, fire and ambulance sirens in good time from inside your vehicle. If you want to install your car sound system yourself, please read the installation and connection instructions that follow these operating instructions.
NOTES AND ACCESSORIES CD changers You can obtain the following CD changers from accessory retailers for connection to this device: CDC A 03, CDC A 08 and IDC A 09. Compact Drive MP3 You can connect the Compact Drive MP3 instead of a CD-changer in order to play MP3 music tracks. If you decide to connect a Compact Drive MP3, you will first need to use a computer to store the MP3 music tracks on the Microdrive™ hard disk that is inside the Compact Drive MP3.
➮ Press the left edge of the control panel into the device until it clicks into place. Note: ● When attaching the control panel, make sure you do not press the display. ➮ To switch off the device, press and hold down button 1 for longer than two seconds. The device switches off. DEUTSCH ENGLISH FRANÇAIS right into the device’s guide. ton 1. The device switches on.
ADJUSTING THE VOLUME Adjusting the volume You can adjust the volume in steps from 0 (off) to 50 (maximum). ➮ To increase the volume, turn the volume control 2 clockwise. ➮ To decrease the volume, turn the volume control 2 anticlockwise. Setting the power-on volume You can set the default volume level at which the device plays when it is switched on. ➮ Press the MENU button 9. ➮ Press the softkey 5 assigned to the “VOLUME” display item. ➮ Press the softkey 5 assigned to the “ON VOL” display item.
➮ Press the joystick OK 8 or the MENU button 9 to close the menu. The settings are saved. Note: You can also adjust the volume during the telephone call using the volume control 2. Activating navigation audio You can either connect a second external audio source or a navigation system to this device. If you do, you must specify which device is connected to this connection by selecting it in the menu. ➮ Press the MENU button 9. ➮ Press the softkey 5 assigned to the “AUX” display item.
ADJUSTING THE VOLUME ➮ Press the joystick OK 8 or the MENU button 9 to close the menu. The settings are saved. Setting the minimum navigation volume You can set the volume level at which the navigation voice output is “mixed in” with the audio source. Note: ● Set the volume on the navigation system to maximum. If the output sounds distorted, reduce the volume slightly on the navigation system. ➮ Press the MENU button 9. ➮ Press the softkey 5 assigned to the “VOLUME” display item.
boost the bass or move it down/left to reduce the bass. When you have finished making your changes, ➮ press the joystick OK 8 or the AUDIO button :. Adjusting the treble ➮ Press the AUDIO button :. “AUDIO MENU” appears in the display. ➮ Press the softkey 5 assigned to the “TREBLE” display item. ➮ Move the joystick 8 up/right to boost the treble or move it down/ left to reduce the treble. When you have finished making your changes, down/left to adjust the right/left volume distribution.
X-BASS X-BASS The X-BASS feature can be used to boost the bass at low volume levels. You can set the X-Bass boost for one of the following frequencies: 32 Hz, 40 Hz, 50 Hz, 63 Hz or 80 Hz in steps from 0 - 6. If you select the 0 setting, the X-Bass function will be deactivated. ➮ Press the AUDIO button :. “AUDIO MENU” appears in the display. ➮ Press the softkey 5 assigned to the “X-BASS” display item. ➮ Move the joystick 8 left or right to select the frequency that you want to boost.
➮ Press the MENU button 9. ➮ Press the softkey 5 assigned to You can choose the colour of the device’s button illumination. There are 16 colours for you to choose from. ➮ Press the MENU button 9. ➮ Press the softkey 5 assigned to the “DISPLAY” display item. ➮ Press the softkey 5 assigned to the “KEYCOLOR” display item. ➮ Move the joystick 8 up/right or down/left to adjust the colour. A different colour is selected every time you move the joystick.
ADJUSTING THE DISPLAY SETTINGS ➮ Press the softkey 5 assigned to the “COLOR” display item. ➮ Press the softkey 5 assigned to the “USER” display item. ➮ In the following menu you can set the red, blue and green colour components yourself. To do so, press the appropriate softkey 5 repeatedly until the displayed colour suits your tastes. ➮ Press the joystick OK 8 or the MENU button 9 to close the menu. The settings are saved.
MENU button 9 to close the menu. The settings are saved. Adjusting the tuner settings To ensure that the tuner works properly, the device must be configured for the region in which you are using it. You can choose between Europe and the USA. By default, the tuner is set to the region in which the device was sold. If you experience problems with radio reception, please check this setting. ➮ Press the MENU button 9. ➮ Press the softkey 5 assigned to the “TUNER” display item.
RADIO MODE Setting the number of antennas Switching to radio mode This device is equipped with two RDS radio receivers (TwinCeiver). You can connect one or two antennas to the device. If two antennas are connected (strongly recommended - the second antenna is included), you can use directional reception when tuning into stations in DDA radio mode. Directional reception considerably improves reception quality in most cases.
➮ press the TUNER button = in radio mode. The radio functions menu appears in the display. ENGLISH Selecting the radio mode To switch between static and dynamic modes, The second page of the radio functions menu is displayed. ➮ Press the softkey 5 assigned to FRANÇAIS ➮ Press the NEXT button 4. the “DYN LIST” display item for dynamic radio mode. ➮ Press the softkey 5 assigned to the “DDA” or “PRESETS” display item for one of the static radio modes.
RADIO MODE Convenient RDS functions (AF, REG) Switching REG on/off To use the REG RDS-function, The convenient RDS functions AF (Alternative Frequency) and REG (Regional) extend your radio’s range of functions (only in FM radio mode). ● AF: If you activate this RDS function, the radio automatically tunes into the best receivable frequency for the station that is currently set. ● REG: At certain times, some radio stations divide their programme into regional programmes providing different content.
➮ Press the softkey 5 assigned to the “MW” display item for the MW waveband. ➮ Press the softkey 5 assigned to the “LW” display item for the LW waveband. ➮ Press the softkey 5 assigned to the “SW” display item for the SW waveband. The main radio menu for the selected waveband is displayed. Selecting an FM memory bank To switch between the FM memory banks FM1, FM2, FM3 and FMT, ➮ press the NEXT button 4 repeatedly until the memory bank that you want is displayed.
RADIO MODE Setting the sensitivity of station seek tuning Scanning receivable stations (SCAN) You can choose whether the radio should only tune into stations providing good reception or whether it can also tune into those with a weak reception. You can use the scan function to briefly play all the receivable stations. You can set the scanning time to between 5 and 30 seconds in the menu. ➮ Press the TUNER button = while Starting SCAN in radio mode. The radio functions menu appears in the display.
➮ Press the softkey 5 assigned to Storing stations manually the “T-STORE” display item. The storing procedure begins. “TRAVEL STORE” appears in the display. After the process is completed, the radio will play the station that is stored in location 1 of the FMT (or AMT) memory bank. ➮ Press one of the six softkeys for longer than two seconds to assign the station to that softkey.
RADIO MODE PTY-EON If you specify the programme type and start seek tuning, the radio will switch from the current station to a station of the selected programme type. Note: If the tuner does not find a station that corresponds to the selected programme type, you will hear a beep and “NO PTY” appears briefly in the display. The radio will then retune to the station that it received last.
Setting HiCut ➮ Repeatedly press the softkey 5 assigned to the “R-TEXT” display item until the “RADIO TEXT ON” or “RADIO TEXT OFF” setting that you want is displayed. ➮ Press the TUNER button = or the joystick OK 8. The settings are saved. ENGLISH Treble reduction feature during interference (HiCut) The HiCut function has the effect of reducing interference noise during poor radio reception. If interference occurs, the system automatically reduces the treble thus reducing the interference level.
TIM TIM - Traffic Information Memory The device is equipped with a digital speech memory, which can automatically record up to four traffic messages. The maximum duration for recorded messages is four minutes. If the TIM function is activated, the device records all the traffic information messages that it receives during the two hours after it was last switched off. In addition, you can set two fixed timers.
➮ Repeatedly press the softkey 5 assigned to the “TIM ON” display item until “TIM RECORD ON” appears in the display. ➮ Press the TUNER button = or the joystick OK 8. The settings are saved. Note: ● After you switch off the device via the vehicle ignition or using button 1, the display will briefly show the current setting (“TIM ON” or “TIM OFF”). Selecting TIM messages “TIM” and the message number are displayed on both sides of the display alongside the top two softkeys.
TIM tion is activated, the device will automatically search for a traffic information station. Setting the timers If TIM is activated, the traffic information messages provided by a tuned traffic information station will be recorded for 2 hours after the device is switched off. Furthermore, you can set two timers that record all the traffic information messages received 30 minutes before and 90 minutes after the set time. The timer function uses the system time as its reference.
Note: The TA menu is displayed during a traffic announcement. To interrupt the current traffic announcement, ➮ press the softkey 5 assigned to the “TA EXIT” display item. Setting the volume for traffic announcements ➮ Press the MENU button 9. ➮ Press the softkey 5 assigned to the “VOLUME” display item. ENGLISH FRANÇAIS ITALIANO NEDERLANDS SVENSKA in radio mode. The radio functions menu appears in the display.
CD MODE CD mode You can use this device to play standard CDs with a diameter of 12 cm. CDRs and CD-RWs (CDs that you have “burned” yourself) can generally also be played. Due to the varying quality of CD blanks, Blaupunkt cannot guarantee that this will work properly. To ensure the system functions properly, only use CDs labelled with the compact disc logo. Problems might be experienced when trying to play copy-protected CDs.
Repeating tracks (REPEAT) ➮ Press the softkey 5 assigned to the “REPEAT” display item. “REPEAT TRACK” appears briefly in the display. The track is repeated continuously until you deactivate REPEAT. Cancelling SCAN and continuing listening to a track To cancel scanning, ➮ press the joystick OK 8. Cancelling REPEAT The currently scanned track will then continue to be played normally. ➮ Press the softkey 5 assigned to Displaying CD text Some CDs include CD text.
CD MODE MP3 MODE Setting scrolling text MP3 mode You can allow the CD text to be displayed as scrolling text in the bottom line of the display. You can also use this car sound system to play CD-Rs and CD-RWs that contain MP3 music files. Switching CD scrolling text on/off Preparing an MP3-CD ➮ Repeatedly press the softkey 5 The various combinations of CD burners, CD burning software and CD blanks may lead to problems arising with the device’s ability to play certain CDs.
T001 T002 T003 T004 T005 D05 T001 T002 T003 T004 T005 T006 T007 D04 T001 T002 T003 T004 T005 T006 T007 T008 T009 T010 T011 Since using some burner software can lead to inconsistencies in the way items are numbered, you should ensure that the root directory D01 either contains only subdirectories containing tracks (Fig. 1) or only tracks (Fig. 2). You can name each directory using a PC. The device is capable of displaying the directory name. Name the directories and tracks using your CD burner software.
MP3 MODE Selecting a directory Selecting from the directory list You can display a list of all the directories on the inserted CD and then conveniently select a directory from it. The directories are displayed with the names that you created when burning the CD. ➮ Press the NEXT button 4 whilst an MP3 is playing. The track list is displayed for the current directory. ➮ Move the joystick 8 to the left or right to switch to the directory list. ➮ Press the joystick 8 up or down to browse through the list.
Scanning tracks (SCAN) You can briefly play (scan) all the tracks on the CD. ➮ Press and hold down the joystick OK 8 for longer than two seconds. The subsequent tracks on the CD are briefly played in ascending order. Note: ● You can set the scanning time. For further details, please read the section entitled “Setting the scanning time” in the “Radio mode” chapter. Cancelling SCAN and continuing listening to a track To cancel scanning, ➮ press the joystick OK 8.
MP3 MODE Cancelling REPEAT To stop the current track or current directory from being repeated, ➮ repeatedly press the softkey 5 that is assigned to the “REPEAT” display item until “REPEAT OFF” appears briefly in the display. Configuring the display There are various options available for displaying the name of the artist, track and album (ID3 tag) or the directory and file name.
peatedly until the CD-changer menu is displayed. Playback continues from the point at which it was last interrupted. If the magazine was removed from the CD changer and then replaced, the CD magazine will first be scanned, and playback will begin from the first track on the first CD that the CD changer detects. or down until the number of the CD that you want appears in the display.
CD-CHANGER MODE Scanning tracks (SCAN) You can briefly play (scan) all the tracks on the CD. ➮ Press and hold down the joystick OK 8 for longer than two seconds. The subsequent tracks on the CD are briefly played in ascending order. Note: ● You can set the scanning time. For further details, please read the section entitled “Setting the scanning time” in the “Radio mode” chapter. Cancelling SCAN and continuing listening to a track To cancel scanning, ➮ press the joystick OK 8.
Naming CDs Deleting a CD name The car sound system allows you to assign names for up to 99 CDs (not with the Compact Drive MP3) so that you can recognise them more easily. The names can be a maximum of seven characters long. “FULL” will appear in the display if you try assigning more than 99 names. ➮ Listen to the CD whose name you ➮ Press the softkey 5 assigned to the “CD NAME” display item. The current name of the CD is displayed in the top line of the display.
CLOCK TIME CLOCK time Setting the clock time ➮ Adjust the minutes by moving the joystick 8 up or down. ➮ Press the joystick OK 8 or the The clock can be set automatically using the RDS signal. You can also set the clock manually if you cannot receive a radio station that supports this feature. MENU button 9 to close the menu. The settings are saved. Setting the clock automatically To set the clock automatically, Setting the date To set the date, ➮ press the MENU button 9.
the “OFFCLOCK” display item. “SHOW CLOCK” means that the clock time will be displayed; “HIDE CLOCK” means it will not be displayed. Switching DSA on/off Switching DSA off To switch off the entire equalizer, ➮ press and hold down the AUDIO button : for longer than two seconds. The DSA menu appears in the display. ➮ Press the softkey 5 assigned to the “OFF” display item. “DSA OFF” appears in the display. ENGLISH ESPAÑOL the “CLOCK” display item.
DSA MAX EQUALIZER Note: ● You can activate/deactivate each equalizer module individually (user EQ, sound presets, DNC, stage effects and sound effects) in the corresponding menu. Switching on DSA To switch the equalizer on again, ➮ press and hold down the AUDIO button : for longer than two seconds. The DSA menu appears in the display. ➮ Press the softkey 5 assigned to the “USER EQ” display item. ➮ Select an equalizer setting.
button : for longer than two seconds. ➮ Press the softkey 5 assigned to the “USER EQ” display item. ➮ Press the softkey 5 assigned to the display item of the equalizer that you want to view. ➮ Press the softkey 5 assigned to the “ADJUST” display item. ➮ Press the softkey 5 assigned to the “VIEWPOST” display item on the left of the display for the front or on the right of the display for the rear. The equalizer setting is displayed.
DSA MAX EQUALIZER ➮ Press the softkey 5 assigned to the “ADJUST” display item. ➮ Press the softkey 5 assigned to the “MANUAL” display item. You can adjust the equalizer for the front and rear loudspeakers separately. ➮ Press the softkey 5 assigned to the “FRONT EQ” display item for the front loudspeakers or “REAR EQ” for the rear loudspeakers. The graphic equalizer settings are displayed.
the “PRESET” display item. ➮ Press the softkey 5 assigned to the display item of the sound preset that you want to use. ➮ Press the joystick OK 8 or the AUDIO button : to close the menu. The settings are saved. Setting the stage effect You can activate a stage effect that “repositions” the music in front of the driver and/or front passenger. This gives you the impression you are standing directly in front of a stage. You can set the distance to your loudspeakers in order to optimise this effect.
DNC DSA MAX EQUALIZER ➮ Turn the volume control 2 or move the joystick 8 to adjust the distance. ➮ Proceed in the same way for all the loudspeakers and press the joystick OK 8 or the AUDIO button : to close the menu. The settings are saved. Selecting the sound effect You can choose between different sound effects for your music: ● CATHEDRAL ● THEATER ● CONCERT ● CLUB ● STADIUM These sound effects have already been programmed. ➮ Press and hold down the AUDIO button : for longer than two seconds.
You can select the DNC boost (i.e. the sensitivity of the volume and sound boost) to five levels. The “DNC 1” setting is suitable for vehicles with a loud engine and music with a lot of bass. The “DNC 5” setting is suitable for vehicles with a quiet engine and for classical music. Find out the best setting for your situation by trying out the various settings. To select a DNC boost level, the “ADJUST” display item. A countdown starts in the display. Calibration begins as soon as the countdown is finished.
SUBWOOFER AND CENTRE SPEAKER Subwoofer and centre speaker You can connect a subwoofer and a centre speaker to this device. In order to optimise the sound still further when using a subwoofer and centre speaker, you can set a low-pass filter for the subwoofer and a high-pass filter for the front and rear channels separately. Adjusting the subwoofer phase You can adjust the phase of the subwoofer output to suit your subwoofer. The phase setting can be adjusted in steps of “45°” to between “-135°” and “180°”.
➮ Press the AUDIO button :. ➮ Press the AUDIO button :. “AUDIO MENU” appears in the display. “AUDIO MENU” appears in the display. ➮ Press the softkey 5 assigned to ➮ Press the softkey 5 assigned to AUDIO button :. Setting up the subsonic filter To avoid interference due to extremely low frequencies, you can set the subsonic filter to limit the frequency response of the device at the lower end of the range. This makes particularly good sense if you are using a small subwoofer.
SUBWOOFER AND CENTRE SPEAKER ➮ Press the softkey 5 assigned to ➮ Press the softkey 5 assigned to the “CENTRE” display item. the “HIPASS F” display item in order to set up the high-pass filter for the front. ➮ Press the joystick 8 left or right to set the frequency for the centre speaker. ➮ Press the joystick 8 up or down to set the gain for the centre speaker. When you have finished making your changes, ➮ press the joystick OK 8 or the AUDIO button :.
Note: ● Please check this setting if the loudspeakers do not emit any sound. ➮ Press the MENU button 9. ➮ Press the softkey 5 assigned to the “VARIOUS” display item. ➮ Repeatedly press the softkey 5 assigned to the “AMP ON” display item until the “INTERNAL AMP ON” or “INTERNAL AMP OFF” setting that you want is displayed. The “AMP ON” softkey will be displayed with a dark background if the internal amplifier is switched on. ➮ Press the joystick OK 8 or the MENU button 9 to close the menu.
EXTERNAL AUDIO SOURCES External audio sources You can connect up to two external audio sources to the device. Audio sources can, for example, be portable CD players, MiniDisc players or MP3 players. You can connect the first external audio source (AUX1) instead of a CD changer. You can connect the second external audio source (AUX2) in addition to the CD changer or AUX1. Instead of AUX2, you can connect a navigation system.
➮ Once you have finished entering the name, press the joystick OK 8 or the MENU button 9 to close the menu. The settings are saved. the “VARIOUS” display item. ➮ Press the softkey 5 assigned to the “ON MSG” display item. The default text for the power-on message appears in the display. The text input marker flashes at the beginning of the line. To enter a different text, ➮ press the joystick 8 to the left or right to move the input marker.
SERIAL NUMBER Displaying the serial number RESETTING Resetting the device You can display the device’s serial number. You can reset the device to its factory default settings. All custom settings will then be cleared. ➮ Press the MENU button 9. ➮ Press the softkey 5 assigned to ➮ Press the MENU button 9. ➮ Press the softkey 5 assigned to the “VARIOUS” display item. ➮ Press the softkey 5 assigned to the “SER NUM” display item.
SPECIFICATIONS DEUTSCH Specifications Amplifier FRANÇAIS ENGLISH 4 x 18 watts sine at 14.4 V and 1% distortion factor at 4 ohms. 4 x 26 watts sine in accordance with DIN 45324 at 14.4 V at 4 ohms. 4 x 50 watts max. power ITALIANO Output power: Tuner NEDERLANDS 87.5 - 108 MHz 531 – 1 602 kHz 153 – 279 kHz 5.85 – 6.
Service-Nummern / Service numbers / Numéros du service aprèsvente / Numeri del servizio di assistenza / Servicenummers / Telefonnummer för service / Números de servicio / Número de serviço / Servicenumre Country: Phone: Fax: WWW: http://www.blaupunkt.