Radio / MD Alaska CJ70 Dallas MD70 New Orleans MD70 Operating instructions
Bitte aufklappen Open here Ouvrir s.v.p. Aprite la pagina Hier openslaan a.u.b.
14 SVENSKA NEDERLANDS 3 13 4 12 5 11 10 9 8 ESPAÑOL 2 PORTUGUÊS 1 ITALIANO 6 7 3 FRANÇAIS ENGLISH DEUTSCH
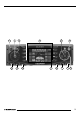
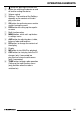
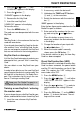
OPERATING ELEMENTS 9 : ; < = > DEUTSCH ENGLISH FRANÇAIS ITALIANO 7 8 NEDERLANDS 6 SVENSKA 5 ESPAÑOL 3 4 button for opening the control unit Button for switching the device on and off and for muting the device Volume control Softkeys.
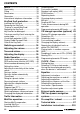
CONTENTS Notes ............................................. 33 Road safety ........................................... 33 Fitting .................................................... 33 Accessories ........................................... 33 Guarantee ............................................. 33 International telephone information ....... 33 KeyCard theft protection ............. 34 Inserting the KeyCard ........................... 34 Removing the KeyCard .........................
You must be able to hear audible alarms from police vehicles, fire engines or ambulances promptly when inside the vehicle. You must therefore listen at an appropriate volume when travelling. Fitting If you want to fit your car radio yourself, read the fitting and connecting notes at the end of the guide. Accessories Only use accessories approved by Blaupunkt. Remote control The optional RC 10, RC 10 H, and RC 08 remote controls allow you to control your car radio’s basic functions safely and conveniently.
THEFT PROTECTION KeyCard theft protection A KeyCard is included with your car radio. The radio can also be operated with a second KeyCard. If one KeyCard becomes lost or damaged you can obtain a replacement through your Blaupunkt dealer. If you use two KeyCards, the settings of the first KeyCard are adopted by the first KeyCard.
The radio can now be operated with the new KeyCard. Note: Two KeyCards is the maximum that can be used with one device. If you already have two KeyCards for the device and then “train” a third KeyCard, the device can no longer be used with the KeyCard that was not involved in the training process. KeyCard lost or damaged If all the KeyCards belonging to a device are damaged or lost, you can “train” a new KeyCard. You can obtain a new KeyCard from your dealer.
THEFT PROTECTION SWITCHING ON AND OFF Display Radio Passport Data Switching on and off Using the supplied KeyCard you can show the Radio Passport data such as the device name, type number (7 6 ...) and the device number in the display. There are a number of methods for switching the device on or off. ➮ Press the MENU button, 8. ➮ Press the or button, 7, until “LEARN KC” appears in the display. ➮ Press the button, 7. Switching on and off with the button 2 ➮ Press the main button, 2, to switch on.
Muting The volume can be adjusted in steps from 0 (off) to 66 (maximum). You can reduce the level of the volume (mute) suddenly. ➮ Press the main button, 2. “MUTE” is shown on the display. Cancelling the mute or The volume level of the device when it is switched on can be adjusted. ➮ Turn the volume control, 3. ➮ Press the MENU button, 8. ➮ Press the button, 7, as often as is necessary for “ON VOL” to appear in the display. ➮ Adjust the switch-on volume with the buttons, 7, or with the volume control.
TONE AND VOLUME Tone and volume Adjusting the left/right volume balance Note: You can make separate adjustments to the bass, treble and loudness for each audio source. ➮ In order to adjust the balance, press the Adjusting the bass ➮ Press the AUD button, 9. “BASS” appears in the display. or buttons, 7, in order to adjust the bass. When you have finished the adjustment ➮ Press the AUD button, 9. ➮ Press the Adjusting the treble ➮ Press the AUD button, 9. “BASS” appears in the display.
Adjusting the display Night-time display brightness You can adjust the display to its location in your vehicle and to your taste. ➮ Press the MENU button, 8. ➮ Press the or button, 7, as often DEUTSCH DISPLAY as is necessary for “ANGLE” to appear in the display. ➮ Adjust the viewing angle with the ➮ Adjust the brightness with the key, 7. ➮ Press the OK button, 5 or the MENU button, 8, to leave the menu. The settings are then saved. key, 7.
RADIO OPERATION Radio Operation This device is equipped with an RDS radio receiver. Many of the FM stations that can be received transmit a signal in addition to the program itself that contains information such as the name of the station and the type of program (PTY). As soon as it can be received, the name of the station is shown in the display . If desired, the program type can be displayed. You may read more about this in the section on “Program Type (PTY)”.
Selecting the FM memory level In order to switch between the FM memory levels Browsing a chain of stations (FM only) If a station is providing several programs it is possible to browse through this “chain” of stations. ➮ press the softkey, 4, indicating “NEXT” ➮ Press the as often as necessary for the desired memory level to be shown in the display. The memory levels are called up in the sequence FM I, FM II and FMT.
RADIO OPERATION Saving a station Scanning through stations Saving a station manually Scanning through available stations (radio SCAN) ➮ Choose the desired memory level from FM I, FM II, FMT or one of the other wavebands, MW or LW. ➮ Tune in the desired station as described under “Setting the station”. ➮ Hold down the softkey, 4, indicating the station “ST1” - “ST6” in which the station is to be stored for longer than two seconds.
➮ Adjust the desired sampling time with the < key, 7. ➮ Press the OK button, 5 or the MENU button, 8, to leave the menu. The settings are then saved. Note: The sampling duration that is selected is also applied to the scanning in CD, tape cassette, MiniDisc and CD changer operation (depending on how the radio is equipped). Program type (PTY) As well as the station name itself, some FM stations also supply information about the type of program being transmitted.
RADIO OPERATION Note: If no station is found with the chosen program type, a beep is sounded, and the display briefly shows “NO PTY”. The tuner returns to the most recently received station. Storing the program type on the station button ➮ Select a program type with the or button, 7. ➮ In order to save a program type, hold down one of the softkeys, 4, indicating “ST1” to “ST6”, for more than one second. The program type is saved at the chosen location.
➮ Press the OK button, 5 or the MENU button, 8, to leave the menu. The settings are then saved. Changing the displayed information You can select the information shown on the display. The upper display line (the headline) can display the station name, frequency or the program type. The lower display line (DOT field) can display the time or the memory level. Changing the headline ➮ Hold down the DIS button, :, until the desired information, i.e. the station name, frequency or program type, appears.
TRAFFIC INFORMATION Adjusting the volume for traffic announcements ➮ Press the MENU button, 8. ➮ Press the or button, 7, until “TA VOLUME” appears in the display. ➮ Adjust the volume with the buttons, 7, or with the volume control. ➮ Press the OK button, 5 or the MENU button, 8, to leave the menu. The settings are then saved. MINIDISC OPERATION MiniDisc operation You can use this equipment to play any standard MiniDisc.
➮ Hold down any arrow button, 7, until the fast forward or reverse search begins. Random track replay (MIX) ➮ Press the softkey, 4, indicating “MIX”. “MIX MiniDisc” appears briefly in the display. The next track played will be selected at random. Ending MIX ➮ Press the softkey, 4, indicating “MIX” again. “MIX OFF” appears briefly in the display. SCAN function Use this function to hear the start of each track on the MD: ➮ Press the softkey, 4, indicating “SCA” “SCAN” appears in the display.
MINIDISC OPERATION Scrolling MD Text You can choose whether the information stored on the MiniDisc (e.g. disc and tracks names) is displayed continually or just once when a new track begins or a new MD is inserted. Switching scrolling text on/off ➮ Press the MENU button, 8. ➮ Using the / buttons, 7, select current status, either “SCRL ON” or “SCRL OFF”. ➮ Press button or scrolling on or off. , 7, to switch ➮ Press the OK button, 5, or the MENU button, 8, to exit the menu. Your settings have been saved.
Starting CD changer operation DEUTSCH ENGLISH FRANÇAIS Note: The operating instructions for your CD changer will provide information about handling CDs, inserting them and operating the CD changer. The CD changer menu is displayed, and play will continue from the point where it was last interrupted. If the magazine is removed from the CD changer and re-inserted, play will start with the first track on the first CD detected by the CD changer.
CD CHANGER OPERATION Changing the display contents You can choose between different display modes during CD changer operation: ● Display of CD number, track number and time. ● Display of CD number, track number and playing time. ● Display of CD name and track number. ➮ In order to change between the display modes, press the DIS button, :, as often as you need for the desired information to be shown on the display.
➮ Listen to a CD in CD changer mode. ➮ Press the MENU button, 8. ➮ Use the / buttons, 7, to select “UPDATE”. button, 7. ➮ Press the button, 7. The device is now in selection mode. “CLR ALL” appears in the display. ➮ Choose the CD that you want to name ➮ Hold down the OK button, 5. with the ➮ Press the buttons, 7. / or button, 7. The device enters edit mode. If your chosen CD is not yet named, seven underscores appear in the display. The current entry location blinks.
CD CHANGER OPERATION ➮ Hold down the softkey, 4, indicating “TPM” for longer than one second. The track is accepted into the list of favourite tracks for this CD. ➮ Continue in the same way for all the other favourite tracks on the CD. Switching favourite track play on and off In order to begin playing the programmed favourite tracks on the inserted CD, or to stop playing only the favourite tracks ➮ briefly press the softkey, 4, indicating “TPM”.
➮ In order to have the time set automatically, press the MENU button, 8. or button, 7, as often as is necessary for “CLK MAN” (manual) to appear in the display. If “CLK AUTO” is displayed, automatic time setting is already active. ➮ Press the ➮ Press the MENU button, 8. ➮ Press the or button, 7, as often as is necessary for “24 H MODE” or “12 H MODE” to appear in the display. or buttons, 7, to switch between the modes. ➮ Press the ➮ Press the OK button, 5 or the MENU button, 8, to leave the menu.
EQUALIZER Equalizer This device has a parametric digital equalizer. In this case, parametric means that in each of the three filters, one individual frequency can be emphasised or reduced (with a gain of +8 to -8 dB). The following filters are available: ● LOW EQ 32 - 200 Hz ● MID EQ 250- 1,600 Hz ● HIGH EQ 2,000 - 12,500 Hz These filters can be set without using any measuring instruments. It allows the sound properties in the vehicle to be significantly affected.
EQUALIZER “MENU” appears in the display. or button, 7. ➮ Press the OK button, 5. ➮ When you have completed all the settings, press the DEQ button, 6. Level meter / Spectrometer or buttons, 7, in order to switch the spectrometer on or off. ➮ Press the ➮ Press the OK button, 5 or the MENU button, 8, to leave the menu. The settings are then saved. NEDERLANDS While you set the equalizer, the level meter in the display gives you a symbolic indication of volume and settings.
EXTERNAL AUDIO SOURCES External audio sources Instead of the CD-changer, you can connect an external audio source with line output. Such sources might be a portable CD player, a MiniDisc player or an MP3 player. The AUX input must be switched on in the menu. You need an adapter cable to connect an external audio source. You can obtain such a cable from your Blaupunkt dealer. Switching the AUX input on and off ➮ Press the MENU button, 8.
as is necessary for “AMP DLAY” to appear in the display. or buttons, 7, in order to adjust the switch-on delay. “DLAY OFF” means that there is no switchon delay, while “DELAY 1” to “DELAY 4” indicate the delay time in seconds. ➮ Press the ➮ Press the OK button, 5 or the MENU button, 8, to leave the menu. The settings are then saved. DEUTSCH 4 x 25 Watt sine wave according to DIN 45 324 at 14. 4 V 4 x 45 Watt max. power Wavebands: VHF (FM) : MW : LW : FRANÇAIS Tuner 87.