Radio / CD Alicante CD34 Freiburg CD34 7 644 172 310 7 644 194 310 Operating instructions http://www.blaupunkt.
Open here 2
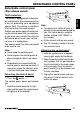
10 9 8 NEDERLANDS ITALIANO FRANÇAIS 6 11 SVENSKA 4 ESPAÑOL 2 PORTUGUÊS 1 DANSK 3 7 ENGLISH 5 3 DEUTSCH
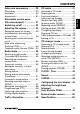
CONTROLS 1 2 3 4 5 28 button for opening the detachable control panel (flip-release panel) Button to switch the device on/ off and operate the volume mute feature BND button (band) to select radio mode as the source, to select the FM memory banks and the MW and LW wavebands TS to start the Travelstore function Volume control TRAF button to switch traffic information standby on/off. RDS button to switch the RDS function on/off (Radio Data System).
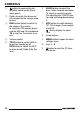
Radio mode ............................ 35 Switching to radio mode ................ 35 Convenient RDS functions ............. 35 Selecting the waveband / memory bank ................................. 36 Tuning into a station ....................... 36 Setting the sensitivity of station seek tuning .................................... 37 Storing stations ............................. 37 Storing stations automatically (Travelstore) .................................. 37 Listening to stored stations ...........
NOTES AND ACCESSORIES Thank you for choosing a Blaupunkt product. We hope you enjoy using this new piece of equipment. Please read these operating instructions before using the equipment for the first time. The Blaupunkt editors are constantly working on making the operating instructions clearer and easier to understand. However, if you still have any questions on how to operate the device, please contact your dealer or the telephone hotline for your country.
DETACHABLE CONTROL PANEL Note: ● Never drop the control panel. ● Never expose the control panel to direct sunlight or other heat sources. ● Avoid direct skin contact with the control panel’s electrical contacts. If necessary, clean the contacts with a lint-free cloth and some alcohol. Attaching the control panel ➮ Hold the control panel at approxi- Detaching the control panel ➮ Press the button 1.
CONTROL PANEL Note: When attaching the control panel, make sure you do not press the display. If the device was still switched on when you removed the control panel, it will automatically switch on with the last settings activated (i.e. radio, CD, CD changer or AUX) when the panel is replaced. ● Off timer After you detach the control panel, the device will switch off after a preset time period. You can set this time to between 0 and 30 seconds. ➮ Press the MENU button 9.
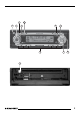
Switching on by inserting a CD If the device is switched off and there is no CD present in the drive, ➮ press the button 1. The flip-release panel opens. ➮ Gently insert the CD with its printed side uppermost into the drive until you feel some resistance. The drive draws in the CD automatically. You must not hinder or assist the drive as it draws in the CD. ➮ Gently close the control panel whilst exerting a little pressure until you feel it click into place. The device switches on and starts playing the CD.
ADJUSTING THE VOLUME When you have finished making your changes, Switching the confirmation beep on/off ➮ press the MENU button 9 twice. The system will output a confirmation beep for some functions if you keep a button pressed down for longer than two seconds, for instance, when assigning a radio station to a station preset button. You can switch the beep on/off. Instantaneously decreasing the volume (mute) You can instantaneously decrease the volume (mute) to a level preset by you.
ADJUSTING THE VOLUME Note: ● You can use the volume control 4 to adjust the volume of a telephone call whilst the call is being outputted by the sound system. or ➮ press the SRC ( ) button 7 repeatedly until the memory bank (e.g. “FM1”) appears in the display. Convenient RDS functions The convenient RDS functions AF (Alternative Frequency) and REGIONAL extend your radio’s range of functions.
RADIO MODE Note: ● REGIONAL must be activated/deactivated separately in the menu. Tuning into a station Switching REGIONAL on/off ➮ Press the MENU button 9. ➮ Press the or button 8 repeatedly until “REG” appears in the display. “OFF” or “ON” is displayed alongside “REG”. ➮ To switch REGIONAL on/off, press the or button 8. ➮ Press the MENU button 9.
Note: ● Any stations that were previously stored in this memory bank are deleted in the process. The display shows the currently set sensitivity level. “SENS HI6” means that the tuner is set to the highest sensitivity setting. “SENS LO1” means it is set to the lowest sensitivity setting. ➮ Set the sensitivity level that you buttons 8. want using the When you have finished making your changes, ➮ press the MENU button 9. Note: ● You can set different sensitivity levels for FM and MW or LW (AM).
RADIO MODE Scanning begins. “SCAN” appears briefly in the display followed by a flashing display of the current station name or frequency. Cancelling SCAN and continuing listening to a station ➮ Press the MENU button 9. Scanning stops and the radio continues playing the station that it tuned into last. Setting the scanning time ➮ Press the MENU button 9. ➮ Press the or button 8 repeatedly until “SCAN TIME” appears in the display. ➮ Set the scanning time that you buttons 8.
Selecting a programme type and starting seek tuning ➮ Press the or button 8. The current programme type appears in the display. ➮ Press the MENU button 9. ➮ If you want to select another pro- Configuring the display gramme type, you can do so by pressing the or button 8 whilst this display is visible. The selected programme type appears briefly in the display. In radio mode you have the option of displaying the waveband together with the memory location and the time or the station name.
TRAFFIC INFORMATION Traffic information Your device is equipped with an RDSEON receiver. EON stands for Enhanced Other Network. Whenever a traffic announcement (TA) is broadcast, the system switches automatically from a station that does not provide traffic reports to the appropriate traffic information station within the broadcasting network that does. Once the traffic report has been played, the system will switch back to the programme that you were listening to before.
Note: ● If the ignition was switched off before you inserted the CD, you will first have to switch on the device by pressing button 2 in order to start playing the CD. To quickly select tracks backwards or forwards, ➮ press and hold down one of the / buttons 8 until fast-reverse / fast-forward track selection begins. ENGLISH FRANÇAIS ITALIANO Fast track selection NEDERLANDS If there is no CD inserted in the drive, ➮ press the button 1. The flip-release panel opens.
CD MODE Scanning tracks (SCAN) You can briefly play all the tracks on the CD. ➮ Press and hold down the MENU Pausing playback (PAUSE) ➮ Press the 3 button :. “PAUSE” appears in the display. button 9 for longer than two seconds. The next track will then be played briefly. Cancelling pause Note: ● You can set the scanning time. For further details, please read the section entitled “Setting the scanning time” in the “Radio mode” chapter.
➮ Press the MENU button 9. ➮ Press the or button 8 repeatedly until “CD TEXT” appears in the display. ➮ Switch the CD text function on Note: ● If a CD is ejected, the drive will automatically draw it back in again after 10 seconds. ● You can also eject CDs whilst the device is switched off or whilst another audio source is activated. FRANÇAIS (“TEXT ON”) or off (“TEXT OFF”) using the or button 8.
CD-CHANGER MODE CD-changer mode Configuring the display Note: ● Information on handling CDs, inserting CDs and operating the CD changer can be found in the operating instructions supplied with your CD changer.
To play the tracks on the current CD in random order, ➮ briefly press the 5 MIX button :. “MIX CD” appears briefly and MIX lights up in the display. To play the tracks on all inserted CDs in random order, ➮ press and hold down the 5 MIX button : for longer than two seconds. “MIX ALL” appears briefly and MIX lights up in the display. Note: ● You can set the scanning time. For further details, please read the section entitled “Setting the scanning time” in the “Radio mode” chapter.
CLOCK - TIME To briefly display the clock time, or button 8 to switch between the modes. When you have finished making your changes, ➮ Press and hold down the SRC ( ) ➮ press the MENU button 9. ➮ Press the CLOCK - Time Displaying the clock time button 7 until the clock time appears in the display. Setting the clock time To set the clock time, ➮ press the MENU button 9. ➮ Press the or button 8 repeatedly until “CLOCK SET” appears in the display. ➮ Press the button 8.
“BASS” appears in the display. or button 8 to adjust the balance (right/left). When you have finished making your changes, ➮ Press the ➮ press the AUDIO button 6. Adjusting the front/back volume distribution (fader) or button 8 to adjust the bass. When you have finished making your changes, To adjust the front/back volume distribution (fader), ➮ press the AUDIO button 6. “BASS” appears in the display. Adjusting the treble ➮ Press the AUDIO button 6. ➮ Press the “BASS” appears in the display.
SOUND X-BASS Equalizer presets X-BASS This device is equipped with an equalizer that has been preset with settings for the “ROCK”, “POP” and “CLASSIC” music styles. To select an equalizer preset, The X-BASS feature can be used to boost the bass at low volume levels. ➮ press the AUDIO button 6. “BASS” appears in the display. button 8 repeatedly until “POP”, “ROCK”, “CLASSIC” or “OFF” appears in the display.
➮ press the MENU button 9 twice. DEUTSCH ENGLISH FRANÇAIS ITALIANO or button 8 to switch between “PEAK ON” and “PEAK OFF”. When you have finished making your changes, ➮ Press the ➮ Press the MENU button 9. “MENU” appears in the display. or button 8 repeatedly until “DIM DAY” or “DIM NIGHT” appears in the display. ➮ Press the or button 8 to switch between the brightness levels. When you have finished making your changes, ➮ Press the ➮ press the MENU button 9 twice.
SPECIFICATIONS EXTERNAL AUDIO SOURCES External audio sources Specifications Instead of connecting a CD changer, you can connect another audio source equipped with a line output. Audio sources can, for example, be portable CD players, MiniDisc players or MP3 players. The AUX input must be activated in the menu. If you want to connect an external audio source, you will need an adapter cable. You can obtain this cable (Blaupunkt no.: 7 607 897 093) from your authorised Blaupunkt dealer.
Service-Nummern / Service numbers / Numéros du service aprèsvente / Numeri del servizio di assistenza / Servicenummers / Telefonnummer för service / Números de servicio / Número de serviço / Servicenumre Country: Phone: Fax: WWW: http://www.blaupunkt.