In Car Entertainment Multimedia 7 607 003 531 Aspen IVDM-7003 Chicago IVDM-7003 7 607 004 504 Operating Instructions BA IVDM-7003 Teil 1 GB 1 www.blaupunkt.com 03.02.
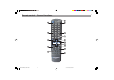
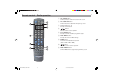
Remote control – General functions 1 31 2 29 6 8 27 10 11 12 25 13 15 23 18 BA IVDM-7003 Teil 1 GB 2 03.02.
Remote control – General functions 1 MUTE button Press once to mute the car sound system Press again to cancel mute G TILT - / + buttons Tilt monitor forward with - button Tilt monitor backward with + button 2 OPEN/CLOSE button Open or close the monitor I LCD button Select the colour of the display illumination 6 DISP / WALLPAPER button Monitor closed: Toggle between time display and display of active signal source Monitor open: Change the wallpaper K SRC button Select the signal source On the se
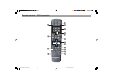
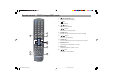
Remote control – DVD operation 3 30 4 5 6 7 28 9 11 12 14 24 16 17 21 BA IVDM-7003 Teil 1 GB 4 19 03.02.
Remote control – DVD operation 3 TA / AUDIO button Select playback language E REPEAT button Repeat a chapter or title 4 AF / SUBTITLE button Select the language of the subtitles or hide the subtitles H RDS / MENU button Call and exit the DVD main menu 5 Number buttons 0 - 9 Enter the title and chapter number L / button Select a chapter up/down 6 DISP / WALLPAPER button Call and exit the DVD menu N 7 / PLAY/PAUSE button Pause and restart playback REG / ANGLE button Select the camera perspect
Remote control – Radio operation 3 30 3 TA / AUDIO button Switch priority for traffic announcements on/off 4 AF / SUBTITLE button Switch AF function (Alternate Frequency) on/off 5 Number buttons 1 - 6 Call up stored stations > / buttons Manual station search up/down @ PTY / ZOOM button Call up a list with available programme types H RDS / MENU button Call up the menu for RDS settings J BAND button Select the waveband/memory bank (FM1 > FM2 > FM3 > MW) L / buttons Automatic station search
Remote control – CD/CD changer/MP3 mode 7 / PLAY/PAUSE button Pause and restart playback 9 button Stop playback ; / buttons Scroll file list up/down / buttons Select CD or folder up/down 28 7 < ENTER button Call up the file selected in the file list via scrolling 9 > / buttons Fast scan forward/back D SCAN button Scan and play tracks or files for approx.
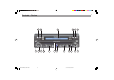
Controls – Device 32 33 48 47 46 45 BA IVDM-7003 Teil 1 GB 8 34 42 44 43 35 36 37 42 41 40 03.02.
Controls – Device P SRC button Select the signal source Q NAVI button Select the navigation mode (only with connected navigation system, e.g.
Safety notes Road safety Failure to observe traffic may result in serious accidents. To avoid any distraction from the traffic, observe the following items: • Familiarise yourself with the operation of the Aspen/Chicago IVDM-7003 before driving. • Operate the Aspen/Chicago IVDM-7003 while driving only if the traffic situation allows it. In case of doubt, stop at a suitable location and operate the Aspen/Chicago IVDM-7003 while the vehicle is standing.
Contents Controls – Remote control ............................................ 2 Controls – Device ........................................................... 8 Safety notes .................................................................. 10 User notes ..................................................................... 14 Safety precautions ................................................................. Care instructions for CDs/DVDs ........................................... Usable media ..........
Contents DVD operation .............................................................. 35 CD-changer mode ........................................................ 46 DVD menu ............................................................................................ 35 Touch screen menu in DVD mode ........................................................ 35 Switching to DVD mode ........................................................................ 36 Starting playback ..............................
Contents Setup menu ................................................................... 56 User setup ............................................................................... 74 Setup menu ........................................................................................... 56 Selecting the setup menu ..................................................................... 56 Performing settings in the setup menu ................................................. 57 Changing the password .......
User notes Thank you for choosing a Blaupunkt product. We hope you enjoy using this new piece of equipment. Please read these operating instructions before using the equipment for the first time. The Blaupunkt editors are constantly working on making the operating instructions clearer and easier to understand. However, if you still have any questions on how to operate the device, please contact your dealer or the telephone hotline for your country.
User notes Care instructions for CDs/DVDs Not the following comments with respect to the read quality: If a CD/DVD becomes soiled, never clean it in a circular motion; instead, use a soft, lint-free cloth and wipe from the inside to the outside. For extreme soiling, we recommend immersing the CD/ DVD in a solution with commercial liquid detergent. Once again, please do not wipe the CD/DVD in a circular motion; instead, always clean from the inside to the outside and let it dry.
User notes Region code License The Aspen/Chicago IVDM-7003 and the DVDs are labelled with the region code that is applicable for the pertinent country. Manufactured under license of Dolby Laboratories. “Dolby”, “Pro Logic” and the double-D symbol are trademarks of Dolby Laboratories. This product contains technologies that are copyright-protected under certain US-American patents. The copyrights are property of Macrovision Corporation and other copyright owners.
Notes about these instructions These instructions describe the functions of the Aspen/Chicago IVDM-7003 and are intended to familiarise you with its operation. Read these instructions before starting up the device. To help you in quickly locating information, the following symbols are used in these instructions: Safety and warning notes contain important information concerning the safe usage and point to accident sources. 1. Marks instructional steps to be performed to reach the goal of an action.
Theft protection The device is equipped with a detachable control panel (fliprelease panel) as theft protection and a four-digit device code. ✔ Detachable control panel Protect your device against theft by taking the control panel with you whenever you leave your vehicle. Do not leave the control panel inside the vehicle - not even in a hiding place. The device is worthless to a thief without this control panel. After removing the control panel from the device, device switches off after approx.
Theft protection Activating the device code Switching on coded devices after a voltage interruption In addition to a detachable control panel, the device is equipped with a four-digit device code. The device code is set to 0000 at the factory. With this setting, the coding is not active and the device can be switched on without code query after a voltage interruption. If a coded device is switched on after disconnecting the battery voltage, e.g. in case of a repair to the vehicle, the code query appears.
Introduction This chapter contains a description of the most important basic functions. Note: The monitor is automatically opened at switchon if this function was activated in the setup menu. For further details, read the section “Configuring the monitor position” in the chapter “Setup menu”. If the monitor was closed at switch-off, it remains in this position after switch-on. Operating options Several options are available to operate the Aspen/Chicago IVDM7003.
Introduction Inserting a CD/DVD Ejecting a CD/DVD 1. Push the CD/DVD into the CD/DVD tray with the printed side facing up. 1. ✔ The drive automatically pulls in the CD/DVD. Press the button on the device. Note: You must not hinder or assist the drive as it draws in the media. EJECT LOADING EJECT Eject display with closed monitor LOADING Load display with closed monitor ✔ ✔ 2. The CD/DVD is ejected. Carefully remove the CD/DVD.
Introduction Adjusting the volume Activating mute 1. On the device: To increase the volume, press the VOL + button. To decrease the volume, press the VOL - button. 1. On the remote control: To increase the volume, press the button. VOL button. To decrease the volume, press the VOL ✔ Playback is muted. ✔ button on the device flashes and the bottom of the The monitor displays “MUTE” B.
Introduction Closing/opening the monitor 1. On the device: Press the Selecting the signal source / CLOSE button. 1. On the remote control: Press the OPEN/CLOSE button. ✔ The monitor is closed or opened. Setting the monitor tilt 1. On the monitor: Touch the center of the monitor to call up the touch screen menu. Touch the button of the desired signal source A. DVD On the remote control: Press the TILT - button to tilt the monitor forward by one increment.
Introduction Sound settings Selecting and setting sound effects: The following sound settings are possible: On the monitor: Aspen IVDM-7003 1. Bass -7 … -1 < 0 > +1 … +7 Touch the center of the monitor to call up the touch screen menu. 2. Touch the ✔ The sound effects menu appears on the display.
Introduction On the remote control: Switching the Downmix mode on/off 1. Press the SOUND / DSP button. ✔ The sound effects menu appears on the display. If the Downmix mode is activated, the multi-channel surround signal is transferred into a conventional stereo signal. Audio Effect Control ProLogic2 OFF SFC OFF DownMIX OFF ProLogic Studio 1. On the remote control: Press the DOWNMIX button to activate the downmix mode. 2. Press the button again to deactivate the downmix mode.
Introduction Show/hide the image of a back-up camera Automatic through connection of telephone calls A back-up camera (optional equipment) can be connected to the Aspen/Chicago IVDM-7003. The camera image is automatically displayed when the reverse gear is selected if the back-up camera was connected to the device as described in the installation instructions. In the setup menu you can configure whether you want to display the image of the back-up camera as horizontal mirror.
Radio mode Radio menu 92 94 100 104 Touch screen menu in radio mode RADIO STATIOn Info R·D·S AF TA REG PTY TP 1. Radio 21 FM1 2. NDR 2 Radio 21 A DVD B C RADIO CD - C A AUX UX 1 A AUX UX 2 NAVI NA R·D·S AF TA REG 1. Radio 21 FM1 2. NDR 2 A TP Radio 21 B 3. Antenne 3. Antenne 4. ffn 4. ffn 5. 89.0 RTL 5. 89.0 RTL D 6. N–JOY 6.
Radio mode Switching to radio mode On the monitor: 1. 1. Touch the ✔ The RDS menu is displayed at the bottom of the monitor. On the monitor: Touch the center of the monitor to call up button to switch the touch screen menu. Touch the to radio mode. RADIO On the device or on the remote control: Press the SRC button until the radio menu is displayed. ✔ 92 94 100 104 AF TP RADIO 21 F1 10580 button on the touch screen menu. RADIO STATIOn R·D·S AF TA REG 1.
Radio mode Switching the RDS function AF (Alternate Frequency) on/off If the RDS function AF (Alternate Frequency) is activated, the device automatically tunes into the best receivable frequency for the station that is currently set. On the monitor: 1. Touch the R·D·S button or touch the touch screen menu. ✔ The RDS menu is displayed at the bottom of the monitor. 2. Select the “AF Set” menu entry with the 3. or button to activate (ON) or deactivate Touch the (OFF) the AF function. 4.
Radio mode Selecting the waveband/memory bank Automatic station search This device can receive programmes broadcast over the FM and AM wavebands. Three memory banks are available for the FM waveband and one memory bank for the AM waveband. Six stations can be stored in each memory bank. 1. Selecting the memory bank or waveband: ✔ 1. On the monitor: Touch the or button repeatedly or touch the BAND button repeatedly on the touch screen menu.
Radio mode Storing stations manually ✔ 18 memory locations are available in the FM waveband (6 on each memory bank) and 6 memory locations in the AM waveband. The device changes to memory bank FM3, if necessary, and automatic storing of stations starts. ✔ After the process is completed, each stored station is played for approx. 3 seconds. The station name is also stored if the RDS function is activated. 1. Select the memory bank FM1, FM2, FM3 or the waveband MW. 2. Tune into the desired station.
Radio mode Station search by programme type Some RDS stations broadcast information about the type of programme broadcast (e.g. news, sports, rock, pop). By using this information, the device perform a directed search for stations of a certain programme type. Selecting the programme type: 1. On the monitor: Touch the screen menu. ✔ Seek tuning starts and the next station with the selected programme type is tuned. ✔ The PTY symbol and the selected programme type are displayed on the monitor A.
Radio mode Traffic information stations Switching traffic announcement priority on/off Traffic information stations are RDS stations broadcasting traffic announcements. If you are listening to a traffic information station, the TP symbol is displayed on the monitor A. The priority for traffic announcements is activated if the display shows the TA symbol B. 92 94 100 104 92 94 100 104 RADIO RADIO STATIOn STATIOn R·D·S AF TA REG 1. Radio 21 R·D·S AF TA REG 1. Radio 21 TP A FM1 2. NDR 2 FM1 2.
Radio mode On the remote control: Cancelling the current traffic announcement 1. Press the RDS / MENU button. ✔ The RDS menu is displayed at the bottom of the monitor. A current traffic announcement can be cancelled if you do not want to listen to it. 2. Select the “TA Set” menu entry with the 3. Press the or button to activate (ON) or deactivate (OFF) the priority for traffic announcements. 4. Press the RDS / MENU button to hide the RDS menu. or button.
DVD operation DVD menu A B Touch screen menu in DVD mode C DVD DVD TITLE 02 CHAP 007 TImE RADIO CD - C A AUX UX 1 A AUX UX 2 NAVI NA A 00:16’35 B C D E Sound Angle OFF 2 English F E M G A B C D E F G Display: Current title Button: Direct selection of title Display: Current chapter Button: Direct selection of chapter Display: Expired playing time Button: Exit DVD menu Display: Playback language Button: Select playback language Display: Subtitle language Button: Select subtitle lan
DVD operation Switching to DVD mode 1. Starting playback On the monitor: Touch the center of the monitor to call up button. the touch screen menu. Touch the DVD On the device or on the remote control: Press the SRC button until the DVD mode is displayed as the signal source. ✔ After an inserted DVD is loaded, either the DVD main menu is displayed or the playback starts. This action is dependent upon the DVD. 1. On the device: Press the The DVD menu is briefly displayed.
DVD operation Selecting a chapter DVD A DVD title can be divided into several chapters. TITLE _ CHAP 007 TImE 00:16’35 Selecting the next chapter: 1. On the monitor: Touch the touch screen menu. button repeatedly on the On the device or on the remote control: Press the repeatedly. button Selecting the previous chapter: 1. On the monitor: Touch the touch screen menu. button repeatedly on the On the device or on the remote control: Press the repeatedly.
DVD operation Fast search To search for a specific section during the playback of a DVD, you can use the fast search function. 1. ✔ 1. On the monitor: Touch the or button on the touch screen menu repeatedly for fast forward or reverse search. On the remote control: Press the forward or reverse search. 2. You found the desired position and want to continue the playback with regular speed. or button for fast On the monitor: Touch the screen menu.
DVD operation Selecting the subtitle language Switching the image format On the monitor: 1. button on the touch screen menu. 1. Touch the ✔ The DVD menu is displayed. 2. To select the desired language of the subtitles or to combutton once or pletely hide the subtitles, touch the several times. Track Pict On the monitor: Touch the button on the touch screen menu. To toggle between wide image 16:9 (WIDE) Wide butand normal image 4:3 (NORMAL), touch the ton.
DVD operation Image settings 5. During playback, you can adjust brightness, colour, contrast, tint and dimmer. EXIT button to end the setting and call up the Use the menu for the image settings again. 6. Touch the 1. Pict On the monitor: Touch the button on the touch Scrn button. screen menu and then touch the ✔ The menu for the image settings is displayed. 2. Select “Brightness”, “Colour”, “Contrast”, “Tint” or “Dimmer” by touching it.
DVD operation Calling the DVD main menu The main menu is stored on the DVD. The selection options offered by the main menu are dependent upon the respective DVD. The main menu of a DVD can offer the following: ● You can select from different languages for the playback or for the subtitles. ● A movie is divided into several sequential chapters. You can select a chapter and directly start the playback. On the monitor: 1. ✔ Touch the then touch the Menu button on the touch screen menu and button.
Audio CD mode Audio CD menu Touch screen menu in Audio CD mode A AUDIO - CD Audio–CD K TRACK 01 TImE 00:02’35 NORMAL No Title 1 Track 1 B A AUX UX 1 A AUX UX 2 NAVI NA NORMAL B 2 Track 2 3 Track 3 5 Track 5 TEXT 13:05 C 3 Track 3 E F G 4 Track 4 D 5 Track 5 E Sound L Setup Rear K J Disp H Func G F A Display: Currently playing track B Display: Expired playing time A Selecting the signal source C Display: Playback mode (Normal, Repeat, Scan, Mix) B Start/inte
Audio CD mode Activating the audio CD mode 1. Exiting playback On the monitor: Touch the center of the monitor to call up button. the touch screen menu. Touch the 1. AUDIO - CD On the device or on the remote control: Press the SRC button until the Audio CD menu is displayed. ✔ The track selected last is playing. Note: When you insert an audio CD, the device automatically switches to Audio CD mode. Track 1 of the inserted CD is playing. Selecting the next track: 1. 1.
Audio CD mode Fast search To search for a specific section during the playback of a track, you can use the fast scan function. 1. ✔ 1. On the monitor: Touch the or button on the touch screen menu repeatedly for fast forward or reverse search. On the remote control: Press the forward or reverse search. 2. You found the desired position and want to continue the playback with regular speed.
Audio CD mode Random track play (MIX) Scanning all tracks (Scan) The Mix function plays the tracks of a CD in random order. The Scan function plays all the tracks of the CD in sequential order for approx. 10 seconds each. 1. Func button on the touch On the monitor: Touch the Mix button. screen menu and then touch the + 1. On the device: Press the 5 / MIX button. On the device: Press the 6 / SCAN button. On the remote control: Press the MIX button.
CD-changer mode CD changer menu Touch screen menu in CD changer mode A DVD CD–C TRACK TImE 01 00:00’35 NORMAL 1. TRACK 1 CD1 2. TRACK 2 B RADIO CD - C A AUX UX 1 A AUX UX 2 CD1 2. TRACK 2 B 3. TRACK 3 E F 3. TRACK 3 H 5. TRACK 5 6. TRACK 6 5 5. TRACK 5 D 6. TRACK 6 5 E Sound 13:05 C 4. TRACK 4 4.
CD-changer mode CD changers Interrupting playback (pause) The following Blaupunkt CD changers can be connected: CDC A03, CDC - A08 and IDC - A09. Playback can be interrupted and restarted. 1. Notes: How to fill the magazine with CDs and insert the magazine in the changer is described in the instructions of your CD changer. On the device: Press the press the button again. If the magazine was newly inserted, all CDs in the magazine are loaded once (magazine scan).
CD-changer mode Selecting tracks on the currently playing CD Repeating tracks (Repeat) Selecting the next track: The Repeat function is used to repeatedly play the current track or the current CD. On the monitor: Touch the button repeatedly or touch button repeatedly on the touch screen menu. the On the device or on the remote control: Press the repeatedly. button Selecting the previous track: 1. The selected Repeat function is displayed on the monitor.
CD-changer mode Random track play (MIX) Scanning all tracks (Scan) The Mix function plays the tracks of the current CD or all CDs in the magazine in random order. The Scan function plays all the tracks of the current CD or all CDs in the magazine in sequential order for approx. 10 seconds each. The selected Mix function is displayed on the monitor. The selected Scan function is displayed on the monitor.
MP3 CD mode MP3 CD menu Touch screen menu in MP3 CD mode A MP3 CD–MP3 K FILE 001 TImE 00:02’44 NORMAL Kuschelrock 1 Abba - I have a B A AUX UX 2 NAVI NA NORMAL B 13:05 I have a dream C 3 Art Garfunkel 3 Art Garfunkel 5 B.O.N - Take my F G 4 Austria 3 - Weu D 5 B.O.
MP3 CD mode Activating the MP3 CD mode 1. Exiting playback On the monitor: Touch the center of the monitor to call up button. the touch screen menu. Touch the 1. MP3 On the device or on the remote control: Press the SRC button until the MP3 CD menu is displayed. ✔ button on the touch On the remote control: Press the button. Selecting folders The file played last is playing. Note: When you insert an MP3 CD, the device automatically switches to MP3 CD mode. Selecting the next or previous folder: 1.
MP3 CD mode Scrolling up/down in file list: Repeating files (Repeat) 1. The Repeat function is used to repeatedly play the current file or the current folder. The selected Repeat function is displayed on the monitor. On the remote control: Press the or button repeatedly. To confirm the selected file, press the ENTER button. REPEAT REPEAT NORMAL Fast search To search for a specific section during the playback of a file, you can use the fast search function.
MP3 CD mode Random play of files (MIX) Scanning all files (Scan) The Mix function plays the files of the current folder or all folders on the CD in random order. The Scan function plays all the files of the current folder or all folders on the CD in sequential order for approx. 10 seconds each. The selected Mix function is displayed on the monitor. The selected Scan function is displayed on the monitor.
External sources Add-on equipment Selecting a connected device as signal source. Two external audio/video sources can be connected to the AUX inputs of the Aspen/Chicago IVDM-7003. If the AUX inputs are activated in the setup menu, they can be selected as signal source. For further details, please read the section “Selecting the external signal source” in the chapter “Setup menu”. 1. Alternatively, the signal converter IVSC-3302 or IVSC-5502 can also be connected to the Aspen/Chicago IVDM-7003.
External sources Navigation system 2. If a navigation system (e.g. TravelPilot EX-V) is connected to the Aspen/Chicago IVDM-7003, you can display the navigation screen on the monitor. Note: To allow for dynamic destination guidance (automatic traffic jam detours), the navigation system must be connected to a suitable TMC source. 1. On the monitor: Touch the screen menu. NAVI button on the touch On the device or on the remote control: Press the NAVI button.
Setup menu Setup menu Selecting the setup menu A Language E The setup menu of the Aspen/Chicago IVDM-7003 offers a variety of options to customise the device. 1. AUDIO ENG FRE SPA OTHERS SUB–TITLE ENG FRE SPA OTHERS MENU ENG GER FRE ITA OFF ✔ SPA Setup button on the touch On the remote control: Press the SETUP button. B D On the monitor: Touch the screen menu. The DVD setup menu is displayed.
DVD setup menu Performing settings in the setup menu DVD setup The settings in the setup menu can be performed using the buttons of the setup menu or the buttons of the remote control. Selecting a language The detailed information about the individual menus contain only descriptions of the operation via buttons. The following overview features a description of the principal operation using the buttons of the remote control. It allows you to perform all the settings in the setup menu.
DVD setup menu 2. 3. 4. Select by touching “AUDIO” (playback language), “SUB-TITLE” (subtitle) or “MENU” (language of menu texts). Perform the setting by touching the desired menu entry. Touch the EXIT Touch the 2. Touch the ✔ The DVD “Display” submenu is displayed. button to confirm the setting. Repeat steps 2 - 4 to perform additional settings, or 5. touch the EXIT Setup button.
DVD setup menu Setting the parental control level 1. Touch the You can set the parental control level so that children can view only movies that are age appropriate. If a DVD features a higher parental control level, it can be played only after entering the password. 2. Touch the ✔ The DVD “Parental Control” submenu is displayed. 3. Activate “LEVEL” by touching it. Note: Not all DVDs support the parental control feature. Setup button on the touch screen menu. button.
AUDIO setup menu Audio setup Setting Dolby ProLogic 2 (Chicago IVDM-7003 only) Setting the input level for external audio sources 1. Touch the Setup button on the touch screen menu and button. then touch the Touch the Setup button on the touch screen menu and button. then touch the 2. Touch the The “Input Level” AUDIO submenu appears. ✔ The “Audio Effect Control” AUDIO submenu is displayed. 3. Activate “ProLogic2” by touching it. 1. ✔ button.
AUDIO setup menu Setting environment audio effects (Chicago IVDM-7003 only) 1. Touch the Setup button on the touch screen menu and button. then touch the 2. Touch the ✔ The „Audio Effect Control“ AUDIO submenu is displayed. 3. Activate “SFC” (environment audio effects) by touching it. button. Setting bass and treble (Aspen IVDM-7003 only) 1. Touch the Setup button on the touch screen menu and button. then touch the 2. Touch the ✔ The “Audio Effect Control” AUDIO submenu is displayed.
AUDIO setup menu Setting the speaker balance Downmix function (Aspen IVDM-7003) 1. Touch the then touch the 2. Touch the ✔ The “Audio Effect Control” AUDIO submenu is displayed. The downmix function in the audio setup’s “Audio Effect Control” submenu is used to control the downmix mode for the audio/video outputs (VIDEO 1 OUT, VIDEO 2 OUT) and loudspeaker/ preamp outputs. Setup button on the touch screen menu and button. button.
AUDIO setup menu 1. Touch the Setup button on the touch screen menu and button. then touch the 2. Touch the ✔ The “Audio Effect Control” AUDIO submenu is displayed. 3. Activate “DownMIX” (tow-zone mode) by touching it. button. Audio Effect Control BASS +0 TREBLE +0 BALANCE +0 FADER +0 Downmix function (Chicago IVDM-7003) The downmix function on the remote control is used to control the downmix mode for the loudspeaker/preamp outputs.
AUDIO setup menu 7-band equaliser (Chicago IVDM-7003 only) Audio Effect Control ProLogic2 OFF SFC OFF DownMIX OFF ProLogic Studio The Chicago IVDM-7003 model features a 7-band equaliser which allows you to optimise the music sound to your vehicle or to optimise the music style. Six sound presettings and one customised setting (USER) are available for this purpose. The linear setting (FLAT), which cannot be changed, deactivates the equaliser.
AUDIO setup menu 1. Touch the Setup button on the touch screen menu and button. then touch the 2. Touch the ✔ The “Speaker Setup” AUDIO submenu is displayed. 7Band Equalizer 7EQ ITEM BALLAD button. +6 Speaker Setup 0 –6 75 150 400 1K 2.4K 6K 15K CENTER ON OFF SUB WOOFER ON OFF NEXT EXIT 6. Adjust the level of the frequency band to the desired value / buttons. with the 7. To change the level of additional frequency bands, move / buttons. the selection mark with the 8.
AUDIO setup menu Speaker setup (Chicago IVDM-7003) The Chicago IVDM-7003 can be set according to the playback frequency ranges of the connected speakers. Before performing the settings, check which speakers (except for the subwoofer) can produce low frequencies. 3. Select “FRONT” (front speaker), “REAR” (rear speaker), “CENTER” (center speaker) or “SUB WOOFER” by touching it. 4. Perform the setting by touching the desired speaker setting.
AUDIO setup menu Setting a delay time 4. You can set a delay time in milliseconds for the center and rear speakers. This simulates a greater distance to the respective speakers. 5. To confirm the setting, touch the 6. Repeat steps 3 - 5 to perform additional settings, or 6. Touch the Note: For the Aspen IVDM-7003, the delay time can be set only if you called the setup menu in DVD mode. The setting affects only the DVD mode. 1. Touch the Setup button on the touch screen menu and button.
AUDIO setup menu 3. Select “FRONT L/R” (left/right front speaker), “REAR L/R” (left/right rear speaker), “CENTER” (center speaker) or / buttons “SUB WOOFER” by touching it. The can be used to scroll back and forth in the menu. Note: Deactivated speakers cannot be selected. For instructions, please read the section “Speaker setup” in this chapter. 4. 1. 2. First, touch the ✔ The “Dynamic Range” AUDIO submenu is displayed. To confirm the setting, touch the 6.
AUDIO setup menu Setting volume decrease for voice output 3. Activate “RESIDUAL” (residual value) by touching it. If a navigation system is connected, the voice output of the navigation system is mixed with the sound of the currently set signal source. In the process, the volume of the signal source is decreased. The percentage decrease of the volume can be adjusted. 4. Repeatedly touch to the left or right of the scale to adjust the desired volume difference. 5.
SCREEN setup menu 3. Touch the desired speaker. Note: Deactivated speakers cannot be selected. For instructions, please read the section “Speaker setup” in this chapter. ✔ A test sound is emitted from the selected speaker for approx. 3 seconds. 4. Repeat the check for the other speakers. 5. Touch the EXIT button twice to exit the test. Monitor setup Setting the monitor position Set the monitor tilt so that you have the best possible view of the screen. The monitor can be set to two positions.
SCREEN setup menu 3. Select “TILT” (monitor tilt), “POSITION” or “OPEN/CLOSE” by touching it. 4. Touch the desired setting. Control Note: The setting “+2” for the monitor tilt cannot be selected if “BACKWARD” was set for the position and vice versa. button. 5. To confirm the setting, touch the 6. Repeat steps 3 - 5 to perform additional settings, or 6. Touch the EXIT EXIT Brightness +0 Color +0 Contrast +0 Tint +0 button to exit the menu.
SCREEN setup menu Activating/deactivating the touch screen monitor Deactivating the touch screen monitor: Before the screen can respond to the touch of a finger, the function must be activated (ON). With deactivated function (OFF), the device can be operated only with the buttons of the remote control and the buttons on the front of the device. 1. Touch the 2. Touch the 3. Touch the ✔ The “Touch Screen” SCREEN submenu is displayed. Activating the touch screen monitor: 1.
SCREEN setup menu Setting the touch position 8. This setting is required if the display position on the monitor and the touch position on the monitor do no longer match. This may be required after operating the device for several years. Sequentially touch the fields at the bottom left and right on the monitor. ✔ This concludes the setting and the “Touch Screen” submenu is displayed again. button on the touch screen menu. 1. Touch the 2. Touch the 3.
USER setup menu User setup 3. Activate “OLD CODE” (old password) by touching it. Changing the password 4. You must change the password (0000 in the delivery state) to protect your device against theft. The password is queried if the device is to be operated again after an interruption of the supply voltage. To change the password, first enter the current password using the buttons 0 to 9 and confirm the entry with the OK button. 5.
USER setup menu 5. Selecting the wallpaper You can select the wallpaper to be displayed in radio, MP3, audio CD and CD changer mode. Touch a memory location (IMG1 - IMG7) to activate the preview mode. Note: The automatic image change should be deactivated for this operation. For instructions, please read the section “Automatic image change” in this chapter. button on the touch screen menu. 1. Touch the 2. Sequentially touch the 3. Touch the ✔ The “Image Manager” USER submenu is displayed.
USER setup menu Automatic image change Deleting wallpapers If image change is activated, the wallpaper changes with every track played by an audio or MP3 CD. In radio mode, the wallpaper changes approx. every five minutes. Proceed as follows to delete stored images: button on the touch screen menu. 1. Touch the 2. Sequentially touch the 3. Touch the ✔ The “Image Manager” USER submenu is displayed. Setup , and button. button. 1. Touch the 2. Sequentially touch the 3.
USER setup menu Loading wallpapers You can also load your own wallpaper into the device from a CDROM. The software required for this purpose is located on the enclosed CD-ROM. IMAGE1 RETURN WALLPAPER 1. Create a download CD according to the programme instructions. Use a CD-R blank for this purpose. 2. Insert the download CD into the CD tray. ✔ The download menu appears after a few seconds. CLEAR Image Download 6. Select the wallpaper to be deleted with the 7. Touch the “CLEAR” entry.
USER setup menu You have the following options: 1. If you want to delete the displayed image, select the “CLEAR” entry and press the ENTER button. ✔ A confirmation dialogue appears. 2. Confirm with “YES” and “OK” by pressing the ENTER button. Or 1. If you want to replace the displayed image with a new image, select the “UPDATE” entry and press the ENTER button. ✔ A list with the images stored on the download CD is displayed. FILE–001 STORE 3.
USER setup menu Setting date and time 6. Touch the You can set the date, the time format (12/24 hours) and the time. In audio sources, the time is displayed at the bottom right of the monitor. 7. Repeat steps 4 - 6 to perform additional settings, or 7. touch the button on the touch screen menu. 1. Touch the 2. Sequentially touch the 3. Touch the ✔ The “Adjust Date & Time” USER submenu is displayed. Setup , and button. button.
USER setup menu 1. Touch the Setup button on the touch screen menu. 2. Sequentially touch the 3. Touch the ✔ The “External Source Setup” USER submenu is displayed. , and button. button. External Source Setup REVERSE ON OFF AUX1 ON OFF AUX2 ON OFF MONITOR1 AUTO DISC RADIO CDC MONITOR2 AUTO DISC RADIO CDC Factory settings You can reset the Aspen/Chicago IVDM-7003 to the standard values (factory setting).
USER setup menu 4. Activate “RESET” by touching it. 5. Touch the “Load Default Config” entry. ✔ The password entry menu appears. 6. Enter the four-digit password using the buttons 0 to 9 and confirm the entry with the OK button. 7. Switch the device off and on again. ✔ All settings performed by you (except for password, date and time) are returned to the factory settings.
Glossary CD text ID3 tag Information on an audio CD that may contain the following data: Identification in an MP3 file that may contain the following data: - Name of track - Name of track - Name of artist - Name of artist - CD name - Name of volume on which the title was released - Year of release Dolby Digital - Music type The digital multi-channel technology Dolby Digital operates with up to 6 channels, thereby offering a true impression of spatial depth and close reality.
Specifications Control panel / Monitor Output power: System: NTSC/PAL auto switch Power supply: 10.8 - 16.0 volt Current consumption max: 5A Standby: 7.3 mA Operating temperature: -20 °C - +70 °C 4 x 16 watt sine according to DIN 45 324 at 14.4 V 4 x 45 watt max. power Center speaker (Chicago IVDM-7003 only): 1 x 12 watt sine according to DIN 45 324 at 14.4 V 1 x 25 watt max. power Storage temperature: -30 °C - +80 °C Screen size (diagonal): 7" (17.
DVD language code table 6566 Abkhazian 7587 Cornish 7285 Hungarian 7684 Lithuanian 8073 Pali 8476 Tagalog 6565 Afar 6779 Corsican 7383 Icelandic 7775 Macedonian 8065 Panjabi 8489 Tahitian 6570 Afrikaans 7282 Croatian 7378 Indonesian 7771 Malagasy 7065 Persian 8471 Tajik 8381 Albanian 8372 Croatian 7365 Interlingua 7783 Malay 8076 Polish 8465 Tamil 6577 Amharic 6783 Czech 7369 Interlingue 7776 Malayalam 8084 Portuguese 8484 Tatar 6582 Arabic 6865 Danish 7385 Inuktitut 778
Country: Germany Austria Belgium Denmark Finland France Great Britain Greece Ireland Italy Luxembourg Netherlands Norway Portugal Spain Sweden Switzerland Czech. Rep.