
Operation Manual


21
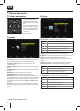
What is included in the box
Supply of this TV includes following parts:
DVD MENU
DVD SETUP
GOTO
A-B
MENU
SOURCE
EXIT
OK
VOL
CH
FAV
DTV
USB
DVD
7
8
9
S.MODE
0
1
2
3
4
5
6
SLEEP
AUDIO
TEXT
ANGLE
REPEAT
DISPLAY
REC LIST
ASPECT
SUBTITLE
TV
GUIDE
P.MODE
RADIO
INFO
TEXT
HOLD
TEXT/DVD
ZOOM
PVR / DVD
1x TV 1x Remote control
2x AAA bateries 1x User guide
1x Stand
1x Stand neck
1x RF cable
1 x TV stand instalation
packet
3D glasses *
Attaching the Stand
Please follow the instructions in the Stand installation
lea et, located in the accessories bag.
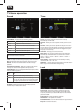
Wall mounting the TV
This television requires a VESA 100 wall mount,
or equivalent.
1. Remove the four screws highlighted below.
2. The wall mount can now be easily attached to the mounting
holes on the rear of the TV. These holes are indicated in the
picture below.
For optimum viewing, if wall mounting the TV higher than eye
level, the TV should be tilted downwards so that the TV’s screen
is ‘face on’. See g 1 and 2
g 2 g 1
TV
TVTV
Viewing angleViewing angle
CorrectWrong
Viewing angleViewing angle
Important Note
Position the TV close to the wall to avoid the possibility of it
falling when pushed.
The instructions shown below are a safer way to set up the
TV, by fixing it to the wall, avoiding the possibility of it falling
forwards if pulled. This will prevent the TV from falling forward
and causing injury. This will also prevent the TV from damage.
This method is used if the TV is placed on a glass surface or you
do not wish to screw anything into your furniture.
Ensure that children do not climb or hang onto the TV.
For this type of installation you will need a fastening chord
A) Using one/both of the top wall-mounting holes and screws
(the screws are already supplied in the wall mounting holes)
fasten one end of the fastening chord/s to the TV.
B) Secure the other end of the fastening chord/s to your wall.
*- optional