Radio / CD Casablanca CD52 Heidelberg CD52 US version Operating instructions http://www.blaupunkt.
Open here Ouvrir s.v.p.
1 4 3 16 15 5 7 14 8 9 PORTUGUÊS 2 ESPAÑOL 6 13 12 11 10 3 FRANÇAIS ENGLISH
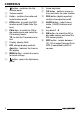
CONTROLS 1 2 3 4 5 6 7 8 9 4 button - unlatches the flip/ release panel Volume control Button - switches the radio and mute function on/off RDS button, to switch the RDS function on/off (Radio Data System).
CD Mode ................................ 15 Starting CD mode ......................... 15 Selecting a track ........................... 15 Quick track selection ..................... 15 Fast search (audible) ..................... 15 Random play (MIX) ........................ 16 Scanning tracks (SCAN) ............... 16 Repeating a track (REPEAT) .......... 16 Interrupting play (PAUSE) .............. 16 Changing the display ..................... 16 Naming CDs .................................
NOTES AND ACCESSORIES Notes and accessories Thank you for deciding to use a Blaupunkt product. We hope you enjoy using this new piece of equipment. Please read these operating instructions before using the equipment for the first time. The Blaupunkt editors are constantly working on making the operating instructions clearer and easier to understand. However, if you still have any questions on how to operate the equipment, please contact your dealer or the telephone hotline for your country.
Amplifier / sub-out (only Casablanca CD52) The car radio provides connections for connecting external amplifiers and a subwoofer. We recommend you use well-matched products from the Blaupunkt or Velocity product ranges. Your car radio is fitted with a flip/release panel to guard against theft. Without this panel, the unit is worthless to the thief. Protect your unit from theft by taking the flip/release panel with you every time you leave the car.
FLIP/RELEASE PANEL ➮ Press the button 1. This unlatches the flip/release panel. ➮ First pull the flip/release panel ● ● ● straight and then to the left out of the unit. After removing the flip/release panel, the unit switches itself off. All the current settings are saved. If there is a CD in the unit, it remains there. Attaching the flip/release panel ➮ Slide the flip/release panel from left to right into the unit guide. ➮ Press the left side of the panel into the unit until it slots into place.
Volume adjustment Mute setting The system volume can be adjusted in steps from 0 (off) to 66 (maximum). This feature enables you to lower the system volume instantaneously (mute). the volume control 2 to the left. Setting the switch-on volume You can set the volume at which you wish the car radio to play when switched on. ➮ Press the MENU button 8. ➮ Press the or button : repeatedly until “ON VOLUME” appears on the display. buttons : to set the switch-on volume.
VOLUME ADJUSTMENT Note: You can adjust the volume for telephone conversations and voice output while they are being heard by using the volume control 2. Automatic Sound (only Casablanca CD52) This function adjusts the volume of your car radio automatically to your driving speed. This requires your device to be connected as described in the installation guide. The automatic volume booster can be set in six stages (0-5). ➮ Press the MENU button 8.
➮ press the FM TS button 5 for FM Automatic seek tuning radio mode. or ➮ press the AM button ? for AM radio mode. Switching the RDS function on/ off ➮ To use the RDS functions, press the RDS button 4. The RDS function is active when RDS lights up in the display with a symbol. Selecting the waveband / memory bank This unit can receive programmes broadcast over the FM and AM wavebands.
RADIO MODE When you have finished making your changes, ➮ press the MENU button 8 or OK ;. Storing stations Storing stations manually ➮ Select the required memory bank (FM1, FM2 or FMT) or the AM waveband. ➮ Tune into the required station. ➮ Press one of the station buttons 1 6 > for longer than two seconds to store the station to that button. Storing stations automatically (Travelstore) You can automatically store the six stations with the strongest reception in the region.
RADIO MODE ➮ If you want to select another pro- Programme type (PTY) Or Besides transmitting the station name, some FM stations also provide information on the type of programme that they are broadcasting. Your radio can receive and display this information. For example, the programme types can be: ROCK CLS_ROCK TOP_40 ADLT_HIT COUNTRY OLDIES SOFT_RCK SPORTS TALK Using the PTY function, you can directly select stations of a particular programme type.
RADIO MODE button : until “HICUT” appears in the display. ➮ Keep pressing the ➮ Press the or button : to ad- just HICUT. “HICUT 0” means that no reduction will be made, “HICUT 3” means a maximum automatic reduction of the treble and interference level will be applied. ➮ Press the MENU button 8 or OK ;. Switching bandwidth during interference (SHARX) The SHARX function allows you to largely avoid interference caused by neighbouring radio stations (FM only).
Risk of damage to CD drive! Single CDs with a diameter of 8 cm and CDs which are not circular (“shape CDs”) should not be used. We accept no liability for any damage to the CD drive that may occur as a result of the use of unsuitable CDs. Starting CD mode If there is no CD in the drive, ➮ Press the button 9. The flip/release panel opens. ➮ Gently insert the CD into the CD compartment with the printed side uppermost until you feel some resistance. The CD will be drawn into the drive.
CD MODE Random play (MIX) ➮ Press the button 5 MIX >. “MIX CD” appears briefly on the display, the MIX symbol lights up. The next track played will be randomly selected. Stopping MIX ➮ Press the button 5 MIX > once again. “MIX OFF” appears briefly on the display, the MIX symbol goes out. Scanning tracks (SCAN) You can briefly listen in to all the tracks on a CD. ➮ Hold down the OK button ; for more than two seconds. The next track starts to play. Note: The scanning time is adjustable.
Entering/altering CD names ➮ Listen to the desired CD. ➮ Press the MENU button 8. ➮ Use the buttons : to select “CD NAME”. ➮ Press the or button : twice. You are now in the edit mode. If the CD you have selected is still unnamed, eight underlines appear on the display. The current input position flashes. buttons : to select your characters. If a position is left blank, you have selected the underline. ➮ Use the or button : to proceed to your next input position.
CD MODE Removing a CD ➮ Press the button 9. The flip/release panel opens to the front and the CD is ejected. ➮ Carefully remove the CD and close the flip/release panel. CD CHANGER MODE CD changer mode Note: Information on handling CDs, inserting CDs and operating the CD changer can be found in the operating instructions accompanying your CD changer. Starting CD changer mode ➮ Press the SRC button @ repeatedly until “CHANGER” appears on the display.
➮ To repeat play of the entire CD, press the button 4 RPT > once again. “REPEAT DISC” appears briefly on the display and RPT lights up. Stopping REPEAT ➮ To stop the repeat function for the current track or CD, press the button 4 RPT > repeatedly until “REPEAT OFF” appears briefly on the display and RPT goes out. Random play (MIX) ➮ To play the tracks on the current CD in random order, press the button 5 MIX >. “MIX CD” appears briefly on the display and MIX lights up.
CD CHANGER MODE buttons : to select “CDC NAME”. ➮ Use the Naming CDs To make it easier for you to recognise your CDs, the car radio offers an individual name option for 99 CDs. The names should have a maximum of seven digits. If you attempt to allocate more than 99 names, “FULL” will appear on the display. ➮ Press the or button :. ➮ Hold down the MENU button 8. A beep sounds at the end of four seconds and “DELETE NAME” appears on the display. ➮ Release the MENU button 8.
➮ Set the minutes using the to display the time. Setting the time The time can be set automatically using the RDS signal. If you are unable to receive an RDS station or the station you are listening to does not support this function, it is also possible for you to set the clock manually. Setting the time automatically ➮ To set the time automatically, press the MENU button 8. button : repeatedly until “CLK MANUAL” (manual) or “CLK AUTO” (automatic) appears on the display.
TONE AND VOLUME BALANCE Tone and volume balance Setting the X-BASS You can adjust the sound settings for each source separately (radio, CD, CD changer/Compact Drive MP3 and AUX). Adjusting the bass ➮ Press the AUDIO = button. X-BASS means that the bass is raised to a comfortable level at lower volume levels. You can adjust the X-BASS function individually for all audio sources. When X-BASS is activated, the X-BASS symbol lights up on the display. “BASS” appears on the display.
button : repeatedly until “FADER” appears on the display. ➮ Press the or button : to set the volume distribution front/rear. ➮ Press the ➮ Press the AUDIO button = or OK ; once you have completed the setting. Notes on adjusting the equalizer We recommend you use a CD you are familiar with when adjusting the equalizer. Before adjusting the equalizer, set the tone and volume balance to zero. To do this, please see the chapter “Tone and volume balance”. ➮ Listen to the CD.
EQUALIZER ➮ Set the equalizer values as described under “What to do”. ● Switching the equalizer on/off ➮ To switch on the equalizer, hold down the DEQ button < until EQ lights up on the display “EQ ON” is briefly displayed. ➮ To switch on the equalizer, hold down the DEQ button < until EQ disappears from the display “EQ OFF” is briefly displayed. Setting the equalizer ➮ Press the DEQ button <. ➮ Select “DIGITAL EQ” using the or button :.
Setting the level indicator Selecting a spectrometer type The level indicator (spectrometer) on your display briefly indicates the volume, tone and equalizer settings with symbols on your display as you make the corresponding settings. When settings are not being made, the spectrometer indicates the original level of the car radio. You can also set the type of spectrometer on your menu. There are two types available. ➮ Press the MENU button 8. ENGLISH EQUALIZER “MENU” appears on the display.
EXTERNAL AUDIO SOURCES TECHNICAL DATA External audio sources Technical data In addition to the CD changer, you can also connect up a different external audio source with a line output. Such sources can be, for example, portable CD players, minidisc players or MP3 players. If there is no CD changer connected to your unit, two external audio sources can be hooked up. The AUX output has to be switched on in the install menu.
Service numbers / Numéros du service après-vente / Números de servicio / Número de serviço Country: Phone: Fax: WWW: http://www.blaupunkt.
Radio / CD Casablanca CD52 Heidelberg CD52 US version Installation instructions Notice de montage Instrucciones de instalación Instruções de montagem http://www.blaupunkt.
When carrying out installation work and making connections please observe the following safety instructions: - Disconnect the negative terminal of the battery! When doing so, please observe the vehicle manufacturer’s safety instructions. - Make sure you do not damage vehicle components when drilling any holes. - The cross sections of the positive and negative cables must not be less than 1.5 mm2.
E Normas de seguridad Durante el montaje y la conexión es imprescindible observar las siguientes normas de seguridad. - Desemborne el polo negativo de la batería. Observe las normas de seguridad dadas por el fabricante del vehículo. - Al perforar agujeros, asegúrese de no dañar ninguna pieza del vehículo. - La sección transversal del cable positivo y del cable negativo no debe ser menor de 1,5 mm2.
ENGLISH DEUTSCH 1. Supplied Mounting Hardware Materiel de montage fourni FRANÇAIS ENGLISH Ferretería de montaje suministrada ESPAÑOL Elementos de fixação fornecidos. A B D C E PORTUGUÊS 12V F 2.
4. A 3. 7 607 621 . . . Car-specific adapter cable which is available at your dealer. Câble adaptateur spécifique au véhicule, disponible dans le commerce. Adaptador específico del vehículo, el cual se puede adquirir en el comercio especializado. Cabo de adaptação específico do automóvel que pode ser adquirido no comércio especializado. E F Antenne 5. uninstalling, 1. Sub out cable 7 607 609 093 B 2. 3. 3. Amplifier 2. B 8 601 910 003 6.
7 8 5 6 1 3 4 15 18 14 17 20 3 5 7 4 6 8 1 3 5 7 2 4 6 8 C B A A 1 2 3 4 5 6 7 8 ENGLISH DEUTSCH 10 9 12 8 11 5 2 C-3 13 16 19 FRANÇAIS ENGLISH 6 3 2 1 D C-2 7 10 4 2 9 1 D B Automatic Sound Radio Mute Sub out Permanent +12V Aut. antenna Illumination Kl.
8. G 12V (max. 150 mA) Relais I R LF L + + + + - 4 Ohm 4 Ohm 4 Ohm 4 Ohm Kl.