Radio / Cassette Hannover CR 67 Operating Instructions Congratulations on your purchase of this Blaupunkt Cassette Receiver. BA Hannov. CR67 SEA gb® 1 29.04.
Table of Contents English Features ........................................................... 3 Traffic Safety and Precautions ......................... 3 Detachable Face ............................................... 4 Electrical Connections and Installation ............ 5 Installation ......................................................... 7 Maintenance ...................................................... 9 Specifications .................................................. 10 Location of Controls ...
ENGLISH Features Congratulations on your purchase of this Blaupunkt Cassette Receiver. Its Codem III FM/AM Tuner and Autoreverse Cassette Tape Player mechanism provide the ultimate in sound reproduction.
Detachable Face Detaching & Attaching the Face: The face of this unit can be detached and taken with you to prevent it from being stolen. Detaching the Face: Press the REL (Release) Button and detach the face by gently pulling it off as illustrated. Note: Do not pull it straight out from the chassis. Be sure not to drop the face when detaching it from the chassis. Attaching the Face: Apply the right hand side of the face to the chassis by sliding (part B) of the face to (part A) at the front of the chassis.
Electrical Connections and Installation Please carefully read all of the instructions before you begin. Carefully follow all instructions. You’ll be glad you did! GENERAL RECOMMENDATIONS • If you’re not confident that you can install the unit correctly, have it installed by a qualified Blaupunkt installation technician. • Use this unit only with negative ground 12 Volt (11-16 Volt) direct current (DC). • Be sure to detach the faceplate before you start to connect or install the unit.
SPEAKER CONNECTIONS • You can connect a speaker (regular, co-axial or tri-axial speakers or component speaker system, all hereafter referred to simply as “speaker”) to each of the units’ four pairs of speaker leads. 5A Power connections red blue black yellow IGNITION ANTENNA +12V GROUND BATTERY +(12V) Speaker connections LF RF LR RR RF RR LF LR 6 BA Hannov. CR67 SEA gb® 6 29.04.
Installation Recommendations • Carefully choose the mounting location so that the unit won’t interfere with normal driving. • Avoid mounting locations where the unit would be subject to high temperatures, such as from direct sunlight or hot air from the heater, or where it would subject to dust, dirt or excessive vibration. • The illustration below shows a typical installation, however, you may need to adjust the installation, depending on the unit.
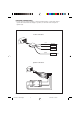
Mounting the Unit in a Japanese Car You may have difficulty mounting this unit in some Japanese cars that have ISO mounting features. In this case, consult your Blaupunkt dealer. 1 Run a blade along the slits on the back of the front trim ring, unscrew the two side screws, and separate it from the unit. Save the trim ring and related hardware in case you ever want to install the unit in another vehicle. 2 Use the vehicle’s own mounting hardware to attach the unit. 2 TOYOTA 1 max.
Maintenance Removing the Unit Use the Release Keys as shown below. Keep them in a safe place in case you need them in the future. Fuse Replacement When replacing the fuse, be sure to use one with the correct amperage, which will be stated on the fuse case. Never use a fuse that has a stated amperage exceeding the one supplied for this unit, as this could cause malfunction and serious damage to the unit. 9 BA Hannov. CR67 SEA gb® 9 29.04.
Specifications Audio Power Specifications Power Output and Total Harmonic Distortion: 10 watts per channel minimum continuous average output into 4 ohms, 4 channels driven, from 30-15 000 Hz with no more than 1% total harmonic distortion. Other Specifications Tuner FM Tuning Range: FM Mono Sensitivity: 87.5 - 108 MHz 1.3 µV Selectivity: Signal-to-Noise Ratio: Harmonic distortion at 1 kHz: Separation: Frequency Response: 80 dB at 400 kHz 65 dB (stereo), 70 dB (mono) 0.7% (stereo), 0.
Location of Controls 1. 2. 3. 4. 5. 6. 7. 8. 9. 10/11. 10. 11. 12. REL (Release) Button ON (Power) Button Source (and Radio Band) Select Cassette Eject Mute/Audio Button/Clock Adjust:00 SCA (Scan) TS (Travel Store) LD (Loudness)/ SENS (Tuning Sensitivity) Cassette Insertion Slot CLK/Display Change Tape Program Change (reverse) Fast Rewind Fast Forward + Button Volume + Bass + Treble + Balance Left Fade to Front 13. 14. 15. 16. 17.
Instructions — General Operation See Traffic Safety & Precautions on page 3. “Press” means a momentary press of less than 1/2 second. All presses requiring more than 1/2 second are followed by beep. “Time Out” When additional button presses are anticipated to complete a procedure, the unit will automatically exit the procedure after 4 seconds of inactivity. Ignition-Off Clock Recall / Turning Unit On Vehicle ignition must be on. To turn unit on, press ON Button (2) or insert a tape.
Audio Operation Volume Control Buttons (+/–) Press + and - to increase/decrease volume from 0 to 63, in increments of 1.25 dB/step. Volume control is accessible from all modes except Bass, Treble, Balance and Fade modes. Adjustable Maximum Turn-On Volume First adjust the volume to the (maximum) volume level desired when the unit is turned on. Press and hold the PWR Button for more than two seconds. The unit turns off and the turn-on volume level is memorized.
Radio Operation Last Station Memory Each FM bank and AM band has its own last station memory which holds last-tuned frequency for that band or bank irrespective of whether that frequency is stored into a preset. Selecting Bands Press SRC as needed to access FM1, FM2, FM3/FMT, AM/AMT banks. Seek Tuning Press /\ or V to seek next receivable frequency. Tuning stops at frequency that fulfills sensitivity requirements predetermined by sensitivity set through SENS/LD button.
Cassette Tape Player Operation Tape Playback: • Insert cassette into Cassette Door. (Note: Make sure that the side of the cassette exposed is facing right and that all slack has been removed from the tape prior to insertion.) • If ignition switch is already in “on” or accessory position, insertion of cassette will turn unit on. If unit already turned on, cassette insertion will override other audio source, such as radio. “LOAD” appears for 2 seconds.
Robert Bosch (SEA) Pte Ltd 8A Jalan 13/6 46200 Petaling Jaya Selangor Darul Ehsan Malaysia Jalan Pemimpin 38C - 38D Singapore 577180 Robert Bosch (Aust) Pty Ltd P.O. Box 66 Rosebank MDC Clayton Victoria 3169 Australia Tahiti Sound B.P. 3793 Papeetee Tahiti 98713 French Polynesia Robert Bosch (Aust) Pty Ltd New Zealand Branch 14-16 Constellation Drive Mairangi Bay, Auckland New Zealand Jebsen & Co.