
User Guide


17
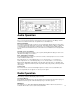
Auxiliary Input Jack
Connect other audio equipment, such as a portable cassette or DAT player, through the 500mV/3.5
mm pigtail connector. Access auxiliary equipment output by pressing SRC until “AUX IN” appears.
Adjust volume, bass, and treble settings through the receiver.
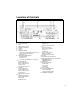
Direct Software Control Menu
Blaupunkt’s exclusive Direct Software Control Menu has many unique features that allow you to
customize the unit to your needs and preferences. All Menu options (except timer and naming
options) are available regardless of which source is in use: AM, FM, CD, CD Changer, Auxiliary.
Using the Menu (See Traffic Safety & Precautions on page 4)
1. Press DIS/MENU for 2 seconds to enter Menu mode.
2. Press /\ / V controls to scroll through Menu.
3. Use << or >> to change Menu setting (or to enter Turn-on Message Enter, Clock Adjustment
Modes, Timer Set, Station Name Access/Edit)
4. Exiting Menu: Press of DIS (or after 8 seconds). Unit exits from Menu. Changes are stored
upon manual or automatic time-out of Menu or turn-off by PWR button — but not stored if exit
caused by panel release or ignition off.
Turn-On Message Activation: (“MSG ON”/”MSG OFF”) Press << or >> to turn message on or off.
Turn-On Message Programming: (“MSG ENTR”) - The unit can scroll a 40-character message
across the display at the time of turn-on. To create your own message:
1. Press >> button. Eight characters appear with the first one blinking.
2. Press /\ / V to select desired characters. If you want to put a blank space in name, select “_”.
3. Press << or >> to locate next character.
4. After eighth character (the farthest right character) is completed, first (left-most) character of
next group of eight characters begins to flash. After fifth group of eight characters, pressing >>
will access first group again.
5. Press Mute to store turn-on message and return to Menu.
Clock Adjustment (“CLOCKSET”)
Pressing << or >> shows blinking time. Subsequent press of << advances the hour; >> advances
the minutes. (To change minute indicator to nearest hour (:00), press Mute button). Unit begins
keeping the time when /\ or V is pressed or when Menu mode ends.)
Tuner Timer Set Mode (“TMR SET”)
1. Before entering Menu, tune in the radio frequency to be activated by timer.
2. Enter Menu mode and scroll to “TMR SET” by pressing /\ or V.
3. Press << or >> to enter timer adjustment mode.
4. Select time that unit should switch to this station by pressing << to adjust hours, >> to adjust
minutes. Press Mute to adjust minutes to :00.
5. To store station and time, press /\ / V or DIS.
Tuner Timer On/Off (“TMR ON”/“TMR OFF”)
Tuner timer allows unit to go to a certain frequency at a certain time — from any source. When
ignition on and unit off, the timer even turns the unit on and goes to the specified frequency. Press
<< or >> to turn Tuner Timer on or off.
Scan Times
You can set different scan times for CD (“CD SCNTM”) & Radio (“RD SCNTM”) between 1 and 16
seconds. Press << or >> to adjust scan time.
Confirmation Beep On/Off (“BTTNBEEP”)
To activate or defeat beep for all button presses, press << or >>. (Button presses requiring more
than 1/2 second always have confirmation beep.)
Adjustable Mute Level (“MUTE LVL”)
The unit’s mute level can be adjusted to any volume level. This mute level also applies to cellular
mute. During Menu mode, once “MUTE LVL” appears, actual mute level is heard. Adjust the mute
level volume by using <</>>, NOT + and –. (If mute is activated when unit volume level is lower
than mute level, unit volume level is maintained, even though “MUTE” appears.