In Car Video IVMR-7002 7 607 004 511 Operating and installation instructions http://www.blaupunkt.
PORTUGUÊS < ESPAÑOL SVENSKA 5 FRANÇAIS ENGLISH 3 = @ ITALIANO 12 6 NEDERLANDS > : 8 ; 9 7 A DANSK ? 4 1 DEUTSCH DEVICE OVERVIEW 15
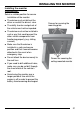
DEVICE OVERVIEW Ceiling-mounted monitor 1 2 3 4 5 6 Lights on the main unit Light switch ON Monitor latch Vehicle interior lighting switch Loudspeaker Infrared receiver for IR remote control IVRC-06 Infrared transmitter for IR headphones IVHS-01 (accessory) 7 Control button Increase the monitor volume / navigate in the OSD menu 8 Control button Decrease the monitor volume / navigate in the OSD menu 9 On/off button for the monitor : Control button MENU See Instructions / OSD menu.
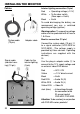
J I MENU See Instructions / OSD menu. J Battery compartment ENGLISH FRANÇAIS ITALIANO NEDERLANDS SVENSKA I PORTUGUÊS H DANSK D E F G D POWER On/off button for the monitor. E TV/VIDEO Input selector: switch between AV1 and AV2. F VOL • arrow button Increase the volume for the selected monitor. VOL • arrow button Decrease the volume for the selected monitor. G MUTE Mute the volume of the loudspeaker inside the monitor.
CONTENTS Device overview ..................... 15 Ceiling-mounted monitor ................ 16 IR remote control ........................... 17 Contents ................................. 18 Notes for the user .................. 19 Precautionary measures ................ 19 Safety notices ........................ 20 Supplied parts ........................ 20 Installing the monitor ............. 21 Installing the monitor (mechanical) . 21 Cables .......................................... 22 Operation ......
Blaupunkt GmbH Hotline Robert-Bosch-Str. 200 31139 Hildesheim Germany We should like to point out that the right to make a claim under the guarantee could be forfeited if the device is changed or modified in any way without the express authorization of the manufacturer. Long-term operation or storage outside the specific temperature range can lead to a shortening of the useful life of the LC display. 1. Positions in which it could restrict the driver’s view. 2.
NOTES FOR THE USER Note We recommend that you allow a specialist workshop to carry out the installation. Safety notices Please observe the following safety notices during installation and whilst making the connections. SUPPLIED PARTS Supplied parts The monitor is supplied with all the parts listed below. Please check that the range of parts supplied with your device is complete. If one of the listed parts is missing, please contact your dealer immediately.
INSTALLING THE MONITOR DEUTSCH Installing the monitor (mechanical) Make sure that the device is installed in a safe and secure position and that it cannot become detached in the event of an emergency stop. ● Do not attach the device merely to the roof liner. ● If you need to drill additional holes, make sure you do not drill through the sheet metal of the vehicle’s roof.
INSTALLING THE MONITOR Cables Interior lighting connection (3 pin) ? > Red White Black = Operating voltage (+12 V) = To the door switch (Door open = Earth) = Earth To avoid discharging the battery, we recommend you use a switched operating voltage (ignition). Warning notice: The operating voltage cable must be protected with at least a 1.5 A fuse.
Opening the monitor ➮ Pull back the monitor release latch There are two switches for the lights: 2 and interior lighting 4. ON ➮ To watch television, lower the : This button is used to switch the lights on/off. Interior lighting monitor until it is at an angle of approx. 90° to the monitor’s base unit. 3 : FRANÇAIS ON 3 to flip down the LCD display. If activated, the lights only come on when the vehicle’s doors are opened.
OPERATION Adjusting the position of the monitor The monitor can be rotated by up to approx. 30° to the right and left from its central viewing position. : 8 ; 9 7 D E F G Closing the monitor ➮ Turn the monitor back to its central viewing position and push it into its base unit so that it clips back into the releasing/locking mechanism. H I Switching on the monitor Press the power-on button 9 on the main unit or the button D on the remote control to switch the monitor on/off.
OPERATION ● COLOR: To adjust the colour ● TINT: To adjust the picture shade (only for NTSC) ● REVOLVE: To revolve the screen display the OSD menu again. SPEAKER ON ZOOM BRIGHTNESS CONTRAST COLOR TINT REVOLVE LEFT-RIGHT UP-DOWN RESET PICTURE EXIT ● ENGLISH CONTRAST: To adjust the contrast FRANÇAIS ● ITALIANO ➮ Select the “EXIT” option to close BRIGHTNESS: To adjust the brightness NEDERLANDS Use the arrow buttons 7 / 8 or I / to select the options.
OPERATION Changing the light bulb ➮ Detach the monitor from the ceiling plate (4 screws). Light bulb specifications Diameter: 8 mm Length: 28 mm Voltage: 12 V, 3 W Changing the battery in the remote control ➮ Push the button on the battery compartment J to the right (see A below). Screws for securing the ceiling-mounted monitor ➮ Pull the battery compartment J out of the remote control (see B below). ➮ Change the 3 V battery (CR 2025). ➮ Remove the 6 screws from the rear.
SPECIFICATIONS 154,08 (H) x 86,58 (V) Signal system: Dual system NTSC/PAL Brightness: 320 cd/m2 Contrast ratio: 400:1 Viewing angle: Left/right: 60/60 degrees Up/down: 50/40 degrees Video input level: 1.0 Vpp ± 10 % Audio input level: 0.3 Vrms Carrier frequency for IR sensor: L-CH: 2.3 MHz R-CH: 2.
Service-Nummern / Service numbers / Numéros du service aprèsvente / Numeri del servizio di assistenza / Servicenummers / Telefonnummer för service / Números de servicio / Números de serviço / Servicenumre Country: Phone: Fax: Germany (D) 0180-5000225 05121-49 4002 Austria Belgium Denmark Finland France Great Britain Greece Ireland Italy Luxembourg Netherlands Norway Portugal Spain Sweden Switzerland (A) (B) (DK) (FIN) (F) (GB) (GR) (IRL) (I) (L) (NL) (N) (P) (E) (S) (CH) 01-610 39 0 02-525 5444 44