Radio / CD Alicante CD31 Essen CD31 Lausanne CD31 Operating instructions
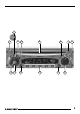
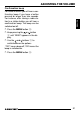
14 13 SVENSKA NEDERLANDS 3 4 5 12 11 6 10 7 ESPAÑOL 1 PORTUGUÊS 8 ITALIANO FRANÇAIS 2 9 3 ENGLISH DEUTSCH
5 6 7 = > ENGLISH FRANÇAIS ITALIANO ; < NEDERLANDS 4 9 : AUDIO button to adjust the bass, treble, balance and fader settings. Arrow buttons. MENU button to open the basic settings menus. button to display the time. Keys 1 - 5. TRAF button to switch traffic information standby on/off. PTY, to switch the PTY function on/off. Volume control. , to increase the volume , to decrease the volume Button to switch the unit on/off. To mute the unit’s volume.
CONTENTS Notes and accessories .......... 27 CD mode ................................ 38 Road safety ................................... 27 Installation ..................................... 27 Accessories .................................. 27 Switching to CD mode .................. 38 Selecting tracks ............................ 38 Quick track selection ..................... 38 Fast searching (audible) ................ 38 Random play (MIX) ........................ 38 Scanning tracks (SCAN) ............
CD changer You can connect the following Blaupunkt CD changers: CDC A 06, CDC A 08, CDC A 072 and IDC A 09. You can also connect the CDC A 05 and CDC A 071 CD changers by using an adapter cable (Blaupunkt no. 7 607 889 093). FRANÇAIS The optional RC 08 or RC 10 remote controls allow you to safely and conveniently access the most important functions of your car radio from your steering wheel. ENGLISH Remote control ITALIANO Road safety has absolute priority.
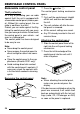
REMOVABLE CONTROL PANEL button 1. Removable control panel ➮ Press the Theft protection The control panel locking mechanism opens. As a way of protecting your car radio against theft, the unit is equipped with a removable control panel (release panel). Without this control panel, the car radio is worthless to a thief. Protect you car radio against theft by taking the control panel with you every time you leave your vehicle. Do not leave the control panel in your vehicle - not even in a hiding place.
➮ To do so, press button >. ➮ Gently insert the CD with the printed side uppermost into the drive until you feel some resistance. The CD will be drawn automatically into the drive. You must not hinder or assist the drive as it draws in the CD. The unit switches on. CD playback begins. ENGLISH Switching on/off using the vehicle ignition If the unit is correctly connected to the vehicle’s ignition and it was not switched off using button >, it will switch on/off simultaneously with the ignition.
ADJUSTING THE VOLUME Adjusting the volume The system volume can be adjusted in steps from 0 (off) to 66 (maximum). To increase the system volume, ➮ press the button =. To decrease the system volume, ➮ press the button =. Setting the power-on volume You can set the default volume at which the unit switches on. ➮ Press the MENU button :. ➮ Keep pressing the or button 9 until “ON VOL” appears in the display. ➮ Set the power-on volume using the and buttons 9.
ADJUSTING THE VOLUME DEUTSCH Confirmation beep ENGLISH For some functions you will hear a confirmation beep if you keep a button pressed for longer than two seconds. For instance, after storing a radio station to a station button you will hear a confirmation beep. The beep can be switched on/off. FRANÇAIS ➮ Press the MENU button :. ➮ Keep pressing the or button 9 until “BEEP” appears in the display. and buttons 9 to switch between the options. “OFF” means beep off, “ON” means the beep is switched on.
RADIO MODE Radio mode This unit is equipped with an RDS radio receiver. Many of the receivable FM stations transmit a signal that not only carries the programme but also additional information such as the station name and programme type (PTY). The station name appears in the display as soon as it is received. Switching to radio mode If you are in CD, CD changer or AUX mode, ➮ press the FMT or BAND (TS) button 2. Or ➮ keep pressing the CD•C button 7 until “RADIO” appears in the display.
Selecting the memory level To switch between the FM memory levels and the MW and LW frequency ranges, ➮ keep pressing the FMT or BAND (TS) button 2 until the required frequency range / memory level is displayed. Tuning into a station There are various ways of tuning into a station. Automatic seek tuning ➮ Press the or button 9. The unit tunes into the next receivable station. 9 until “SENS” appears in the display. ➮ Press the button 9. The display shows the currently set value for sensitivity.
RADIO MODE Note: ● If you want to use this feature, the RDS function must be activated. or button 9 to switch to the next station on the broadcasting network. When using this feature, you will only be able to switch to stations that you have received once already. To do so, use either the Travelstore function or allow the automatic seek tuning feature to run once through the entire frequency range.
Programme type (PTY) Besides transmitting the station name, some FM stations also provide information on the type of programme that they are broadcasting. For example, the programme types can be: CULTURE TRAVEL JAZZ SPORT NEWS POP ROCK MUSIC Using the PTY function, you can directly select stations of a particular programme type. PTY-EON If you specify the programme type and start seek tuning, the radio will switch from the current station to a station of the selected programme type.
RADIO MODE The selected programme type is displayed briefly. Treble reduction feature during interference (HICUT) or button 9 to start seek tuning. The next station corresponding to your selected programme type will then be tuned into. The HICUT function improves the sound when radio reception is poor (FM only). When interference is being experienced, the treble is automatically cut, which therefore also reduces the level of interference.
TRAFFIC INFORMATION RECEPTION and DEUTSCH ENGLISH buttons 9. ITALIANO ➮ Press the MENU button : twice. FRANÇAIS ing the NEDERLANDS Note: You will hear a warning sound ● if you leave the reception area of a traffic information station that you are currently listening to. ● if, while listening to a CD, you leave the reception area of a traffic information station that you are tuned into and the subsequent automatic search cannot find a new traffic information station.
CD MODE CD mode You can use this unit to play standard CDs with a diameter of 12 cm. Risk of damage to the CD drive! CD singles with a diameter of 8 cm and contoured CDs (shape CDs) are not suitable for playback in this unit. We accept no liability for any damage to the CD drive that may occur as a result of the use of unsuitable CDs. Switching to CD mode ● If there is no CD inserted in the drive.
➮ press the SCAN button 4 again. The current track will then continue to be played. Repeating tracks (REPEAT) button 9. The current setting is displayed. “TIME” for the playing time display and “PLAY” for the track number display. button 9 to select the required setting. ➮ Press the ➮ Press the MENU button : twice. If you want to repeat a track, Removing the CD from the unit ➮ press button 3 (RPT) ;. To remove the CD from the unit, RPT appears in the display.
CD CHANGER MODE CD changer mode Fast searching (audible) Note: ● Information on handling CDs, inserting CDs and operating the CD changer can be found in the operating instructions supplied with your CD changer. To fast search backwards or forwards, Switching to CD changer mode ➮ Keep pressing the CD•C button 7 buttons 9 pressed until fast reversing / fast forwarding begins.
“MIX CD” appears briefly and MIX lights up in the display. To play the tracks on all inserted CDs in random order, ➮ press button 4 (MIX) ; again. “MIX ALL” appears briefly and MIX lights up in the display. Note: ● In the case of CD changers CDC A 08 and IDC A 09, all CDs in the changer are randomly selected. All other changers first play all the tracks on a CD in random selection before moving to the next CD in the changer.
CLOCK - TIME To display the time, or button 9 to switch between the modes. When you have finished making your changes, ➮ Keep the MENU ( ) button : ➮ press the MENU button :. ➮ Press the CLOCK - Time Displaying the time pressed until the time appears in the display. Setting the time ➮ Press the MENU button :. ➮ Keep pressing the or button 9 until “CLOCKSET” appears in the display. ➮ Press the button 9. The time appears in the display. The minutes flash on and off and can be adjusted.
Adjusting the balance settings To adjust the BASS, To adjust the left/right volume distribution (balance), ➮ press the AUDIO button 8. Adjusting the treble settings To adjust the TREBLE, ➮ press the AUDIO button 8. “BASS” appears in the display. or button 9 until “TREB” appears in the display. ➮ Keep pressing the or button 9 to adjust the treble. When you have finished making your changes, ➮ Press the ➮ press the AUDIO button 8. “BASS” appears in the display.
X-BASS EXTERNAL AUDIO SOURCES X-BASS External audio sources The X-BASS feature can be used to boost the bass at low volume levels. Instead of connecting a CD changer, you can also connect another audio source equipped with a line output. The audio source, for example, can be a portable CD player, MiniDisc player or MP3 player. If you want to connect an external audio source you will need a Blaupunkt adapter cable (Blaupunkt no.: 7 607 897 093). The AUX input must be activated in the menu.
Output power: 4 x 25 watts sine in accordance with DIN 45 324 at 14.4 V 4 x 45 watts max. power Tuner Frequency ranges: FM: 87.5 – 108 MHz MW: 531 – 1,602 kHz LW: 153 – 279 kHz FM frequency response: 35 - 16,000 Hz CD Frequency response: 20 - 20,000 Hz Input sensitivity 2 V / 6 kOhm PORTUGUÊS ESPAÑOL AUX input: ENGLISH The scope of the guarantee is orientated around the regulations in force within the country in which the unit was purchased.