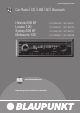
www.blaupunkt.com Car Radio | CD | USB | SD | Bluetooth Helsinki 220 BT London 120 Sydney 220 BT Melbourne 120 www.blaupunkt.
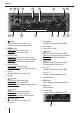
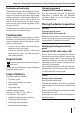
Controls 1 2 3 17 16 1 4 5 15 6 7 14 button (Helsinki 220 BT and London 120) Unlock the detachable control panel 2 MENU button Short press: Call up/close menu Long press: Start scan function 13 4 Volume control In the menu: Change settings Fast-Browse mode: Select folder and track 5 CD tray (Helsinki 220 BT and London 120) 6 Display 7 / button In the menu: Select menu item Radio mode: Start seek tuning MP3/WMA mode: Change to next/previous folder / button In the menu: Change menu level Rad
Contents Safety notes ...................................................... 4 Symbols used .............................................................. 4 Road safety .................................................................. 4 General safety notes ................................................. 4 Declaration of conformity ...................................... 5 Cleaning notes .................................................. 5 Disposal notes...................................................
Safety notes Safety notes Road safety The car sound system was manufactured according to the state of the art and established safety guidelines. Even so, dangers may occur if you do not observe the safety notes in these instructions. These instructions contain important information to easily and safely install and operate the car sound system. • Read these instructions carefully and completely before using the car sound system.
Safety notes | Cleaning notes | Disposal notes | Scope of delivery | Placing the device in operation Declaration of conformity The Blaupunkt Europe GmbH declares that the car sound systems London 120 and Melbourne 120 comply with the basic requirements and the other relevant regulations of the directive 2004/108/EC and the car sound systems Helsinki 220 BT and Sydney 220 BT comply with the basic requirements and the other relevant regulations of the directive 1999/5/EC.
Placing the device in operation Attaching the control panel 쏅 Push the control panel into the bracket at the right edge of the device. 쏅 Push the control panel carefully into the left bracket until it clicks into place. Note: If you switch on the car sound system while the vehicle ignition is switched off, it automatically switches off after 1 hour to preserve the vehicle battery. Removing the control panel 쏅 Press the button 1 to unlock the control panel.
Placing the device in operation | Traffic information | Radio mode Helsinki 220 BT and Sydney 220 BT = 쏅 Press and hold the buttons 7 and at the same time and press the On/Off button 3. The car sound system switches on. The display briefly shows "DEMO MODE" if you switched on the demo mode. By pressing any button, the demo mode is interrupted and you can operate the device. Traffic information In the reception area "EUROPE", an FM station can identify traffic reports by means of an RDS signal.
Radio mode Notes: • Up to 5 stations (Helsinki 220 BT and Sydney 220 BT) or up to 7 stations (London 120 and Melbourne 120) can be stored in each memory bank. • Memory banks can be activated or deactivated via the user menu (see the chapter "User settings", section "Making settings in the "TUNER" menu", menu item "TUN BAND" (band selection)). Deactivated memory banks are skipped during the source selection with the SRC button @.
Radio mode With Travelstore, you can store 5 or 7 FM stations in the FMT memory bank in all reception areas. In the reception areas "USA", "S-AMERICA" and "THAILAND", you can also store 5 or 7 AM stations in the AMT memory bank. 쏅 Select a memory bank of the desired waveband, e. g. FM1 or AM. 쏅 Press the SRC button @ for approx. 2 seconds. The tuner starts the automatic station seek tuning; the display shows "FM TSTORE" or "AM TSTORE".
CD/MP3/WMA mode CD/MP3/WMA mode Basic information Helsinki 220 BT and London 120: This car sound system can be used to play audio CDs (CDDA) and CD-R/RWs with audio, MP3 or WMA files as well as MP3 or WMA files on USB data carriers. Sydney 220 BT and Melbourne 120: This car sound system can be used to play MP3 or WMA files on USB data carriers and SD(HC)/MMC cards. Notes: • To ensure proper functioning, use only CDs with the Compact-Disc logo.
CD/MP3/WMA mode Inserting/ejecting a CD (Helsinki 220 BT and London 120) Connecting/removing a USB data carrier Inserting a CD Connecting a USB data carrier 쏅 Switch off the car sound system so that the data carrier will be correctly registered. 쏅 Pull the protective cap of the USB socket : to the front until it moves out of the socket and fold it down. 쏅 Connect the USB data carrier. 쏅 Turn on the car sound system. If the USB data carrier is initially selected as audio source, the data are read first.
CD/MP3/WMA mode Notes: • If the inserted memory card cannot be played, "SD ERROR" is briefly displayed. • The time required for reading in the data depends on the design and size of the memory card. Removing the memory card 쏅 Switch off the car sound system so that the memory card will be correctly unregistered. 쏅 Open the cover of the card slot B. 쏅 Push on the memory card until it disengages. 쏅 Pull the memory card out of the card slot. 쏅 Close the cover of the slot again.
CD/MP3/WMA mode Switching display 쏅 Press the DIS button A once or several times to switch among these displays: Operation Display T01 00:15 CD* T01 03:37 T01 18:30 MP3/ WMA FILE ARTIST ALBUM SONG PLAY 00:15 TOTAL03:37 CLOCK18:30 Meaning Track number and playing time Track number and duration Track number and time File name Artist** Album name** Track name** Playing time Track duration Time * Helsinki 220 BT and London 120 only ** Track name, artist and album name must be stored as ID3 tag to be abl
Bluetooth® Bluetooth® (Helsinki 220 BT and Sydney 220 BT) You can connect the car sound system via Bluetooth® with other Bluetooth®-ready devices, such as cell phones or MP3 players. This allows you to use the car sound system with its integrated microphone as hands-free system for connected cell phones and control the audio output of other Bluetooth® devices and play them back via the loudspeakers of the car sound system (Bluetooth® streaming).
Bluetooth® 쏅 Press the button 7 to pair a cell phone. The display shows "PAIRING" and the Bluetooth® symbol is flashing. The car sound system can now be recognised by a Bluetooth® cell phone for approx. 2 minutes and connected. 쏅 Search the car sound system from your cell phone (Bluetooth® name: "BLAUPUNKT"). As soon as the car sound system is located by the cell phone and is to be connected, the display briefly shows "ENTER PIN" and the currently stored PIN (by default "1234").
Bluetooth® Telephone functions Answering/rejecting an incoming phone call With an incoming call, the display alternately shows "IN CALL" and the number of the caller. The current audio source is muted and a ring tone is played via the loudspeakers of the car sound system. Note: If the number of the caller is not being transmitted, the display shows "IN CALL" instead of the number.
Bluetooth® • You can cancel the voice recognition by pressing the button =. • Please note that the duration of the voice recognition is limited and depending on the respective cell phone. Storing a phone number in the car sound system You can store five phone numbers in the car sound system and place calls with the speed dial (see the following section). 쏅 Enter the phone number as described in the section "Making a call". 쏅 Press the desired memory button 1 - 5 > for approx. 2 seconds to store the number.
Bluetooth® Selecting tracks 쏅 Press the / button 7 briefly to change to the previous/next track. Interrupting playback 쏅 Press the 3 > button to interrupt the playback ("PAUSE") or to continue it. Additional functions in the Bluetooth® menu Changing the Bluetooth® PIN The factory-set Bluetooth® PIN of the car sound system is "1234"; e.g. it must be entered on the cell phone when pairing a cell phone. This PIN can be changed. 쏅 In the Bluetooth® menu, select the "PIN EDIT" menu item.
Bluetooth® | External audio sources | Sound settings Unpairing all paired devices 쏅 In the Bluetooth® menu, select the "DELETE ALL PAIRED DEVICES" menu item. 쏅 Press the button 7 to unpair all cell phones or streaming devices. The display briefly shows "ALL DEVICES DELETED". External audio sources Front AUX-IN socket Danger! Increased risk of injury from connector. In case of an accident, the protruding connector in the front AUX-IN socket may cause injuries.
Sound settings | User settings FADER Front/rear volume distribution. Settings: R9 (rear) to F9 (front). 쏅 Press the button 7 to open the submenu. 쏅 Turn the volume control 4 to perform the setting. X-BASS Increase of bass at low volume. Settings: OFF, 1, 2, 3 (highest increase). 쏅 Press the button 7 to open the submenu. 쏅 Turn the volume control 4 to perform the setting. PRESETS Selecting equalizer presettings. Settings: POP, ROCK, CLASSIC, EQ OFF (no presetting). 쏅 Press the button 7 to open the submenu.
User settings TUN BAND (band selection) Activating or deactivating memory banks. Memory banks that can be deactivated: Region EUROPE USA S-AMERICA THAILAND Memory banks FM2, FMT, MW FM2, FMT, AM, AMT FM2, FMT, AM, AMT FM2, FMT, AM, AMT Settings in each case: ON, OFF. 쏅 Press the button 7 to open the submenu. 쏅 Press the / button 7 repeatedly until the desired memory bank is displayed. 쏅 Press the button 7 to change the setting.
User settings SCROLL Select the display of scrolling text (e. g. when displaying MP3 file names) either as single display or continued display. Settings: 1X (single display), ON (continued display). 쏅 Press the button 7 to open the submenu. 쏅 Turn the volume control 4 to change between the settings. Making settings in the "VOLUME" menu ON VOLUME Setting the power-on volume. Settings: 1 – 50. 쏅 Press the button 7 to open the submenu. 쏅 Turn the volume control 4 to set the desired power-on volume.
User settings | Factory settings CLOCK SET Setting the time. 쏅 Press the button 7 to open the submenu. 쏅 Press the / button 7 to change between minutes and hours. The minute or hour display flashes if it is selected. 쏅 Turn the volume control 4 to adjust the minutes or hours. 쏅 Briefly press the MENU button 2 to confirm the time entered and to exit the user menu. Making settings in the "VARIOUS" menu SCAN TIME Setting the scan time in 5-second increments. Settings: 5 – 30.
Useful information | Technical data Useful information Warranty We provide a manufacturer's warranty for products bought within the European Union. For devices purchased outside the European Union, the warranty terms issued by our respective responsible domestic agency are valid. The warranty terms can be called up from www.blaupunkt.com. Service In some countries, Blaupunkt offers a repair and pick-up service. Information about the availability of this service in your country can be found at www.
Installation instructions Installation instructions Safety instructions When carrying out installation work and making connections please observe the following safety instructions: • Disconnect the negative terminal of the battery! When doing so, please observe the vehicle manufacturer's safety instructions. • Make sure you do not damage vehicle components when drilling any holes. • The cross sections of the positive and negative cables must not be less than 1.5 mm².
Installation instructions Supplied mounting hardware Supplied mounting hardware 1 011 200 110 / 1 011 200 210 / 1 011 300 301 / 1 011 300 311: 1 011 200 111 / 1 011 200 211 / 1 011 300 302 / 1 011 300 312: 26
Installation instructions 1. A Available as an optional accessory 12V 7 607 621 … 2. Helsinki 220 BT and London 120 only Installation kits 7 608 … … 3.
Installation instructions 4. 6. Removal 1 011 200 110 / 1 011 200 210 / 1 011 300 301 / 1 011 300 311: Antenna connection 1. Helsinki 220 BT and London 120 only 2. 1 011 200 111 / 1 011 200 211 / 1 011 300 302 / 1 011 300 312: 1. 2. Antenna 3. Antenna connection 5. 182 165 53 1-20 7.
Installation instructions C-1 1 C-2 7 10 4 6 3 2 C-3 13 16 19 9 12 8 11 5 15 18 14 17 20 1 3 5 7 2 4 6 8 1 3 5 7 2 4 6 8 * C Aut. antenna +12V Amplifier +12V Remote Control +12V Switched Ext. Supply +12V B 10 Ampere max. 200 mA A A 1 2 3 4 5 6 7 8 NC Radio Mute NC Permanent +12V Aut. antenna +12V * Illumination Kl.
Installation instructions Relais +12V 7 1 35 Kl.
Please keep the filled-in radio pass in a safe place! © 2012 All rights reserved by Blaupunkt. This material may be reproduced, copied or distributed for personal use only. This product is protected by certain intellectual property rights of Microsoft. Use or distribution of such technology outside of this product is prohibited without a license from Microsoft.
Passport Name: ...................................................................................................................... Type: ...................................................................................................................... Serial no.: BP ............................................................................................................... 1 011 _ _ _ _ _ _ Blaupunkt Europe GmbH Robert-Bosch-Straße 200 D-31139 Hildesheim http://www.blaupunkt.