In Car Video IVMS-5601 IVMS-7001 Operating and installation instructions http://www.blaupunkt.
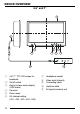
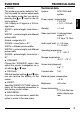
DEVICE OVERVIEW 5.6" and 7" 1 9 VIDEO SRC 5 7 8 6 10 1 2 3 4 5 6 12 5.
TABLE OF CONTENTS DEUTSCH Notes / Accessories .............. 14 Fitting ..................................... 14 ITALIANO FRANÇAIS ENGLISH Prepare the working area .............. 14 Mark out the dimensions ................ 15 Carefully cut open the headrest cover ............................................. 15 Open the headrest and remove filling and other items ..................... 15 Lay the cable through the headrest ........................................
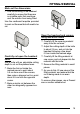
NOTES / ACCESSORIES FITTING/REMOVAL Important notes Fitting This device is not intended for fitting in the forward section of the passenger compartment where it could also be seen by the driver. Fitting this device in any part of the vehicle where it could interfere with or distract the driver’s attention is dangerous and is not permitted. The manufacturer cannot accept responsibility for any damage caused as a result of improper fitting of this device.
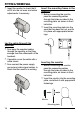
FITTING/REMOVAL DEUTSCH Mark out the dimensions ➮ Feel the covering of the headrest ITALIANO NEDERLANDS SVENSKA PORTUGUÊS Use a knife with an adjustable cutting depth to cut out the planned area. ➮ Make the first cut inside the marked area at a point about 0.5 cm from one of the corners, then make a diagonal cut to a point about 0.5 cm from the opposite corner. ➮ Make a similar cut between the other two diagonally opposed corners. DANSK Carefully cut open the headrest cover away from the cut area.
FITTING/REMOVAL ➮ Insert the monitor to check that it will fit into the cut area, and make adjustments if necessary. Insert the mounting frame in the headrest ➮ Before connecting the monitor, pass the connecting cables through the holes provided in the mounting plate, as shown in the illustration. ➮ Insert the mounting plate into the area that has been cut out, and fix it in place with appropriate fastenings.
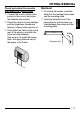
FRANÇAIS extraction tool between the screen and the mounting plate. ➮ Insert the extraction tool at the place where a slot has been provided between the screen and the mounting plate. ENGLISH ➮ To remove the screen, insert the ESPAÑOL SVENSKA NEDERLANDS ITALIANO Extraction tool PORTUGUÊS porarily in the cut-out, and place the headrest into position. ➮ Check the various monitor settings such as brightness, headphone function, volume control and so on.
FUNCTION OSD functions Main menu ➮ Call up the main menu by pressing the “MODE” key on the main device, or “MENU” on the remote control unit. ➮ Select the “EXIT” option to leave the OSD menu again. tions, select “MISC” from the main menu. ➮ When in the sub-menu, select the “MAIN MENU” option to return to the main menu, then select “EXIT” to leave the OSD menu.
NTSC/PAL dual system Standby: ENGLISH Power supply / consumption: 112 V DC ± 10%, <700 mA < 1 mA ITALIANO Video input level: Combined video signal 0.7 2.0 Vp-p, 75 Ohm Audio input level: 0 - 0.3 Vrms, 10 - 20 kHz NEDERLANDS Operating temperature: 0° C - +60° C SVENSKA Storage temperature: -20° C - +70° C Screen size (diagonal): 5.
TECHNICAL DATA Resolution (pixels): 5.6": 720 (H) x 234 (W) = 168,480 pixels 7": 1440 (H) x 234 (W) = 336,960 pixels Black light: cold cathode tube Visible screen area: 155.52 (W) x 87.75 (H) mm Angle of view: 5.6": 7": from left and right: 45°, from above: 10°, from below: 30° from left and right: 60°, from above: 60°, from below: 30° Full monitor dimensions: 5.
Service-Nummern / Service numbers / Numéros du service aprèsvente / Numeri del servizio di assistenza / Servicenummers / Telefonnummer för service / Números de servicio / Números de serviço / Servicenumre Country: Phone: Fax: WWW: http://www.blaupunkt.