www.blaupunkt.com Radio CD USB MP3 WMA Kingston MP47 7 647 603 310 Bedienungsanleitung Operating instructions Mode d’emploi Istruzioni d’uso Gebruiksaanwijzing Bruksanvisning Instrucciones de manejo Instruções de serviço Betjeningsvejledning Instrukcja obsługi Návod k obsluze Návod na obsluhu 01_KingstonMP47_deu.indd 1 23.01.
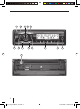
1 13 3 2 12 11 4 10 5 9 8 7 6 14 2 01_KingstonMP47_deu.indd 2 23.01.
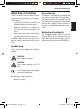
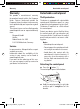
Controls 1 button to open the detachable control panel (flip-release panel). 2 BAND button Short press: Selects the FM memory banks and the MW and LW wavebands. Long press: Starts the Travelstore function. 3 On/Off button Short press: Switches the device on. In operation: Mutes the device. Long press: Switches the device off. 4 Volume control ; MENU/OK button Short press: Calls up the menus for basic settings and confirms settings. Ending the scan function. Long press: Starts the Scan function.
About these instructions .................. 43 Symbols used................................ 43 Use as directed.............................. 43 Declaration of conformity................ 43 For your safety ................................ 44 If you are installing device yourself.... 44 Observe the following! .................... 44 Cleaning instructions...................... 45 Disposal of old unit (EU countries only) ........................ 45 Scope of delivery .............................
Contents CD-changer mode ............................ 64 Switching to CD changer mode ........ 64 Selecting CDs................................ 64 Selecting tracks ............................. 64 Fast seek tuning (audible) ............... 64 Repeating individual tracks or whole CDs (REPEAT) ...................... 65 Random track play (MIX) ................. 65 Scanning all tracks on all CDs (SCAN)...65 Interrupting playback (PAUSE)......... 65 Configuring the display ................... 66 Clock – Time....
About these instructions Use as directed These instructions contain important information to easily and safely install and operate the device. • Read these instructions carefully and completely before using the device. • Keep the instructions at a location so that they are always accessible to all users. • Always pass on the device to third parties together with these instructions. In addition, observe the instructions of the devices used in conjunction with this device.
For your safety For your safety The device was manufactured according to the state of the art and established safety guidelines. Even so, dangers may occur if you do not observe the safety notes in these instructions: If you are installing device yourself You may only install the device yourself if you are experienced in installing car sound systems and are very familiar with the electrical system of the vehicle. For this purpose, observe the installation instructions at the end of these instructions.
Scope of delivery Cleaning instructions Scope of delivery Solvents, cleaning and scouring agents as well as dashboard spray and plastics care product may contain ingredients that will damage the surface of the device. Use only a dry or slightly moistened cloth for cleaning the device.
Warranty Warranty We provide a manufacturer's warranty for products bought within the European Union. Devices purchased outside the European Union are subject to the warranty terms published by our respective regional agency. The warranty terms can be called up under www.blaupunkt.com or requested directly from: Blaupunkt GmbH Hotline Robert-Bosch-Str. 200 D-31139 Hildesheim, Germany Service In some countries, Blaupunkt offers a repair and pick-up service.
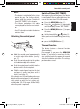
Detachable control panel Attaching the control panel Switch-off time (OFF TIMER) After opening the control panel, the device is switched off after an adjustable time. You can set this time from 15 to 30 seconds. 쏅 Press the MENU/OK button ;. 쏅 Press the or button < repeatedly until the displays shows "OFF TIMER". 쏅 Press the MENU/OK button ; to open the menu. 쏅 Set the time with the or button <. When you have finished making your changes, 쏅 press the ESC/DIS button 5.
Switching on/off Volume Switching on/off Adjusting the volume There are various ways of switching the device on/off: You can adjust the volume in increments from 0 (off) to 66 (maximum). To increase the volume, 쏅 turn the volume control 4 clockwise. To decrease the volume, 쏅 turn the volume control 4 counterclockwise. Switching on/off with the On/Off button 쏅 For switch-on, press the On/Off button 3. The device switches on.
Volume Quickly reducing the volume (MUTE) You can quickly reduce the volume to a preset level. 쏅 Briefly press the On/Off button 3. "MUTE" appears on the display. Cancelling mute To return to your previously set volume level, 쏅 briefly press the On/Off button 3 again. Adjusting the mute level You can adjust the mute level. 쏅 Press the MENU/OK button ;. 쏅 Press the or button < repeatedly until "MUTE LVL" appears on the display. 쏅 Press the MENU/OK button ; to open the menu.
Volume When you have finished making your changes, 쏅 press the ESC/DIS button 5. Note: You can use the volume control 4 to adjust the volume of telephone calls and navigation announcements whilst you are listening to them. Switching the confirmation beep on/off The system will output a confirmation beep for some functions if you keep a button pressed down for longer than two seconds, for instance, when assigning a radio station to a station preset button. You can switch the beep on or off.
Radio mode Switching to radio mode This device is equipped with an RDS radio receiver. Many of the receivable FM stations broadcast a signal that not only carries the programme but also additional information such as the station name and programme type (PTY). The station name appears on the display as soon as the tuner receives it. If you are in CD, CD changer, USB or AUX mode, 쏅 press the BAND button 2. or 쏅 press the SOURCE button = repeatedly until "TUNER" appears on the display.
Radio mode "OFF" or "ON" is displayed alongside "REG". To switch REGIONAL on/off, 쏅 press the or button 9. When you have finished making your changes, 쏅 press the ESC/DIS button 5. Switching the RDS function on/off To switch the RDS functions AF and REGIONAL on or off, 쏅 press and hold the TRAF button : for longer than two seconds. If the RDS comfort function is active, the RDS symbol appears on the display.
Radio mode Note: When using this feature, you will only be able to switch to stations that you have received once before already. To receive the stations, use the Scan or Travelstore function. Setting the sensitivity of station seek tuning You can choose whether the radio should only tune into stations providing good reception or whether it can also tune into those with a weak reception. 쏅 Press the MENU/OK button ;. 쏅 Press the or button < repeatedly until "SENS HI" or "SENS LO" appears on the display.
Radio mode Listening to stored stations 쏅 Select the memory bank or waveband. 쏅 Press one of the station buttons 1 - 6 8. The stored station is played if it can be received. Scanning receivable stations (SCAN) You can use the scan function to play all the receivable stations briefly. You can set the scanning time in the menu to between 5 and 30 seconds. When you have finished making your changes, 쏅 press the ESC/DIS button 5.
Radio mode Switching PTY on/off 쏅 Press the MENU/OK button ;. 쏅 Press the or button < repeatedly until "PTY" appears on the display with the current setting. 쏅 Press the or button 9 to switch PTY ON or OFF. When you have finished making your changes, 쏅 press the ESC/DIS button 5. Selecting the PTY language You can select the language for the display of the programme types. Options include DEUTSCH, ENGLISH and FRANÇAIS. 쏅 Press the MENU/OK button ;.
Traffic information Traffic information Your device is equipped with an RDS-EON receiver. EON (Enhanced Other Network) ensures that whenever a traffic announcement (TA) is broadcast, the system switches automatically from a station that does not provide traffic reports to the appropriate traffic information station within the broadcasting network that does. Once the traffic report has been played, the system will switch back to the programme that you were listening to before.
CD mode You can use this device to play standard audio CDs, CD-Rs and CD-RWs with a diameter of 12 cm. To avoid problems when playing self-burned CDs, you should not burn CDs at speeds greater than 16-speed. Risk of severe damage to the CD drive! CD singles with a diameter of 8 cm and noncircular contoured CDs (shape CDs) must not be used. We accept no responsibility for any damage to the CD drive that may occur as a result of the use of unsuitable CDs. The drive draws in the CD automatically.
CD mode Random track play (MIX) Repeating tracks (REPEAT) 쏅 Press the 3 MIX button 8. "MIX ALL" appears briefly on the display and the MIX symbol is displayed. The next randomly selected track will then be played. If you want to repeat a track, 쏅 press the 4 RPT button 8. "RPT TRACK" appears briefly on the display and the RPT symbol is displayed. The track is repeated continuously until you deactivate Repeat. Cancelling MIX 쏅 Press the 3 MIX button 8 again.
Displaying CD text Ejecting a CD Some CDs include CD text. The CD text might contain the names of the artist and the album. The CD text is shown as scrolling text on the display with every track change. 쏅 Press the button 1. The control panel opens to the bottom. Switching CD text on/off 쏅 Press the MENU/OK button ;. 쏅 Press the or button < repeatedly until "CDTEXT" appears on the display with the current setting.
MP3/WMA mode MP3/WMA mode You can also use this car sound system to play CD-Rs and CD-RWs as well as USB data carriers that contain MP3 music files. You can also play WMA files. This chapters deals only with playing MP3 files since the operation for MP3 and WMA files is identical. Notes: • WMA files with Digital Rights Management (DRM) from online music shops cannot be played with this device. • WMA files can only be played back safely if they were created with Windows Media Player version 8 or later.
If you like your files to be in the specific order, save the files on the data carrier in the desired sequence in which you want to play them later. The devices plays back the files in the order in which they were physically stored on the data carrier. To play back files in this device, the MP3 files must have the file extension ".MP3" and the WMA files the file extension ".WMA". Notes: To ensure uninterrupted playback: • Do not try changing the file extension to ".
MP3/WMA mode be routed, for example, to the glove compartment or a suitable place of the center console. Note Always switch off the device before connecting or disconnecting the USB data carrier so that the data carrier is correctly registered and unregistered. 쏅 Connect the USB data carrier with the USB cable. As soon as a USB data carrier is connected, it can be selected with the SOURCE button =. The display shows "USB".
Fast search Scanning tracks (SCAN) To fast seek tuning backwards or forwards, 쏅 press and hold down the or button 9 until fast searching backwards/forwards begins. You can scan (briefly play) all the tracks on the MP3 data carrier. 쏅 Press the MENU/OK button ; for longer than two seconds. The next track will then be scanned. "SCAN" and the current track name are intermittently shown on the display.
MP3/WMA mode Cancelling Repeat To stop the current track or current directory from being repeated, 쏅 press the 4 RPT button 8 once or several times until "RPT OFF" is displayed. The RPT symbol disappears from the display. Interrupting playback (PAUSE) To stop the playback, 쏅 press the 3 button 8. "PAUSE" appears on the display. Cancelling pause 쏅 During the pause, press the button 3 8. Playback is continued.
CD-changer mode To repeat the current track, 쏅 press the 4 RPT button 8 once or several times until "RPT TRACK" is displayed. The display shows the RPT symbol. To repeat the current CD, 쏅 press the 4 RPT button 8 once or several times until "RPT DISC" is displayed. The display shows the RPT symbol. Cancelling Repeat To stop the current track or current CD from being repeated, 쏅 press the 4 RPT button 8 once or several times until "RPT OFF" is displayed. The RPT symbol disappears from the display.
CD-changer mode Configuring the display You can choose from various display options in CD changer mode: • Track number and playing time • Track number and time • CD number and track number To switch between the display options, 쏅 press the ESC/DIS button 5 once or several times until the desired display appears. Clock – Time Clock – Time Setting the time To set the time, 쏅 press the MENU/OK button ;. 쏅 Press the or button < repeatedly until "CLOCK SET" appears on the display.
Clock – Time To display the time when the device is off and the vehicle ignition is on, 쏅 press the MENU/OK button ;. 쏅 Press the or button < repeatedly until "CLOCK OFF" or "CLOCK ON" appears on the display. 쏅 Press the or button 9 to switch the display between CLOCK ON and CLOCK OFF. When you have finished making your changes, 쏅 press the ESC/DIS button 5.
Sound The following table shows an overview of the setting options: BASS TREBLE MIDDLE Level (GAIN) x x x Frequency (FREQ) x Quality factor (QFAC) x x – x x for bass and middle only) as well as GAIN (level, for middle only): AUDIO BASS TREBLE Level GAIN GAIN GAIN Frequency FREQ FREQ FREQ Quality factor QFAC – QFAC E-BASS E-TREBLE E-MIDDLE ENHANCED To adjust the bass and treble levels quickly and conveniently for a simple sound adjustment, these settings are located directly
Sound Setting the left/right volume distribution (BALANCE) To adjust the left/right volume distribution, 쏅 press the AUDIO button 7. "BASS" appears on the display. 쏅 Press the or button < repeatedly until "BALANCE" appears on the display. 쏅 Press the MENU/OK button ; to open the menu. 쏅 Press the or button < to adjust the balance (right/left). To exit the menu, 쏅 press the ESC/DIS button 5.
Sound Adjusting equalizer middle (E-MIDDLE) Adjusting equalizer treble (E-TREBLE) You can select 1 of 4 middle frequencies (0,5 Hz, 1 Hz, 1,5 Hz, 2,5 Hz) and set the level for the selected frequency between -7 and +7. You can also set the quality factor between 0.5 and 1.25. You can select 1 of 4 treble frequencies (10 kHz, 12.5 kHz, 15 kHz, 17.5 kHz). Adjusting middle frequency, level and quality factor 쏅 Press the AUDIO button 7. "BASS" appears on the display.
Preamplifier output (Preamp-Out/Sub-Out) You can use the preamplifier outputs (Preamp-Out) of the car sound system to connect external amplifiers. In addition, you can connect an amplifier for operating a subwoofer to the integrated dynamic lowpass filter of the device (level and cut-off frequency can be adjusted). For this purpose, the amplifiers must be connected as described in the installation instructions.
X-BASS X-BASS X-Bass allows you to increase the bass at low volume. The selected X-Bass setting is effective for all audio sources (radio, CD, CD changer or AUX). For X-BASS, either the basic function X-BASS boost or the equalizer X-BASS (E-XBASS) is available. The basic function allows you to adjust the X-BASS boost. The equalizer X-BASS also allows you to select an X-BASS frequency. Adjusting X-BASS boost The X-BASS increase can be set in increments of 0 to 3.
Equalizer presettings This device features an equaliser in which the settings for the music genres "ROCK", "POP" and "CLASSIC" are already programmed. To select an equalizer setting, 쏅 press the AUDIO button 7. "BASS" appears on the display. 쏅 Press the or button < repeatedly until "ENHANCED" appears on the display. 쏅 Press the MENU/OK button ;. "E-BASS" appears on the display. 쏅 Press the or button < repeatedly until "PRESETS" appears on the display. button 9 to open the 쏅 Press the Presets menu.
Display Mixing a colour for the display illumination To customise the display illumination to suit your tastes you can either mix a colour yourself using the three primary colours red, green and blue (RGB) or from the colours red and green (RG). 쏅 Press the MENU/OK button ;. 쏅 Press the or button < repeatedly until "DISP COL" appears on the display. 쏅 Press the button 9 to open the RGB menu or the button 9 to open the RG menu. The display shows "4096 COL" for the RGB menu or "256 COL" for the RG menu.
External audio sources External audio sources, such as portable CD players, MiniDisc players or MP3 players, can be connected to the device in two ways: 1. Via the rear AUX input (if no CD changer is connected to the device). Notes: • An adapter cable is needed to connect an external audio source via the rear AUX input. You can obtain this cable (Blaupunkt no.: 7 607 897 093) from your Blaupunkt dealer. • With the SOURCE button =, you can select the rear AUX input. The display then shows "CDC/AUX". 2.
Factory settings Technical data Factory settings: Technical data Volume of traffic 30 announcements (TA VOL) Amplifier Output power: 4 x 18 watts sine at 14.4 V and 1% distortion factor at 4 ohms. 4 x 26 watts sine in accordance with DIN 45324 at 14.4 V at 4 ohms. 4 x 50 watts max.
Bitte den ausgefüllten Gerätepass sicher aufbewahren! Please keep the filled-in radio pass in a safe place! Prière de conserver soigneusement la carte d’autoradio remplie ! Tenete per favore il libretto di apparecchio, debitamente riempito, in un posto sicuro! Bewaar de ingevulde apparaatpas op een veilige plaats! Vänligen förvara ifyllt apparatpass på säker plats! ¡Favor guardar el documento del aparato debidamente llenado en un lugar seguro! Por favor, guardar o cartão preenchido do aparelho num lugar segu
Germany Austria Belgium Denmark Finland France Great Britain Greece Ireland Italy Luxembourg Netherlands Norway Portugal Spain Sweden Switzerland Czech. Rep.