Radio / Cassette Canberra C31 Freiburg C31 Las Vegas DJ31 San Diego DJ31 Operating instructions
Bitte aufklappen Open here Ouvrir s.v.p. Aprite la pagina Hier openslaan a.u.b.
16 15 SVENSKA NEDERLANDS 3 4 14 5 6 13 7 8 12 ESPAÑOL 1 PORTUGUÊS 9 10 ITALIANO FRANÇAIS 2 11 3 ENGLISH DEUTSCH
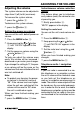
OPERATING ELEMENTS 1 2 3 4 5 6 7 8 26 Button, to unlock the removable control panel (release panel) BAND button (Band), to switch to radio mode, to select the FM memory levels and the MW and LW frequency ranges (MW and LW are not available on the Freiburg C31 and Las Vegas DJ31) TS, to start the Travelstore function FMT button (Freiburg C31 and Las Vegas DJ31), to select the FM memory levels, to switch to radio mode, to start the Travelstore function.
Switching to radio mode ................ 33 RDS functions (AF, REG) .............. 33 Selecting the frequency range / memory ......................................... 33 Tuning into a station ....................... 34 Setting the sensitivity of the station search mode ................................. 34 Storing stations ............................. 34 Storing stations automatically (Travelstore) .................................. 35 Listening to preset stations ............
NOTES AND ACCESSORIES Thank you for deciding to purchase a Blaupunkt product. We hope you enjoy using this new piece of equipment. Before using the device for the first time, please read these instructions carefully. The Blaupunkt editors are constantly working on making the operating instructions clearer and easier to understand. However, if you still have any questions on how to operate the unit please contact your dealer or the telephone hotline for your country.
Removing the control panel 1 ● ● ● off the unit and then out towards the left. The unit switches off after the control panel is removed. All the current settings are saved. Any cassette already inserted in the unit remains there. Attaching the control panel ➮ Slide the control panel from left to right into the unit's panel locking mechanism. NEDERLANDS ➮ Press the left-hand edge of the SVENSKA control panel into the unit until it clicks into place.
SWITCHING ON/OFF Switching on/off There are various ways of switching the unit on/off: Switching on/off using the vehicle ignition If the unit is correctly connected to the vehicle's ignition and it was not switched off using button @, it will switch on/off simultaneously with the ignition. You can also switch the unit on even if the ignition is off: ➮ To do so, press button @. Note: ● To protect the vehicle battery, the unit will switch off automatically after one hour if the ignition is off.
Setting the power-on volume You can set the unit's default power-on volume. ➮ Press the MENU button <. ➮ Keep pressing the or button ; until “ON VOL” appears in the display. ➮ Set the power-on volume using the and buttons ;. To help you adjust the volume more easily, the volume will be increased / decreased as you make your changes. If you change the setting to “0”, the power-on volume will be the same as the volume level that was set before the unit was last switched off.
ADJUSTING THE VOLUME You can find out from your Blaupunkt dealer which navigation systems can be used with your car radio. If a traffic information message is received during a telephone call or whilst a navigation announcement is being made, the traffic message will only be played after the call or voice output is finished. If you are already listening to a traffic announcement and a telephone call arrives or the navigation system wishes to make a voice output, the traffic announcement will first be heard.
or button ;. When you have finished making your changes, If you are in cassette, CD changer or AUX mode, ➮ press the MENU button <. ➮ press the BAND (TS) button 2 or Switching the RDS function on/off FMT button 2. “RADIO” appears in the display. ➮ To use the RDS functions (AF and RDS functions (AF, REG) The RDS functions AF (Alternative Frequency) and REG (Regional) extend your radio’s range of functions.
RADIO MODE Five stations can be stored on each memory level. ➮ Briefly press the BAND (TS) button 2 or the FMT button 2 to switch between the memory levels and frequency ranges. Tuning into a station There are various ways of tuning into a station. Automatic seek tuning ➮ Press the or button ;. The unit tunes into the next receivable station. Tuning into stations manually You can also tune into stations manually. ➮ Press the or button ;.
Listening to preset stations ➮ Select the memory or the frequency range. ➮ Press the preset station button 1 5 = of the station you want to listen to. Scanning receivable stations (SCAN) You can briefly play all the receivable stations. You can set the scanning time to between 5 and 30 seconds in the menu. Scanning is stopped and the station that was tuned into last will remain active. Setting the scantime ➮ Press the MENU button <. ➮ Keep pressing the or button ; until “SCANTIME” appears in the display.
RADIO MODE For example, the programme types can be: CULTURE TRAVEL JAZZ SPORT NEWS POP ROCK CLASSICS Using the PTY function, you can directly select stations of a particular programme type. Selecting a programme type and starting seek tuning ➮ Press the Note: ● If no station is found that corresponds to the selected programme type, you will hear a beep and “NO PTY” appears briefly in the display. The station that was listened to last will then be tuned into again.
➮ press the MENU button < twice. ➮ keep the RDS button 3 pressed ITALIANO Optimising radio reception ➮ Keep the RDS button 3 pressed ENGLISH until “NAME FIX” appears in the display. To allow scrolling text to be displayed again, Some radio stations use the RDS signal to transmit advertising or other information instead of their station name. These scrolling texts appear in the display. You can deactivate the feature for displaying scrolling texts.
TRAFFIC INFORMATION RECEPTION Traffic information reception Your radio unit is equipped with an RDSEON receiver. EON stands for Enhanced Other Network. Every time a traffic announcement (TA) is transmitted, you will automatically be switched from a station that does not provide traffic information to a station within the broadcasting network that does. Once the traffic information message is over, you will be switched back to the programme that you were listening to before.
➮ keep pressing the CD•C button 9 until “CASSETTE” appears in the display. The cassette plays in the direction that was set last. Cassette eject ➮ Press the button 5. The cassette is ejected. ➮ Remove the cassette. Changing the playback direction To switch between the two playback directions SIDE A and SIDE B, ➮ press the button 7. Note: ● The direction of play is automatically switched over when the end of the tape is reached (autoreverse).
CASSETTE MODE Repeating tracks ➮ Press button 3 (RPT) =. The current track is repeated. RPT appears in the display. When the end of the track is reached and the tape is rewinding, “RPT TRCK” appears in the display. To stop repeating the track, ➮ press button 3 (RPT) = again. Normal playback is then continued. RPT disappears from the display. Scanning all the tracks on a cassette (SCAN) ➮ Press the SCAN button 4. “CAS SCAN” appears in the display.
Selecting the tape type If you play a “metal” or “CrO2” tape type, you should set the tape type to “MTL ON”. To select the tape type, ➮ press button 1 (MTL) =. “MTL ON” or “MTL OFF” appears briefly in the display. until “CHANGER” appears in the display. Playback begins with the first CD that the CD changer detects. Selecting a CD To move up/down from one CD to another, ➮ press the or several times.
CD CHANGER MODE Fast searching (audible) To fast search backwards or forwards, buttons ; pressed until fast reversing / forwarding begins. ➮ keep one of the Repeating individual tracks or whole CDs (REPEAT) If you wish to repeat the current track, ➮ briefly press button 3 (RPT) =. “RPT TRCK” appears briefly and RPT lights up in the display. If you wish to repeat the current CD, ➮ press button 3 (RPT) = again. “RPT DISC” appears briefly and RPT lights up in the display.
To display the time, Cancelling pause ➮ keep the MENU ( ) button < Changing the display Setting the time manually To set the time, To switch between the track number / CD number display and the track number / playing time display, ➮ press the MENU button <. ➮ Keep pressing the or button ➮ press the MENU button <. ➮ Keep pressing the or button ; until “CDC DISP” appears in the display. ➮ Press the button ;. The current setting is displayed.
CLOCK - TIME Selecting 12/24-hour clock mode ➮ Press the MENU button <. ➮ Keep pressing the or button ; until “24 H MODE” or “12 H MODE” appears in the display. or button ; to switch between the modes. When you have finished making your changes, ➮ Press the ➮ press the MENU button < twice. Displaying the time continuously when the unit is off and the ignition is on To display the time when the unit is off and the vehicle ignition is on, ➮ press the MENU button <.
You can adjust the sound and volume distribution settings separately for each source (radio, cassette, CD changer and AUX). To adjust the left/right volume distribution (balance), or button ; to adjust the bass. When you have finished making your changes, ➮ Press the ➮ press the AUDIO button :. ➮ press the AUDIO button :. ITALIANO “BASS” appears in the display. or button ; to adjust the balance (right/left).
X-BASS EXTERNAL AUDIO SOURCES X-BASS External audio sources The X-BASS feature can be used to boost the bass at low volume levels. Instead of connecting a CD changer, you can connect another audio source equipped with a line output. The audio source, for example, can be a portable CD player, MiniDisc player or MP3 player. The AUX input must be activated in the menu. If you want to connect an external audio source, you will need an adapter cable.
Output power: 4 x 25 watts sine in accordance with DIN 45 324 at 14.4 V 4 x 45 watts max. power Tuner Frequency ranges: FM: 87.5 - 108 MHz MW: 531 - 1,602 kHz LW: 153 - 279 kHz (MW and LW are not available on the Freiburg C31 and Las Vegas DJ31 units) FM frequency response: 35 - 16,000 Hz Cassette Frequency response: 30 - 18,000 Hz ENGLISH The scope of the guarantee is orientated around the regulations in force within the country in which the unit was purchased.
Service-Nummern / Service numbers / Numéros du service aprèsvente / Numeri del servizio di assistenza / Servicenummers / Telefonnummer för service / Números de servicio / Números de serviço Country: Phone: Fax: WWW: http://www.blaupunkt.