Radio / CD / MP3 Bermuda MP35 7 645 185 510 Operating instructions http://www.blaupunkt.
Open here 2
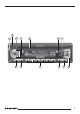
1 PORTUGUÊS 3 4 13 12 5 6 11 10 7 ESPAÑOL 2 9 8 3 FRANÇAIS ENGLISH
CONTROLS 1 2 3 4 5 6 7 8 9 : ; < = 4 Button to switch the unit on/off and to mute the unit. Button to release the control panel. CD Eject button . Volume control. CD-Slot. AUDIO button, to adjust the bass, treble, balance and fader settings and Sound Preset Short press: MENU button, to open the basic settings menu. Long press: SCAN, to start scan function. Arrow buttons X-Bass button to adjust the XBass function. Short press: DIS button, to display the time. Long press: to change the display priority.
Theft protection ................................ 7 Detaching the control panel .............. 7 Attaching the control panel ............... 7 Switching on/off ....................... 8 Adjusting the volume ................ 9 Setting the power-on volume ............. 9 Instantaneous volume reduction (mute) . 9 Mute while telephoning ..................... 9 Confirmation beep ......................... 10 Radio mode ............................ 10 Switching to radio mode .................
NOTES AND ACCESSORIES Notes and accessories Accessories Thank you for deciding to purchase a Blaupunkt product. We hope you enjoy using this new piece of equipment. Before using the device for the first time, please read these instructions carefully. The Blaupunkt editors are constantly working on making the operating instructions clearer and easier to understand. However, if you still have any questions on how to operate the unit please contact your dealer or the telephone hotline for your country.
Note: ● Never drop the control panel. ● Never expose the control panel to direct sunlight or other heat sources. ● Avoid making direct skin contact with the control panel’s contacts. If necessary, clean the contacts with a lint-free cloth and some alcohol. Detaching the control panel 2 ● The unit switches off after the control panel is detached. ● All the current settings are saved. ● Any CD already inserted in the unit remains there.
SWITCHING ON/OFF Switching on/off There are various ways of switching the unit on/off: Switching on/off using the vehicle ignition If the unit is correctly connected to the vehicle’s ignition and it was not switched off using ON/OFF button 1, it will switch on/off simultaneously with the ignition. Switching on/off using the detachable control panel ➮ Remove the control panel. The unit switches off. ➮ Attach the control panel again. The unit switches on.
Setting the power-on volume You can set the unit’s default power-on volume. ➮ Press the MENU button 7. ➮ Press the or button 8 repeatedly until “ON VOLUME” appears in the display. ➮ Set the power-on volume using the and buttons 8. To help you adjusting the volume more easily, the audible volume level will increase or decrease accordingly as you make your changes. If you select “LAST VOL”, the volume played before the unit was last switched off will be reactivated.
RADIO MODE ADJUSTING THE VOLUME Confirmation beep Radio mode For some functions you will hear a confirmation beep if you keep a button pressed for longer than two seconds. For instance, after storing a radio station to a station button you will hear a confirmation beep. The beep can be switched on/off. ➮ Press the MENU button 7. ➮ Press the or button 8 repeatedly until “BEEP” appears in the display. ➮ Use the or buttons 8 to switch between the options.
This unit can receive programmes broadcast over the FM and AM frequency ranges. There are three memory banks for the FM range and one for the AM range. Six stations can be stored in each memory bank. Selecting the FM memory bank or the AM frequency range respectively ➮ Press the BND•TS button < to switch between the FM memory banks (FM1, FM2 and FMT) and the AM frequency range respectively. Note: ● Different seek tuning sensitivities can be set separately for FM and AM respectively.
RADIO MODE Storing stations automatically (Travelstore) You can automatically store six stations with the strongest reception in the region. The stations are stored in the FMT or AM memory depending on the selected frequency range. Note: ● Stations that were previously stored in this memory are deleted in the process. ➮ Press and hold the BND•TS button < until the seek tuning starts. The station storing procedure begins. “FM TSTORE” or “AM TSTORE” appears in the display.
To ensure the system functions properly, only use CDs labelled with the compact disc logo. Problems might be experienced when trying to play copy-protected CDs. Blaupunkt cannot guarantee the proper functioning of copy-protected CDs! Risk of damage to the CD drive! Contoured CDs (shape CDs) are not suitable for playback in this unit. We accept no liability for any damage to the CD drive or CD that may occur as a result of the use of unsuitable CDs.
CD MODE Scanning tracks (SCAN) Pausing playback (PAUSE) You can briefly play all the tracks on a CD. ➮ Press the MENU button 7 for longer than two seconds. The next track will then be played for scantime as set in the “Setting the scantime”. ➮ Press button 3 ;. “PAUSE” appears in the display. Note: ● You can set the scantime. For further details, please read the section entitled “Setting the scantime” in the “Radio mode” chapter.
➮ Press the button 3. ➮ Remove the CD Notes: ● An ejected CD will be reloaded into the unit if not removed within 10 seconds to protect it from accidental damage. ● You may also eject a CD when the unit is off, or when CD is not playing. Preparing the MP3-CD The various combinations of CD burners, CD burning software and CD blanks may lead to problems arising with the ability to play certain CDs.
MP3 MODE Each directory can be named using a PC. The directory name can be displayed in the device’s display. Name the directories and files using your CD burner software. The software’s operating instructions will provide details on how to do this. Note: ● When naming directories and files you should avoid using special characters. If you like your files to be in the correct order, you should use burner software that places files in alphanumerical order.
Scanning tracks/files (SCAN) You can briefly play all the tracks/files on the CD. ➮ Press the MENU button 7 for longer than 2 seconds. “SCAN” appears alongside the blinking track/file numbers during the scanning process. Note: You can set the scanning time (scantime). For further details on setting the scantime, please read the “Setting the scantime” section in the “Radio mode” chapter.
MP3 MODE Setting the display Setting the standard display mode While playing MP3 tracks/files, you can choose to display one of the following standard display modes: ● Track/file number and playing time ● Track/file number and clock time ● Directory number and track/file number ● Directory number and clock time ● Directory number and playing time The chosen display will be shown after scrolling the MP3 texts at every change of track/file.
5 options are available: ● Track number and play time ● Track number and clock ● CD number and track number ● CD number and clock ● CD number and play time ➮ Press the DIS button : once or several times for longer than two seconds until the required display appears. Switching to CD changer mode ➮ Press the SRC button = repeatedly until “CHANGER” appears in the display. The CD Changer will resume playback from where it was last played previously.
CD CHANGER MODE ➮ To play the tracks on all the inserted CDs in random order, press button 5 MIX ; longer than two seconds. “MIX ALL” appears briefly and MIX lights up in the display. Stopping MIX ➮ Press button 5 MIX ; briefly and “MIX OFF” appears briefly in the display and MIX disappears. Scanning all tracks on all CDs (SCAN) ➮ To briefly play all the tracks on all inserted CDs in ascending order, press the MENU button 7 for longer than two seconds.
Setting the time ➮ To set the time, press the MENU button 7. ➮ Press the or button 8 repeatedly until “CLOCK SET” appears in the display. ➮ Press the button 8. The time appears in the display. The minutes flash on and off and can be adjusted. ➮ Adjust the minutes using the buttons 8. ➮ Once you have set the minutes, press the button 8. The hours start flashing. but➮ Adjust the hours using the tons 8. When you have finished making your changes, ➮ press the MENU button 7 twice.
TONE AND VOLUME DISTRIBUTION SETTINGS Tone and volume distribution settings Setting the left/right volume distribution (balance) You can adjust the tone settings (bass and treble) separately for each source (radio, CD/MP3, CD changer and AUX). The volume distribution (balance and fader) settings apply to all audio sources. ➮ To set the left/right volume distribution (balance), press the AUDIO button 6. “BASS” appears in the display. ➮ Press the button 8 repeatedly until “BAL” appears in the display.
Note: ● X-BASS setting is shared by all audio source (radio, CD/MP3, CDchanger or AUX). ➮ To set the X-BASS, press the X-BASS 9 button. ➮ Press the or button 8 to choose between the possible settings. ➮ Press the X-BASS 9 button once you have completed the setting. Note: ● The selected preset sound effect is applied to all audio sources.
LEVEL DISPLAY EXTERNAL AUDIO SOURCES Setting the level display External audio sources The level display briefly provides a symbolic display of the volume and the audio control settings whilst you are adjusting them. When settings are not being made, the level display indicates the music level of the car radio. You can switch the music level display on/off in the menu. ➮ Press the MENU button 7. “MENU” appears on the display. ➮ Press the or button 8 repeatedly until “PEAK LVL” appears on the display.
SPECIFICATIONS ENGLISH Specifications Amplifier 18W RMS x 4ch @ 14.4V @ 4ohm @ 1% THD FRANÇAIS Output power: Tuner ESPAÑOL Frequency ranges USA: FM: 87.5 - 107.9 MHz (200 kHz step) AM: 530 - 1710 kHz (10 kHz step) PORTUGUÊS Frequency ranges Europe: FM: 87.5 - 108 MHz (100 kHz step auto/50 kHz manual) AM: 531 - 1602 kHz (9 kHz step) Frequency ranges Thailand: FM: 87.5 - 108 MHz (50 kHz step auto/25 kHz step manual) AM: 531 - 1602 kHz (9 kHz step) Frequency ranges South America: FM: 87.5 - 107.
Service numbers / Numéros du service après-vente / Números de servicio / Número de serviço Country: Phone: Fax: WWW: http://www.blaupunkt.