Navigation system TravelPilot RG 05 Operating Instructions TravelPilot RG 05
Important information for road traffic safety Operation while driving As a driver you are solely responsible for your road safety. Use this equipment only in situations where you keep complete control of your vehicle at all times! Remember that, at a speed of 50 kph, you travel a distance of almost 14 m within one second. Route guidance The route guidance system provides you with driving recommendations only. It is always up to you to take another route.
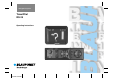
1 2 3 TravelPilot RG 05 4 5 7 6 8 9
Control elements of the TravelPilot RG 05 1 2 3 4 5 6 Enter key (confirmation) Cursor up, switching between route guidance/map display Cursor down, switching between route guidance/map display Select character, indication of current position when the vehicle is stationary Select character, page-by-page scrolling through lists, alter zoom range for map display, increase volume of voice output during route guidance, indication of current position when the vehicle is stationary Select character, repeat voic
Product information Scope of delivery The TravelPilot RG 05 is an active route guidance system. After having inserted the corresponding navigation CD containing the area of the current vehicle position and the destination area, you can use this system in order to be guided to your destination. Discs for other countries or Merian Scout travel guides are under preparation or already available.
Table of contents DSC menu (Direct Software Control) ....................................... 55 Destination memory .................................................................... 55 Delete curr. dest. ......................................................................... 57 Enter location .............................................................................. 57 Map info ...................................................................................... 58 Audio ...........................
Display/activation of the navigation menu (NAV menu) Turn on the system. • Press AUX. The display shows the AUX selection menu, the contents of which depends on the connected sources. • Press the / keys to move the cursor to the line NAVIGATION and • confirm with . The navigation page selected last will appear on the monitor. If the navigation module was already activated, the display will show the navigation page selected last immediately. In the map display mode, to select the NAV menu.
Entering the destination • Use the / keys to move the cursor to ENTER DESTINATION and • confirm with . A selection of the possible ways to enter a destination appears on the display: DEST. FROM MEMORY Prerequisite: You have stored at least one destination. CITY, if your destination does not correspond to the destination entered last. STREET/JUNCTION, if the destination is in the same city. Prerequisite: The destination entered last contains a city name.
DEST. FROM MEMORY Make sure that you have at least stored one destination in the destination memory. Use the / keys to scroll through the list page by page. Select a destination with the cursor keys / . Use / to move to the left/right of the selected entry. Confirm by pressing . To quit this screen: Move to ENTER DESTINATION with the / cursor keys and confirm with . CITY To enter the destination. The system will display the name of the destination entered last.
Use the / keys to move the cursor to the desired destination. You can scroll through the list of cities page by page using the / keys. Confirm the entered city by pressing the key. CHANGE CITY Use this item to alter a pre-selected city. NAV MENU To abort the entry and return to the NAV menu. CENTRE When choosing this option, the system will display a list of all local parts of the selected city available on the disc.
NAV MENU To abort the entry and return to the NAV menu. JUNCTION By specifying a junction you can define your destination more precisely. This function shows you all streets either intersecting with or directly connected to the selected destination street. Choose the junction coming closest to your destination and confirm by pressing the key. CHANGE JUNCTION Use this item to alter a pre-selected junction. NAV MENU To cancel the entry and return to the NAV menu.
Under AIRPORT you can enter both regional and international airports. STORE DESTINATION Before starting the route guidance function, you can store the entered destination. For this purpose, move the cursor to the line “STORE DESTINATION” and press the key. You can enter a short name in order to find the destination more quickly. If you do not want to record such a name, press the key. Now the destination has been stored.
When driving on a digitised road, you will be guided to your destination with the assistance of spoken driving recommendations and direction symbols after the route calculation pro-cess has been completed. During the route guidance process you can use the / keys to increase or reduce the voice output volume. Press to repeat the current spoken message. Press the key to display the destination info for approximately 4 seconds during the trip.
100 metres travel to be able to output driving recommendations again. If you have reached your destination, the system displays the corresponding message and you will hear a voice saying “You have reached your destination”. After the symbol “destination reached” has disappeared from the display, the system will only show you the name of the currently used street or display “NAV MENU” if the vehicle is stationary. NAV MENU Back to the NAV menu.
You can provide this destination with a short name. Press the key if you do not wish to enter a short name. The destination will automatically become the DESTINATION ON MAP. You can then start the route guidance function or move the cursor to ENTER DESTINATION in order to repeat the entry. Choose the item NAV MENU to abort the destination entry. Start route guidance START GUIDANCE After having activated the navigation module, the display will show the destination entered last.
Information displayed on the monitor During route guidance, two basic monitor modes are available: • Directional symbols (pictograms showing driving recommendations) • Map display Directional symbols If the map display mode is active, use the the pictogram mode.
Map display If the pictogram mode is active, use the or button to switch to the map display mode. The map orientation depends on the scale selected. It is rotated to follow the direction of driving for all scale values up to 20 km; for all other scales as of 20 km, the map is orientated towards the destination. Use / to alter the scale.
The individual road classes are displayed with the following colours: red = Motorways yellow = Federal roads (scale < 100 km) green = Country roads (scale < 10 km) dark green = Major residential roads (scale < 2 km) light brown = Residential roads (scale < 0.2 km) light brown/dotted = Factory premises, paths (only scale 0.1 km) green/dotted = Pedestrian areas (scale < 0.
Info menu INFO MENU LOCATION MAP NAV MENU The map showing the current vehicle location is rotated towards the direction of driving. Use the / keys to change the scale from 100 m to 200 km. Vehicle is stationary: Back to the NAV MENU with . During the trip: By pressing the key the TravelPilot will show the destination info for approximately 4 seconds. Back to the NAV menu: Press key once again while the destination info is still being displayed.
ROUTE LIST AUTOZOOM Listing of all streets from the current position to the destination. Page through the list using the / or / keys. Quit with INFO MENU. Shows the location , destination and route using the largest possible scale. = current vehicle location = destination The map is generally oriented to magnetic north. The arrow indicating the vehicle position shows the current direction of driving using north as its reference. Use to alter the scale. Reset to the optimal scale with the key.
DESTINATION AREA This option shows the destination area with a scale of 100 m to 200 km to be selected with the / keys. The map is oriented to magnetic north. Scale changes made using the DESTINATION AREA function have no effects on the scale used in the normal map mode. Vehicle is stationary: Back to the NAV MENU with . During the trip: By pressing the key the TravelPilot will show the destination info for approximately 4 seconds.
DSC menu (Direct Software Control) The DSC menu contains the following items: NAV MENU DESTINATION MEMORY DELETE CURR. DEST. ENTER LOCATION MAP INFO AUDIO GPS STATUS STANDBY TIME CALIBRATE NAV MENU Back to the NAV menu. DESTINATION MEMORY Use this item to edit the destination memory. The following editing options are available: SORT ABC . . . Sorts the destinations in alphabetical order. SORT DISTANCE Sorts the destinations as a function of the distance to the respective vehicle position.
STORE DESTINATION Stores the destination entered last. You can enter a short name in order to find the destination more quickly. If you do not want to record such a key. name, press the LOCATION AS DEST. Stores your current location as a destination. Using this option is particularly advisable if you are new to a city, in order to find the way back to this position (e.g. your hotel) quickly. You will have to enter a short name. Make sure that each short name is only used once.
DELETE CURR. DEST. The destination entered last (i.e. the current one) will be deleted. The TravelPilot will prompt you to enter a new destination. ENTER LOCATION If the vehicle has been transported on a car-train or ferry, it will be necessary to re-position the system to the new vehicle location. Thanks to GPS this will be done automatically after some 100 metres travel. Should the system be not able to re-position itself automatically, then you will have to enter your current location manually.
MAP INFO MAP LOCATION Use buttons , , , to move the vehicle symbol to the actual location. By pressing the MOD key the vehicle symbol will start rotating counter-clockwise. Hold down the MOD key until the vehicle symbol is properly aligned with the course of the road. DSC MENU Back to the DSC menu. When selecting this menu, the following items will be available: DSC MENU Back to the DSC menu. DISTANCE Remaining distance to the destination. TRAVEL TIME Remaining time until reaching the destination.
AUDIO The menu items can be selected with the cursor and switched ON and OFF using the key. All of the activated menu items will be displayed in the map. LOCAL LANGUAGE From the displayed list of languages you can select a language of your choice to be used for displaying the messages and for voice output. Note: When changing the language or selecting a new one, the system will automatically re-boot the voice output. The booting of a language can take up to 20 minutes.
SWITCH OFF Use this option to switch off the voice output SWITCH ON Use this option to switch on the voice output. VOLUME When this option is active, you can use the / keys to adjust the basic volume (initial volume when turning on the system) while a spoken message is being output. During the route guidance process, the volume can be altered using the / keys. The new setting will be remained until the set is switched off. BASS You can alter the reproduction of the bass frequencies using the / keys.
GPS STATUS Use this option for information on whether or not GPS correction is switched on or off, how many satellites are available and how many received. The TravelPilot shows the current location (geographical longitude and latitude). GPS ON or GPS OFF The system indicates the currently active setting in the upper part of the monitor. You can switch GPS on/off via the option in the lower part of the display.
tion adjusted last will remain stored. As soon as the vehicle is started again, the last status will be displayed and the route guidance function will be continued automatically. In order to avoid that the battery goes flat you should choose a max. standby time of 30 minutes. CALIBRATE For example, a re-calibration of the system will become necessary if the message “OFF ROAD” is frequently displayed although you are driving on a digitised road.
Example for destination entry Selected destination: Stuttgart, Karlstraße/Markstraße junction Use the cursor to select the following menu items one after the other and confirm with : • NAV MENU • ENTER DESTINATION • CITY The header of the screen shows “ENTER CITY”. Select the character “S” with the MOD rocker button: • For this purpose, press the / or / keys as many times until the “S” is highlighted. • Press MOD. The “S” now appears in the entry line. Select “T”, “U” and “T” one after the other.
Note: If you cannot find the desired place within the list of cities, you can use the / keys of the MOD rocker button to scroll the listing page by page. In order to enter the destination “Karlstraße/Marktstraße junction”, • move the cursor to STREET/JUNCTION and • confirm with . Select the character “K” with the MOD rocker button: • For this purpose, press the / or / keys as many times until the “K” is highlighted. • Press MOD. The “K” now appears in the entry line.
Note: After the first scrolling a street called “KARL-STRASSE,KÖNI” will appear on the monitor. This street name is too long in order to be shown in one display. Press the key to read the rest of the name. The correct name of this street is “KÖNIG-KARL-STRASSE”, therefore continue to scroll forwards. • Move the cursor to the line “KARLSTRASSE” and • confirm by pressing . After a short time the monitor will show the selected destination “STUTTGART KARLSTRASSE”.
Autonomous route guidance After entering the destination and activating the route guidance function, the system begins to calculate the route leading to your destination. You can now start to drive. The system provides you with an acoustic and visual message saying “the route (to destination) is being calculated”. To determine the most favourable route, the system gives priority to motor and expressways.
Annex CD-ROM The data required for the route guidance function is digitally stored on the CD-ROM. For more information on the contents please refer to the CD booklet. Calibration Caution: A faulty calibration can lead to a complete failure of the system. In case of doubt, please contact your TravelPilot dealer! For example, a re-calibration of the system will become necessary if the message “OFF ROAD” is frequently displayed although you are driving on a digitised road.
Changing the CD ^ = The CD-ROM can only be changed if the vehicle is stationary. The system must be switched on. Open the flap on the navigation computer and • press the button. The cartridge ejects. You can now put a different disc into the cartridge (label side facing up, cartridge in the direction of the arrow) and slowly insert it into the CD slot. The cartridge will be automatically transported to the operating position and the navigation computer will start reading the information.
Blaupunkt-Werke GmbH Bosch Gruppe 9/96 TravelPilot RG 05 K7/VKD 8 622 400 439 (A3)