RX+ 12 Digitalradio mit Uhrenfunktion Digital radio with clock radio
RX+ 12 2
RX+ 12 3
RX+ 12 4
RX+ 12 5
RX+ 12 6
RX+ 12 7
RX+ 12 8
RX+ 12 9
RX+ 12 10
RX+ 12 11
RX+ 12 12
RX+ 12 13
RX+ 12 21 1 2 3 4 5 6 7 8 9 10 11 12 13 14 15 16 17 18 19 20 14
RX+ 12 15
RX+ 12 16
RX+ 12 17
RX+ 12 18
RX+ 12 19
RX+ 12 20
RX+ 12 21
RX+ 12 22
RX+ 12 23
RX+ 12 24
RX+ 12 25
RX+ 12 26
RX+ 12 27
RX+ 12 28
RX+ 12 29
RX+ 12 30
RX+ 12 IMPORTANT SAFETY INSTRUCTIONS Important Safety Instructions Caution: To reduce the risk of electric shock, do not dismantle the product and do not expose the apparatus to rain or moisture. No user-serviceable parts inside. Refer servicing to qualified personnel only.
RX+ 12 Conformity Model number: RX+ 12 Description: Digital radio with clock radio Brand name: Blaupunkt Responsible party: M3 Electronic GmbH Gutenbergstrasse 5, D-65830 Kriftel. Germany Hereby, Blaupunkt Competence Center Audio M3 Electronic GmbH, declares that this Class 1 equipment is in compliance with the essential requirement and other relevant provisions of Directive 1999/5/EC. Letter of conformity can be obtained from info@m3-electronic.de. SAFETY INSTRUCTIONS 1.
RX+ 12 10. Ventilation - The product must be properly ventilated. Do not place the product on a bed, sofa, or other similar surface. Do not cover the product with any items such as tablecloths, newspapers, etc. 11. Heat - The product should be situated away from heat sources such as radiators, heat registers, stoves, or other products, including amplifiers that produce heat. No naked flame sources, such as lighted candles, should be placed on the apparatus. 12.
RX+ 12 22. Mains fuses - For continued protection against fire hazard, use fuses only of the correct type and rating. The correct fuse specification for each voltage range is marked on the product. 23. Do not turn up the volume while listening to a section with very low level inputs or no audio signals. If you do, the speaker may be damaged when a peak level section is suddenly played. 24.
RX+ 12 5. The unit should not be impeded by covering the ventilation opening with items such as newspaper, table-cloths, curtains etc. Make sure that there are at least 20 cm of space above and at least 5 cm of space on each side of the unit. 6. The apparatus must not be exposed to dripping or splashing and that objects filled with liquids, such as vases, must not be placed on the apparatus. 7. To prevent fire or shock hazard, do not expose this equipment to hot places, rain, moisture or dust. 8.
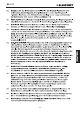
RX+ 12 INTRODUCTION Front View 21 1 2 3 4 5 6 7 8 9 10 11 12 13 14 15 16 Back View 17 18 19 20 36
RX+ 12 Button function introduction 1. Display 2. --- short press to switch the radio between standby ON and OFF. In standby ON mode: press and hold to check the software version, and short press to system reset operation. 3. Band ---DAB/FM switching. 4. Scan --- radio scan button. 5. Info/Alarm --- short press to switch the radio information display. Press and hold two seconds for alarm setting. 6. Shift --- combine with 1/6 - 5/10 key to save station. 7. --- next (station selection). 8.
RX+ 12 setting; then press Enter button shift to alarm source (beeper/DAB/FM)/ alarm volume / alarm mode (Daily/Weekday/Weekend/once) selection; press or button to select between these options. Then press Enter button again to complete the alarm setting. And the unit will resume to previous play mode. Note: a. The alarm setting will implement and quit the alarm interface automatically if there is no further operation last 10 seconds. b.
RX+ 12 6. During the station playing, press Info/Alarm button and you can see the signal strength, time information, and the content of station. 7. If you want to store the station, press and hold one of 1/5 – 6/10 key. For example, you want to save one stations in preset 3, press and hold the 3/8 button for 2 seconds, wait for the display to show “Preset 3 stored”, which means that the station has been stored successfully. It is the same operation for other preset stations. 8.
RX+ 12 FM OPERATION 1. In DAB band, if you want to listen FM radio, please press Band to switch to FM band. 2. In FM mode, press Scan button to auto tune station. Short press the Scan button and the unit will search for radio frequency automatically. When it finds a station with strong signal, the unit will stop searching and will play this station. Short press the Scan button for high frequency auto tuning, long press the Scan button for lower frequency auto tuning. 3.
RX+ 12 4. Open up the battery door on the rear side, install and put 4 pcs 1.5V AAA into the compartment. Please pay attention to direct the voltage +/polarity according to the symbol inside. When you are using battery power supply, the whole functionality operation is the same as with DC power. When the battery has low power, the display will show low battery bar. When the battery is exhausted, the display show “Change Battery”, and then switches Power OFF after two seconds.
RX+ 12 This symbol on the product or in the instructions means that your electrical and electronic equipment should be disposed at the end of its life separately from your household waste. There are separate collection systems for recycling in the EU. For more information, please contact the local authority or your retailer where you purchased the product. All rights reserved by Blaupunkt Competence Center Audio M3 Electronic GmbH.