www.blaupunkt.com Mobile Navigation TravelPilot 100 EE Operating and installation instructions (long version) TP100EE_lo_GB_193.indd 1 29.08.
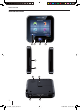
Device overview Device overview 2 1 3 4 5 6 8 9 7 10 2 TP100EE_lo_GB_193.indd 2 29.08.
Device overview 1 Display (Touch screen): Simple and intuitive operation by touching the buttons on the display. 2 VOL -: Reduce the volume 3 On/off switch: • Long press (longer than 3 seconds): Turns the device on or off. • Short press: Opens the main menu.
Contents Device overview ..................................2 Safety notice .......................................7 Warning symbols used ...........................7 Intended use ........................................7 Road safety ..........................................7 General safety information......................7 Tips about using the CD/DVD ..................8 Cleaning tips ........................................8 Disposal tips.........................................8 First operation ........
Contents Further functions after entering the destination ..................................21 Saving destinations .............................21 Saving an entered destination/one of the previous destinations as favourite .......22 Fixing the route settings .......................22 Starting to navigate ...........................23 Start navigation...................................23 On reaching the destination ..................23 Ending navigation ................................23 GPS reception lost.
Contents Warning settings* ................................35 Warning while exceeding the speed limit ................................36 Change speed camera warning settings...............................36 Activating warnings in pedestrian mode ..............................36 Activating safety mode ......................36 Menu settings* ....................................36 Activating the animation ....................37 Selecting a background .....................37 Track information settings* .......
Safety notice Safety notice General safety information It is in your own interest to read the following safety references carefully before you operate the device. Consider the following tips in order to protect yourself and the device against defects and against injuries or possible mortal danger due to fire or explosion: • Protect the equipment against becoming wet or damp as it is not waterproof or splash-proof. • Do not open or change the device.
Safety notice | First operation Tips about using the CD/DVD A CD/DVD is included with the device, which contains navigation software and a digital map. In order to protect the CD/DVD against dirt and damage please consider the following info: Store the CD/DVD in its case. Only touch to edges of the CD/DVD. Do not place the CD/DVD and its case in direct sunlight. Only use a clean CD/DVD. Clean the CD/DVD with a soft, lint free cloth from the inside outward. Never clean the CD/DVD in the direction of play.
First operation | Mounting in the vehicle Note: The battery is equipped with a protection from overheating from excessive current flow. The protection prevents the overloading of the battery starting from an ambient temperature over 45 °C. Turning the device on Note: The mode can be changed over at any time (see chapter "Using the menus, Simple mode/ advanced mode"). 쏅 Tap on the button to select the mode: – Simple Mode: Clear operation for fast destination input.
Mounting in the vehicle | Switching on /off 쏅 Press the suction cup of the mounting against the screen. 쏅 Fold the lever at the mounting plate toward the screen. Attach the cup retainer The suction cup mounting plate has two supports for the cup retainer. 쏅 Push the cup retainer onto the supports until they engage. Removing the suction cup mounting plate If you change vehicles, you can remove the mounting plate very simply. 쏅 Fold the lever at the mounting plate away from the screen.
Using the menus Using the menus Simple mode/advanced mode 2 modes are available for the operation of the device: The simple mode for fast destination input and the advanced mode with many additional settings and functions. The modes can be changed at any time. Note: Additional functions and settings of the advanced mode are marked by a star "*" in this manual. The provided short manual contains detailed information regarding the simple mode. Changing modes 쏅 Tap on the symbol in the main menu.
Using the menus | Information about GPS Buttons 쏅 Tap on an entry in order to select it. Tap on this button in order to return to the previous menu. Tap on this button in order to turn to the next page in the menu. Done: Tap on this button in order to confirm an entry or a setting. Information about GPS Keyboard The navigation device measures the current position of your vehicle via GPS and compares these coordinates with its digital map.
Information about GPS | Making basic adjustments This information can be found in the menu. – Accuracy: Signal strength of the GPS satellites – In addition, the number of received GPS satellites is represented by bars (the colour represents the signal strength). For navigation signals at least 3 satellites are needed.
Making basic adjustments 쏅 Tap on the symbol to activate summer time (ticked) or to deactivate it (not ticked). Note: Adjust the settings if the time has changed at your location, or if you must adapt to another time zone. 쏅 Tap on the button to leave the menu. Activating the PIN request You have the possibility with the PIN request of blocking the use of the device to unauthorised access. Thus each time that you switch the device on your PIN (Personnel Identity Number) is queried which you have set up.
Navigation Navigation The navigation equipment does not relieve you of your responsibility as a driver for correct and prudent behaviour on the road. Entering an address Tap on the symbol. 쏅 The Find Address menu is displayed. DANGER! Diverting your attention away from the road can cause accidents! Do not operate the device while driving. Look at the display in a safe traffic environment. Notes: • Plan the route before you start. • Use the basic settings initially.
Navigation -or쏅 Tap on the button Intersection and enter the road which crosses the entered road. The map is displayed. 쏅 Tap on the button Set as Destination. The route is computed and the navigation is started. Note: • You have the possibility after entering the destination of starting the navigation or e.g. of storing the destination. For this, read the chapter "Further functions after entering the destination". • The navigation starts as soon as a GPS signal is received.
Navigation Insert Via: Adding a location on a route as a stopover – Continue: Adding a location as a stopover on the current route. Further places can be entered in the map as stopovers or a destination. – Remove : If you mark a destination, the button is displayed. The destination is removed. 쏅 Tap on the button Set as Destination to start the navigation. – Points of interest (POI) Points of interest (or POI's) are specific locations such as parking and petrol stations wihch are stored in the digital map.
Navigation | Route planning Selecting a POI according to stored criteria The search criteria enables a quick search of the POIs. The POIs are divided in such a way in certain categories, e.g. Parks, shopping and eating. 쏅 Tap on the menu Where to search? on the button Saved Search Criteria . 쏅 Select one of the stored criteria. A list of the associated POIs is displayed. 쏅 Select the desired POI. The map is displayed. 쏅 Tap on the button Set as Destination to start the navigation.
Route planning – Route information The Route Information menu contains information about the route, e.g. about the travel time and distance with the current route settings (mode). Tap on the symbol. 쏅 The menu Route Information is displayed. 쏅 Tap on the button Plan on Map in order to display the route on the map. 쏅 Tap on the button Start Navigating to start the navigation. Tap on the button to leave the menu. 쏅 -or쏅 Tap on the button Delete Route to delete the current route.
Route Planning | Fly over/Simulation Saving a route Fly over/simulation * 쏅 Plan your holiday trip comfortably from home and provide youself with an overview of the distance and travel time - also without GPS reception. Select fly over or simulation: Fly over consists of a fast display of the route without audio instructions. With simulation the route is simulated with audio instructions and a realistic speed. Tap on the symbol to save the route. The keyboard is displayed.
Further functions after entering the destination Further functions after entering the destination Requirements: • You have entered a destination as described in the chapter "Destination input" -or• You have entered a POI as described in the chapter "Points of interest" -or• You have selected a position in the map as described in the chapter "Working with the map", "Tap in the map". The map is displayed. 쏅 Tap on the button Set as Destination to start the navigation.
Further functions after entering the destination Destinations from the Favourites can be renamed (see: "Manage"). You can delete individual destinations again from both lists (see "Manage"). 쏅 Saving an entered destination/one of the previous destinations as favourite Requirements: • You have entered a destination as described in the chapter "Destination input" -or• You have selected a destination from the History list as described in the chapter "Destination input". The map is displayed.
Starting to navigate Starting to navigate DANGER! Not adhering to traffic regulations can cause accidents. Only follow the directions if the state of the road and the traffic regulations allow it. The navigation device will bring you to your destination even if you have to deviate from the planned route. Note: You can orient yourself at any time on the map or arrow representation. Start navigation When you start the navigation a route with your settings is computed (see "Fixing the route settings").
Starting to navigate -or쏅 Tap on No to continue navigating. GPS reception lost If during navigation the GPS reception is disturbed over longer period of time, the navigation is stopped. As soon as the reception is re-established the device automatically recognizes whether your position has changed and computes the route again if necessary. You can then simply continue navigating. Note: External influences can disturb the view to the sky and thus the GPS reception of the navigation device.
Starting to navigate 쏅 Click on the action arrow to display the Route Information menu. 쏅 Tap on the lower action arrow to display the Itinery menu. Trip information display The Destination menu contains information about the route, e.g. the travel time and distance. Tap on the symbol. 쏅 The Destination menu is displayed. 쏅 Tap on the different buttons in order to display the data during the navigation. You can select a maximum of 3 buttons. The selected buttons are then marked.
Working with the map Note: If you tap on any place in the map during navigation, an auxiliary menu with further functions is displayed. For more on this, read the chapter "Further functions during navigation". Working with the map Display map 쏅 Tap on the navigation menu on the button Map. Tap on the symbol to close the map 쏅 view and to return to the navigation menu.
Working with the map | Manage Quick Menu Manage In the Quick Menu make the settings which are often used during navigation. Tap on the symbol to go to the Quick 쏅 Menu. Note: If you have activated the button Quick Menu, the respective button is marked. 쏅 Adjust the volume control in order to change the volume for navigation announcements. Tap on the symbol in order to 쏅 switch between the day and night views. Tap on the symbol to activate the 쏅 route record (ticked) or to deactivate it (not ticked).
Manage Manage the last destination Managing user data 쏅 쏅 Tap on the Manage menu on the button User Data Management. The User Data Management menu is displayed. 쏅 Tap on the button Remove Pins to delete your set pins. -or쏅 Tap on the button Backup User Data to secure your user data. Note: In order to be able to secure your user data, a memory card must be placed in the card slot. The data can be stored only on a memory card. -or쏅 Tap on the button Restore User Data to restore your user data.
Managing POIs Managing POIs* In the Manage POI menu you can manage and delete your POIs. You have the following settings options: • Create new group • Change group details • Change POI details Select in the menu Manage on the 쏅 symbol. The Manage POI menu is displayed. 쏅 Tap on the button My POI or All in order to change between your provided and all POIs. Tap on the button to leaf 쏅 through the menu. Creating a new group Create groups in order to sort your POIs. 쏅 Tap on the button New Group.
Managing POIs 쏅 Tap on the button with the name of the POI which you want to change. The details are displayed. Renaming a POI 쏅 Tap on the button with the name of the POI. The keyboard is displayed. 쏅 Give the group a name and tap on the button Done. Changing a POI symbol 쏅 Tap on the button with the blue symbol. A list of symbols is displayed. 쏅 Tap on the button to leaf through the list of symbols. 쏅 Tap on the desired symbol in order to assign it to the POI. Deleting a POI 쏅 Tap on the button Delete.
Recording a route Recording a route* In the Manage Saved Routes menu mark the route and manage saved routes. Tap on the symbol in the navigation 쏅 menu. The Manage menu is displayed. Recording routes 쏅 Tap on the symbol. The Manage Track Logs menu is displayed. 쏅 Tap on the button Record to start recording. The map is displayed. 쏅 Tap on the button Stop Recording to stop recording. Replaying recorded routes If you have already stored track information, these are displayed in a list.
Settings in the navigation menu Settings in the navigation menu Map display* 쏅 You can change these settings: • 3D settings • Colour profile • 2D terrain • Street name display • Lane info Select in the menu Settings on the 쏅 symbol. The Map Screen Settings is displayed. 쏅 Tap on the symbol in the main menu. The navigation menu is displayed Tap on the symbol. The Settings menu is displayed. In the menu you can change the mode. 쏅 Tap on the button Simple Mode to change to simple mode.
Settings in the navigation menu Colour profile In the Colour Profiles menu you have the possibility of selecting different colour profiles for the day and night views. 쏅 Tap on the button Night Mode to turn night mode on or off. Note: You can easily select this function if necessary in the Quick Menu (see chapter "Buttons on the map display"). 쏅 Tap on the button Daytime Colour Profile in order to select a colour profile for the day view.
Settings in the navigation menu Navigation settings* You can change these settings: • Hold road position • Replanning after deviating from route • Fixing the position • Automatic overview mode Select in the menu Settings on the 쏅 symbol. The Navigation Settings is displayed. If you have made changes in the settings: Tap on the button to leave the menu. 쏅 Hold road position 쏅 Tap on the button Keep Position on Road to activate this function (ticked) or to deactivate it (not ticked).
Settings in the navigation menu Audio settings* 쏅 Select in the menu Settings on the symbol. The Sound Settings is displayed. If you have made changes in the settings: 쏅 Tap on the button to leave the menu. Setting the dynamic volume 쏅 Tap on the button Dynamic Volume in order to let the volume automatic increase starting from a certain speed. You can make further settings for the dynamic volume: 쏅 Tap on the button Dynamic Volume Settings in order to display further settings options.
Settings in the navigation menu Warning while exceeding the speed limit 쏅 Tap on the button Warn When Speeding to activate this function (ticked) or to deactivate it (not ticked). The maps can contain information about the permitted maximum speed. If the function is activated, you receive a warning if you drive too fast. Note: The speed information is not available for each region. Please ask your dealer. 쏅 Tap on the symbol with the three points in order to have further settings options indicated.
Settings in the navigation menu 쏅 Tap on the symbol. The Menu menu is displayed. If you have made changes in the settings: Tap on the button to leave the menu. 쏅 Activating the animation 쏅 Tap on the button Animation to activate animated menus (ticked) or to deactivate it (not ticked). Selecting a background 쏅 Tap on the button Background in order to select one from a list of available background images.
Device settings Device settings Settings in the Settings menu: • Display • Key sounds (sounds of the buttons) • Language • Time • Product information • Anti theft protection On the second page of the menu you will find these settings: • Factory settings • Calibrate touchscreen 쏅 Tap on the symbol in the main menu. The Settings menu is displayed. 쏅 Tap on the button to leaf through this menu. If you have made changes in the settings: 쏅 Tap on the button to leave the menu.
Device settings Time In the Time menu you can make the settings for the time such as time zone and summer time. Only with the correct settings can the correct arrival time be indicated to you during navigation. Refer to the chapters "Making basic adjustments" and "Setting the time zone". Product information Tap on the symbol. 쏅 Product information about the device, like the version of the used map and the navigation software are indicated. 쏅 Tap on No to cancel the process.
Software | Service | Guarantee | Technical Data Software Newly installing the navigation software The navigation software for your navigation device is included in the enclosed CD/DVD for reinstalling or repair with instructions. Updating the navigation software In order to always keep your navigation device up to date, Blaupunkt offer software updates at regular intervals. These can be downloaded from the Blaupunkt Internet site under www.blaupunkt. com.
Problem assistance table Problem assistance table Problem Cause Measure The device does not work, or works incorrectly The operating system is overloaded. Do a reset (see chapter "Switching on/off") Reset the factory settings (see chapter "Settings"). All personal settings are deleted! Reinstall the navigation software with the help of the CD/DVD. The display remains dark when I turn on the device.
Problem assistance table Problem Cause Measure The device can receive no, or only a weak GPS signal. After switching on, the device needs about 1 minute before it is ready to navigate. With initial switiching on, the device needs a bit more time and a strong GPS signal. Go into the open and raise the device up a bit. Your device will be operational at the latest after 2 to 5 minutes. After that your device will be able to navigate under less ideal conditions.
TP100EE_lo_GB_193.indd 43 29.08.
Country: Phone: Fax: Germany (D) 0180-5000225 05121-49 4002 Austria (A) 01-610 39 0 01-610 39 391 Belgium (B) 02-525 5444 02-525 5263 Denmark (DK) 44-898 360 44-898 644 Finland (FIN) 09-435 991 09-435 99236 France (F) 01-4010 7007 01-4010 7320 Great Britain (GB) 01-89583 8880 01-89583 8394 Greece (GR) 210 94 27 337 210 94 12 711 Ireland (IRL) 01-46 66 700 01-46 66 706 Italy (I) 02-369 62331 02-369 62464 Luxembourg (L) 40 4078 40 2085 Netherlands (NL) 00 31 24