TravelPilot Navigation Radio/CD TravelPilot E1/E2 Operating instructions www.blaupunkt.
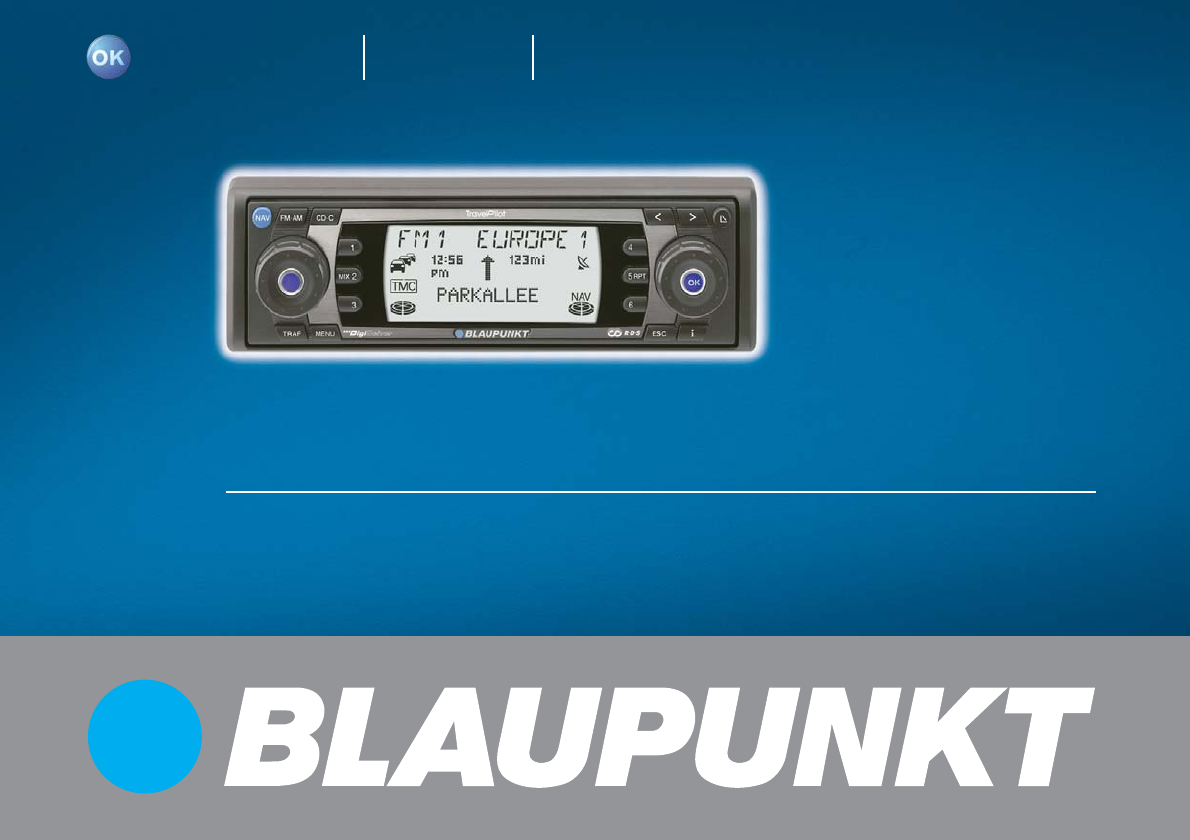
Device overview 4 2 1 3 16 15 5 6 7 14 8 9 13 12 11 10
1 NAV button Short press: Activates navigation mode and the four memory banks. Long press: Opens the selection menu for traffic-jam ahead and route options. ; OK button Short press: Confirms menu items Long press: Starts the scan function Radio: Opens the menu to select a waveband CD changer: Opens the CD selection menu 2 Volume control < 3 Switches the device on/off and activates/deactivates the mute volume function.
INTRODUCTION NAVIGATION RADIO CD / MP3 CD CHANGER SETUP APPENDIX Dear Customer, Guarantee Notice regarding liability Congratulations on buying the TravelPilot E1/E2. You can be sure you have made the right choice in purchasing this device. We provide a manufacturer guarantee for our products bought within the European Union. For devices bought outside the European Union, the conditions of warranty issued by our representatives responsible for the relevant country apply.
Quick guide to navigation N1 NAVi TMC LAST 1O DEST INP. NAV Press the NAV button 1 once to switch from the radio or CD-changer (optional) audio source to the main navigation menu. Use the menu knob : to select the DESTination INPut menu item and then press the OK button ; to enter a new destination. You will first be asked to select the destination country. Confirm your selection by pressing the OK button ;. Now confirm the marked TOWN menu item by pressing the OK button ;.
INTRODUCTION NAVIGATION RADIO SELEC= TMC POI STREET TOWN CENTR CD / MP3 FM1 NAV In the subsequent selection, choose between STREET, TOWN CENTRe or POI (point of interest). Streets can only be selected if the data are available on the navigation CD that is being used. If you selected STREET, you can subsequently also enter crossroads or house numbers. Enter the name in the same way as described for TOWN. Select TOWN CENTRe if you want to be guided directly to the centre of a town district.
Safety notices The TravelPilot E1/E2 has been designed for use in passenger cars. Special information such as height restrictions or maximum permitted road load, which is required for navigating lorries, trucks and buses, is not included on the navigation CDs. Inserting/removing a CD • For safety reasons, you should only insert or remove a CD when the vehicle is stationary. • Only open the control panel when you want to insert or remove a CD.
INTRODUCTION NAVIGATION RADIO CD / MP3 CD CHANGER SETUP APPENDIX Device overview .................................... 2 Navigation ............................................ 21 Quick guide to navigation .................... 5 How navigation works ........................... 21 Bypassing a traffic jam during navigation .............................................. 46 Safety notices ........................................ 7 Inserting the navigation CD ...................
MP3 mode (only TravelPilot E2) ......... 61 Steering wheel remote control ........... 74 Glossary ............................................... 93 Preparing an MP3-CD ........................... 61 Selecting an audio source ..................... 74 Specifications ...................................... 94 Switching to MP3 mode ........................ 63 Adjusting the volume ............................. 74 Installation instructions ...................... 95 Selecting a directory .................
INTRODUCTION NAVIGATION RADIO CD / MP3 Compatible navigation CD-ROMs The TravelPilot E1/E2 can only be used with navigation CD-ROMs that are labelled with an “E”. If there is no CD-ROM inserted in the device, a message informing you of this appears in the display as soon as you try to enter a destination. Note: The TravelPilot E1/E2 is not designed for use with navigation CD-ROMs (CD-Rs, CD-RWs) that you have burned yourself.
About these instructions The aim of these instructions is to familiarize you with the functions of your TravelPilot E1/E2 and to ensure that you can safely and successfully operate the device. Before starting to use your TravelPilot E1/E2, please read these instructions carefully and keep them in a safe place in your vehicle. Note: Make sure you do not keep the equipment pass (enclosed in these instructions) inside your vehicle.
INTRODUCTION NAVIGATION RADIO CD / MP3 Detachable control panel (flip-release panel) Theft protection To provide protection against theft, your device is equipped with a detachable control panel (flip-release panel) and a 4-digit device code. The device is worthless to a thief without this control panel. Protect your device against theft by taking the control panel with you every time you leave your vehicle. Do not leave the control panel in your vehicle – not even in a hiding place.
Attaching the release panel 1 Slide the control panel straight into the device’s bracket. 2 Close the control panel. Note: When attaching the control panel, make sure you do not press the display.
INTRODUCTION NAVIGATION RADIO CD / MP3 CD CHANGER SETUP Switching the device on/off 1 To switch on your TravelPilot E1/E2, press button 3. ✔ The device plays the last active audio source at the volume level that was set when the device was last switched off. You can limit the power-on volume to a maximum value.
Selecting the operating mode N1 NAVi To switch to navigation mode, 1 press the NAV button 1. ✔ The main navigation menu appears or, if a navigation session is already active, the navigation (route guidance) display will appear instead. TMC LAST 1O DEST INP. NAV To switch to radio mode, 1 press the FM•AM button 4. ✔ The top line of the display shows the current station name / frequency as well as the memory bank.
INTRODUCTION NAVIGATION RADIO CD / MP3 Adjusting the volume To increase the system volume, 1 turn the volume control 2 anticlockwise. SETUP APPENDIX volume 20 turn the volume control 2 clockwise. To decrease the system volume, 1 CD CHANGER TMC ✔ The currently set value appears in the top line of the display whilst you are making your adjustments.
Putting through telephone calls automatically If the device is properly connected to a car telephone, telephone calls will be outputted over the loudspeakers of the TravelPilot E1/E2. TELEPHONE appears in the display. The call will be put through even if the TravelPilot E1/E2 is switched off. The TravelPilot E1/E2 will then switch on for the duration of the telephone call. =ELEPHONE TMC NAV You can set the volume level of the telephone call.
INTRODUCTION NAVIGATION RADIO CD / MP3 Display The TravelPilot E1/E2’s display contains all the navigation information (e.g. visual driving recommendations), menus and lists, as well as the radio, CD and CD-changer (optional) audio sources. The display’s brightness and readability can be optimised to suit the viewing angle in your vehicle. For further information, read the section entitled “Setting the day/night display brightness and contrast” in the “Setup – basic settings” chapter.
Switching on a coded device after disconnection from the battery power supply If you switch on a coded device after having disconnected it from the battery power supply (e.g. after carrying out repairs to the vehicle), the system will display a message asking you to enter the code. You will find the numerical code printed on your device’s equipment pass.
INTRODUCTION NAVIGATION RADIO CD / MP3 CD CHANGER SETUP APPENDIX Once you have finished entering the whole numerical code and it is shown in the display, 4 press and hold down the OK button ; for longer than 2 seconds. ✔ The device switches on. Entering the wrong numerical code If you inadvertently entered and confirmed the wrong numerical code, you can enter it again.
Navigation The navigation system in the TravelPilot E1/E2 helps you find your way to destinations quickly and safely without first having to spend time studying a roadmap. When navigation (route guidance) is active, you will be guided by the device’s voice output feature. The system will warn you in good time about approaching turning-off points.
INTRODUCTION NAVIGATION RADIO CD / MP3 CD CHANGER SETUP APPENDIX Note: If you do not take out the ejected CD, the drive will draw it back in again automatically after approx. 10 seconds. Downloading the navigation software The system automatically loads the navigation software into memory from the CD. The software remains in memory until the device is disconnected from the operating voltage or until the system automatically shuts down fully 72 hours after the user switches off the device.
Note: Any memory available after the corridor has been loaded will be used to store the data for the surrounding area function. The CD symbol at the bottom right of the display indicates when data are being loaded. Data are loaded even if there is no navigation session currently active. You will be asked to insert the navigation CD in certain situations when the device needs to load new data from the CD.
INTRODUCTION NAVIGATION RADIO CD / MP3 To switch between the navigation system’s memory banks, 1 press the NAV button 1 repeatedly until the memory bank that you want appears in the top line of the display. Before navigation can begin, you must first insert a TravelPilot type “E” navigation CD into the drive or the necessary data must already be available in the device’s memory. Furthermore, you must specify a destination.
Entering destinations using the text input line You can use the text input line to enter data such as town names and road names into the navigation system. The text input line is equipped with an intelligent text-input feature, which only allows you to enter characters that can logically follow on from the ones you have already entered. Example: If you are entering a street name and there are no streets starting with the letter A in your chosen destination town, the system will hide the letter A.
INTRODUCTION NAVIGATION RADIO CD / MP3 CD CHANGER ✔ If the characters you have entered so far allow the system to find a name match, it will automatically complete the name for you. 4 Repeat steps 1 - 3 as many times as are necessary until the name that you want is displayed in the text input line. 5 If you want the system to use this name, press and hold down the OK button ; for a longer period or press the button 8.
Entering a destination – Country The navigation CD currently contains the entire road data for a country as well as the interconnecting road network (Major Roads) for Europe. When you enter a destination for the first time, the system will ask you to select a country. Generally this will be the country in which you are currently staying. 1 N1 NAVi TMC LAST 1O DEST INP. NAV Mark and confirm the DESTination INPut menu item in the main navigation menu and then mark and confirm the COUNTRY menu item.
INTRODUCTION NAVIGATION RADIO CD / MP3 In smaller municipalities, it is possible that a postcode will cover several small towns and villages. In this case you must select the appropriate place name after entering the postcode. In general, entering the first letter of the place name that you want will be sufficient. This will then appear next to the postcode in the display. CD CHANGER TMC SUPRAREG.D TOWN POS.
Note: If there are several instances of the place name that you selected, the system will display another menu containing the text input line so that you can define the county. Enter some more letters in order to define the place more precisely. The system displays the distance as the crow flies and the destination direction in order to assist you. This, however, does not apply if you selected the town by entering the postcode.
INTRODUCTION NAVIGATION RADIO CD / MP3 3 Enter the special destination name in the same way as you would enter a destination name. 4 Switch to the list. CD CHANGER Mark and confirm the destination that you want. TMC As soon as you have selected and confirmed the special destination that you want, you can start navigation. For further information, read the section entitled “Navigation”. Mark and confirm the STREET menu item. 2 Enter the street name using the text input line.
● JUNCTION: You can additionally select a road junction or a crossroads on the selected street in order to define your destination more precisely. Note: If you enter a new destination without the navigation CD-ROM (corridor function) being present in the device, you will not be able to select the house number and junction. ● CONTINUE: You have finished entering the destination and can start navigation. For further information, read the section entitled “Navigation”.
INTRODUCTION NAVIGATION RADIO CD / MP3 CD CHANGER Crossroads 1 APPENDIX SELEC= If you selected the JUNCTION menu item, a list of road junctions and crossroads that are available on the destination street will be displayed. Note: If a crossroads or junction appears twice, the system will also display the compass direction. SETUP TMC HOUSE NUMB JUNCTION CONTINUE NAV Mark and confirm the crossroads that you want in the list. ✔ The selected destination is displayed.
3 You can now start navigation using the OK button ;. Plus Point: After you have finished entering the destination and before starting navigation, you have the option of storing the destination in the destination memory. For further information, read the section entitled “Destination memory”. You can specify route options in order to customise the route to suit your particular requirements, e.g. excluding motorways.
INTRODUCTION NAVIGATION RADIO CD / MP3 CD CHANGER ✔ The destination input menu appears. 3 Select and confirm the category that you want. ✔ The available destinations are displayed alphabetically. TMC Note: If available, the text input line is opened first of all. Use it to enter the required name or the first letter and then open the list. 5 TMC Area around your position You can select special destinations relevant to the area around your current vehicle position. Press the NAV button 1.
✔ The available destinations are displayed sorted according to their distance from your position. Note: If available, the text input line is opened first of all. Use it to enter the required name or the first letter and then open the list. 5 Select and confirm the destination that you want. As soon as you have selected and confirmed the special destination that you want, you can start navigation. For further information, read the section entitled “Navigation”.
INTRODUCTION NAVIGATION RADIO CD / MP3 CD CHANGER SETUP APPENDIX Note: If available, the text input line is opened first of all. Use it to enter the required name or the first letter and then open the list. 5 Select and confirm the destination that you want. As soon as you have selected and confirmed the special destination that you want, you can start navigation. For further information, read the section entitled “Navigation”.
Entering a destination – From the destination memory You can store destinations in the destination memory that you drive to regularly so you can access them easily for other navigation sessions. For further information, read the section entitled “Destination memory”. The navigation system has four memory banks at its disposal (N1, N2, N3 and N4). Six destinations can be stored in each memory bank. To access destinations from the destination memory, 1 press the NAV button 1.
INTRODUCTION NAVIGATION RADIO CD / MP3 CD CHANGER SETUP APPENDIX Destination memory In the destination memory you can store destinations that you want to navigate to later on. You can also set your current position as a position marker and then access it from memory at some other point in time to use it as your destination. It is not possible to set a position marker during an active navigation session.
✔ You will hear a confirmation beep when the destination has been stored. The navigation display will then appear again. Storing your current position as a destination You have the option of storing your vehicle’s current position as a destination in the destination memory. This feature is useful if you spot an interesting location during your journey and want to return to it some other time.
INTRODUCTION NAVIGATION RADIO CD / MP3 Navigation Starting navigation Once you have entered a destination, the destination address appears in the display. If you want to start a navigation session in order to be guided to this destination, 1 CD CHANGER After you activate navigation, the system will show a warning on the display for approx. 5 seconds. Afterwards, the system starts calculating the route.
Plus Point: If you deviate from the recommended route, the system automatically calculates a new route from the current vehicle position to the already entered destination. The system might ask you to insert the navigation CD. Driving recommendations The visual driving recommendations are shown in the middle display area. If you are driving straight on, the name of the road you are currently driving down is displayed beneath the driving recommendations.
INTRODUCTION NAVIGATION RADIO CD / MP3 CD CHANGER SETUP APPENDIX Switching audio sources You can switch to a different audio source at any time during navigation. 1 Press the FM•AM 4 button or the CD•C button 5 during the active navigation session to switch between radio mode and CD-changer mode. ✔ The main menu of the selected audio source appears in the display. CDchanger mode is only available if a CD changer is connected and operational.
Dynamic navigation During dynamic navigation, the TravelPilot E1/E2 analyses digital traffic information messages and uses this information when planning the route. The system receives the traffic messages from TMC (Traffic Message Channel) stations. These are RDS stations that additionally broadcast their traffic messages in digital form. If the system is already receiving a TMC station, the TMC symbol will appear on the display. NAVI TMC TRAFF.
INTRODUCTION NAVIGATION RADIO CD / MP3 Recalculating the route If the TravelPilot E1/E2 receives a traffic message from the TMC that is relevant to the route, it will automatically recalculate the route. The system outputs a voice announcement informing you that the route is being recalculated.
3 Mark and confirm the TMC AUTO menu item. 4 Mark the ON menu item and press the OK button ;. 5 Press the ESC button = twice to return to navigation mode. radio TMC Tuning into TMC stations manually TMC AUTO SEEK NAV To tune into a TMC station manually, proceed as follows: 1 Press the button 7 or the button 8. ✔ The radio tunes into the next receivable station. If it is a TMC station, the TMC symbol appears on the display. If not, start seek tuning again.
INTRODUCTION NAVIGATION RADIO CD / MP3 CD CHANGER Bypassing a traffic jam during navigation Alongside the ability to automatically bypass traffic jams with the aid of the dynamic navigation feature, the TravelPilot E1/E2 also gives you the option of manually entering traffic jams or blocked sections of road during an active navigation session. SETUP APPENDIX NAVI TMC TRAFF.
Defining route options You can customise the route to suit your requirements at any time, even during an active navigation session. The configurable parameters are: ● DYNAMIC: Dynamic navigation with TMC. ● FAST: The system calculates a time-optimised route. ● SHORT: The system calculates a distance-optimised route. ● OPTIMUM: The system calculates a route that is both time and distance optimised.
INTRODUCTION NAVIGATION RADIO CD / MP3 CD CHANGER To define the route options, 1 Mark and confirm the ROUTE OPTIions menu item. ✔ The menu for setting the route options appears. 3 Select the route option that you want to change. 4 Press the OK button ; to change the setting. APPENDIX NAVI press and hold down the NAV button 1 for longer than 2 seconds. ✔ A selection menu appears in the display. 2 SETUP TMC TRAFF.
Displaying the route list 0/177 MI You can display the route list that was calculated by the navigation system. The route list is updated during the journey, and the route sections that you have not yet driven down are displayed. 1 Press and hold down the navigation session. button < for longer than 2 seconds during a TMC 65O yd B1, KAISER STRASSE NAV ✔ The calculated route list is displayed. 2 You can browse through the list by turning the menu knob :.
INTRODUCTION NAVIGATION RADIO CD / MP3 CD CHANGER SETUP APPENDIX Radio mode The TravelPilot E1/E2 is equipped with an RDS radio receiver. Many of the receivable FM stations transmit a signal that not only carries the programme but also additional information such as the station name. The station name appears in the display as soon as it is received. RDS functions (AF, REG) The convenient RDS functions AF (Alternative Frequency) and REG (Regional) enhance your TravelPilot E1/E2’s range of functions.
5 Press the OK button ; or the ESC button = to accept the setting. ✔ The selection menu appears again. 6 Press the ESC button = twice to close the selection menu. Switching the REG RDS function on or off 1 Press the MENU button ?. ✔ The setup menu appears in the display. 2 Mark and confirm the RADIO menu item. regional ✔ A selection menu appears in the display. 3 Mark and confirm the REGIONAL menu item. 4 Select ON or OFF to switch the regional function on or off.
INTRODUCTION NAVIGATION RADIO CD / MP3 Switching to radio mode To switch to radio mode, 1 CD CHANGER FM1 briefly press the FM•AM button 4. ✔ The radio will play the station that it received last. SETUP TMC Selecting the waveband / memory bank APPENDIX NDR 2 NDR2 NJOY RAD2 ffn Ante JUMP NAV This device can receive programmes broadcast over the FM frequency range as well as the MW and LW (AM) wavebands.
Tuning into a station There are various ways of tuning into a station. Automatic station seek tuning 1 Press the button 7 or the button 8. ✔ The radio tunes into the next receivable station. Note: You can adjust the sensitivity of station seek tuning. For further information, read the section entitled “Configuring the radio functions” in the “Setup – basic settings” chapter. Tuning into stations manually You can also tune into stations manually.
INTRODUCTION NAVIGATION RADIO CD / MP3 CD CHANGER SETUP APPENDIX Storing stations Storing stations manually 1 Select the memory bank (i.e. FM1, FM2, FMT) that you want or one of the wavebands (MW or LW). 2 Tune into the station that you want. 3 Press and hold down one of the station buttons 1 - 6 > for longer than 2 seconds to assign the station to that button. ✔ The stored station name or frequency is then displayed alongside the corresponding preset memory button.
Scanning receivable stations (SCAN) You can briefly play (scan) all the receivable stations. The scanning time is 10 seconds. FM1 Starting SCAN 1 Press and hold down the OK button ; for longer than 2 seconds. NDR2 NJOY RAD2 ✔ Scanning begins. SCAN appears briefly in the display followed by the current station name or frequency. Stopping SCAN and continuing listening to a station 1 SCAN ffn Ante JUMP NAV Press the ESC button =.
INTRODUCTION NAVIGATION RADIO CD / MP3 Switching traffic information priority on or off 1 symbol lights up in Note: The symbol flashes and seek tuning starts automatically if you leave the reception area of the traffic information station or if you switch from a station that provides traffic information to one that does not. Interrupting the current traffic announcement You can cancel the current traffic announcement if you do not want to listen to it. 1 SETUP FM1 Press the TRAF button @.
CD mode You can play standard audio CDs with a diameter of 12 cm in the TravelPilot E1/ E2’s internal CD drive. CD-Rs (CDs that you have “burned” yourself) can generally also be played. Due to the varying quality of CDs, Blaupunkt cannot guarantee that this will work properly. To ensure the system functions properly, only use CDs labelled with the compact disc logo. Problems might be experienced when trying to play copy-protected CDs.
INTRODUCTION NAVIGATION RADIO CD / MP3 CD CHANGER SETUP Inserting a CD button 9 to open the release panel. 1 Press the 2 Any CD that might already be in the device is ejected automatically. 3 Carefully insert the CD with the printed side uppermost into the device’s CD compartment. Push the CD until you feel some resistance. From this point onwards, the drive will draw in the CD automatically. ✔ CD playback begins automatically after the drive has checked the CD. The main CD menu appears.
If you want to activate the internal CD drive, 1 press the CD•C button 5 again. ✔ The CD starts playing. Selecting tracks You can select tracks directly whilst a CD is playing. To select the next track, 1 press the button 8. ✔ If the last track on the CD has been reached and you press the the system will then switch to the first track. button 8, To repeat the current track or select the previous track, 1 press the button 7.
INTRODUCTION NAVIGATION RADIO CD / MP3 CD CHANGER SETUP APPENDIX To cancel the MIX function, 1 press the 2 MIX station button > again. The MIX function is automatically cancelled if you activate the SCAN function. Scanning all the tracks on a CD (SCAN) scan CD If you briefly want to play (scan) all the tracks on a CD, proceed as follows: 1 Press and hold down the OK button ; for longer than 2 seconds. ✔ All the tracks on the CD are scanned in ascending order. The scanning time is 10 seconds.
MP3 mode (only TravelPilot E2) You can also use the TravelPilot E2 to play CD-Rs and CD-RWs that contain MP3 music files. MP3 is a process developed by the Fraunhofer Institute for compressing CD audio data. Compression allows data to be reduced to around 10% of their original size without a noticeable loss in quality (at a bit rate of 128 kbit/s). If a lower bit rate is used to convert CD audio data to MP3, you will be able to create smaller files but this will be accompanied by a loss in audio quality.
INTRODUCTION NAVIGATION RADIO CD / MP3 Note: When naming directories and tracks/files you should avoid using accents and special characters since they might not be displayed correctly. You can use a maximum of 32 characters (including the “.MP3” file extension) for track names and directory names. Names that are longer than 32 characters cannot be displayed correctly. MP3 tracks can contain additional information such as the artist, album and track names (ID3 tags).
Switching to MP3 mode MP3 mode is activated in the same way as normal CD mode. For further information, please read the section entitled “Playing a CD” in the “CD mode” chapter. Once the device has checked the CD, it begins playing the first track in the first directory that it finds. You will see the name of the track appear as scrolling text on the first line of the display (you can also deactivate scrolling text. To do so, read the “Selecting MP3 info” section at the end of the chapter).
INTRODUCTION NAVIGATION RADIO CD / MP3 CD CHANGER SETUP APPENDIX Selecting a directory in browse mode You can display the current directory and the three subsequent directories on the four lines of the display. The directories are displayed with the names that you created when burning the CD. In the directory display, you can use the menu knob : to display and select any of the available directories. 1 Briefly press the OK button ; during MP3 playback.
Selecting tracks Selecting tracks/files using the arrow buttons To move up to another track/file in the current directory, 1 press the button 8 once or several times. To move down to another track/file in the current directory, 1 press the button 7 once or several times. ✔ If you press the the beginning.
INTRODUCTION NAVIGATION RADIO CD / MP3 Fast seeking To start fast forward seeking, 1 press and hold down the button 8 until fast seeking begins. To start fast reverse seeking, 1 press and hold down the button 7 until fast seeking begins. Random play (MIX) You can play all the tracks contained in a directory and all the tracks on a CD in random order. 1 Press the 2 MIX station button >. ✔ MIX DIR appears in the display. The tracks in the directory are selected at random and then played.
Scanning all the tracks in a directory (SCAN) If you briefly want to play (scan) all the tracks in the current directory, proceed as follows: 1 Press and hold down the OK button ; for longer than 2 seconds. ✔ All the tracks in the directory are scanned in ascending order. The scanning time is 10 seconds. To cancel the SCAN function, 1 press the ESC button =. The SCAN function is cancelled automatically if you activate the MIX function.
INTRODUCTION NAVIGATION RADIO CD / MP3 CD CHANGER Selecting MP3 info Whilst MP3 mode is activated, the track name appears as scrolling text on the first line of the display and the name of the artist appears on the second and third lines (only if the ID tags are available in the MP3 files). If there are no ID tags available, the file name is displayed as scrolling text on the first line. APPENDIX SE==INGS TMC You can also prevent scrolling texts from being displayed on the first line (FIX setting).
CD-changer mode You can use the following Blaupunkt CD changers with the TravelPilot E1/E2: ● CDC - A03 ● CDC - A08 ● IDC - A09 Please refer to the installation and connection instructions supplied with your CD changer for information on how to install the CD changer in your vehicle and connect it to the TravelPilot E1/E2. As an alternative to a CD-changer, you can connect the Compact Drive MP3 (it might be necessary to update the software of the Compact Drive. See www.blaupunkt.de).
INTRODUCTION NAVIGATION RADIO CD / MP3 CD CHANGER If the audio CD in the internal CD player is active, then 2 APPENDIX CDC press the CD•C button 5 again. ✔ The CD changer display appears. CDC appears in the top line of the display. Beneath it you will see the number of the CD in the CD changer, the track currently being played and the playing time. SETUP TMC CD O1 TRACK 7 3:24 NAV Note: When you insert the magazine, all the CDs in the changer are first loaded once (magazine scan).
Selecting tracks To select the next track, 1 press the button 8. ✔ If the last track on the CD has been reached and you press the the system will then switch to the first track. button 8, To replay the current track or select a previous track, 1 press the button 7. ✔ If the first track on the CD is selected and you press the system will then start playing the last track.
INTRODUCTION NAVIGATION RADIO CD / MP3 Randomly playing all the tracks on all the CDs To play the tracks on all the CDs at random, 1 CD CHANGER APPENDIX mix magAZINE press the 2 MIX station button > repeatedly until MIX MAGAZINE appears in the top line of the display. ✔ The tracks on all the CDs in the changer are chosen at random until you cancel the MIX function.
Repeating tracks (REPEAT) RP= =rack To repeat a track, activate the repeat function. 1 Select the track that you want, 2 press the 5 RPT station button >. TMC ✔ The track is repeated until you cancel the repeat function. CD O2 TRACK 2 2:33 NAV If you want to cancel the repeat function, 1 press the 5 RPT station button > again.
INTRODUCTION NAVIGATION RADIO CD / MP3 REMOTE CD CHANGER CONTROL Steering wheel remote control The RC 10 steering wheel remote control allows you to safely and conveniently operate some of the TravelPilot E1/E2’s primary functions from your steering / buttons have the same function as the menu knob :. The wheel. The / buttons and the OK button have the same function as the equivalent buttons on the TravelPilot E1/E2.
Muting You can mute the device’s volume using the remote control. 1 Press the button. Cancelling mute If you want to cancel mute, button again or 1 press the 1 press the V+ or V- button.
INTRODUCTION NAVIGATION RADIO CD / MP3 CD CHANGER Setup – basic settings ● SOUND - Adjust the sound distribution and equalizer ● VOLUME - Set the default volume levels ● RADIO - Configure the settings for the main radio functions ● MP3 - Activate / deactivate MP3 scrolling texts (only TravelPilot E2) ● NAVI - Configure speech output, optimum route and language & speech options (optimum route and language & speech options only for TravelPilot E2).
2 Press the MENU button ?. SOUND ✔ The setup menu appears in the display. 3 Mark and confirm the SOUND menu item. ✔ The sound menu appears in the display. 4 Mark and confirm the menu item (BASS, TREBLE, LOUDNESS, BALANCE or FADER) whose setting you want to adjust. TMC BASS TREBLE LOUDNESS BALANCE NAV ✔ The scale for adjusting the setting is displayed. 5 Adjust the sound value that you want using the menu knob :. 6 Press the OK button ; or the ESC button = to accept the setting.
INTRODUCTION NAVIGATION RADIO CD / MP3 Notes on adjusting the settings We recommend you use a CD that you are familiar with for making changes to the settings. Before adjusting the equalizer, set the sound settings and sound distribution settings to zero. For further details, refer to the section entitled “Adjusting the sound and sound distribution”. 1 Listen to the CD. 2 Now refer to the “Sound impression / problem” column in the table entitled “Help adjusting the equalizer”.
Adjusting the equalizer 1 SOUND Press the MENU button ?. ✔ The setup menu appears in the display. 2 Mark and confirm the SOUND menu item. TMC ✔ The sound menu appears in the display. 3 FADER DIGITAL EQ NAV Mark and confirm the DIGITAL EQ menu item. ✔ The equalizer menu appears in the display. 4 Mark and confirm the frequency band (SUB LOW, LOW, MID, MID HIGH or HIGH) that you want to adjust. 5 Mark and confirm the FREQUENCY menu item. ✔ The scale for adjusting the setting is displayed.
INTRODUCTION NAVIGATION RADIO CD / MP3 CD CHANGER SETUP APPENDIX Configuring the power-on / navigation / traffic announcement / telephone volume and GALA settings You can adjust the device’s power-on volume ( ON MAX), the amount by which the audio volume level is decreased during a navigation announcement (NAV DIFF), the minimum volume level for traffic announcements (TA MIN), the minimum volume level for telephone calls (TEL MIN) and the setting for the speeddependent automatic volume adjustment fea
✔ The volume menu appears in the display. 3 VOLUME Mark and confirm the menu item whose setting you want to change. ✔ The scale for adjusting the setting is displayed. 4 Set the volume level that you want using the menu knob :. ✔ To help you configure the setting more easily, the system will increase/ decrease the volume as you make your changes. 5 TMC ON MAX NAV DIFF TA MIN TEL MIN NAV Press the OK button ; or the ESC button = to accept the setting. ✔ The volume menu appears in the display again.
INTRODUCTION ● NAVIGATION RADIO CD / MP3 CD CHANGER SETUP APPENDIX REGIONAL - At certain times, some radio stations divide their programme into regional programmes providing different regional content. You can use the REG function to prevent the device from switching to alternative frequencies that are transmitting different programme content. Settings options: ON - The regional function is activated. OFF - The regional function is deactivated.
3 Mark and confirm the menu item that you want to adjust. radio ✔ The selection menu or the scale for adjusting the setting is displayed. 4 Select the setting using the menu knob :. 5 Press the OK button ; or the ESC button = to accept the setting. ✔ The radio menu appears in the display again. 6 TMC Press the ESC button = twice to close the radio menu.
INTRODUCTION NAVIGATION RADIO CD / MP3 4 Adjust the value that you want using the menu knob :. 5 Press the OK button ; or the ESC button = to accept the setting. CD CHANGER Press the ESC button = twice to close the display menu. Configuring the language and speech options Note: The navigation CD-ROM must already be inserted in the device before you can change the language and speech options.
Setting the language SE==INGS To set the language, 1 press the MENU button ?. ✔ The setup menu appears in the display. 2 TMC Mark and confirm the LANGUAGE menu item. ✔ The available languages are displayed alphabetically. 3 NAVI DISPLAY LANGUAGE CLOCK NAV Mark and confirm the language that you want. ✔ The language that you selected is loaded and then the menu is displayed in that language. 4 Press the ESC button = to close the setup menu.
INTRODUCTION NAVIGATION RADIO CD / MP3 4 Select ON or OFF using the menu knob :. 5 Press the OK button ; or the ESC button = to accept the setting. CD CHANGER SETUP APPENDIX ✔ The navi setup menu is displayed again. 6 Press the ESC button = twice to close the navi setup menu.
Configuring the optimum route (only TravelPilot E2) SE==INGS The TravelPilot E2 allows you to configure the optimum route yourself. To do so, you must adjust the relationship between “fast route” and “short route”. The factory default setting is 40 to 60. TMC To set the optimum route, 1 press the MENU button ?. NAVI DISPLAY LANGUAGE CLOCK NAV ✔ The setup menu appears in the display. 2 Mark and confirm the NAVI menu item. ✔ The navi setup menu is displayed.
INTRODUCTION NAVIGATION RADIO CD / MP3 CD CHANGER Adjusting the clock 1 APPENDIX SE==INGS The system normally sets the clock using the GPS signal. You will only have to set the current local time to the nearest five minutes once. Note: You can also set the local time here when switching from summer to winter time and back. SETUP TMC Press the MENU button ?. NAVI DISPLAY LANGUAGE CLOCK NAV ✔ The setup menu appears in the display. 2 Mark and confirm the CLOCK menu item.
Device code SE==INGS If you switch on a code-enabled device after it was disconnected from the vehicle’s power supply, you will have to enter the device code. You can also disable this code request feature. CODE TMC NAV Activating / deactivating the code request feature 1 Press the MENU button ?. ✔ The setup menu appears in the display. 2 Mark and confirm the CODE menu item. 3 Mark and confirm the ON or OFF menu item. CODE ✔ The menu for entering the numerical code appears.
INTRODUCTION NAVIGATION RADIO CD / MP3 CD CHANGER SETUP APPENDIX Installation The installation menu contains all the necessary items for testing the TravelPilot E1/E2 and preparing it for operation. Installation test The installation test allows you to check whether the system is correctly receiving signals from the sensors. Note: The test must be carried out with the ignition switched off. 1 Switch off the ignition and turn on the device using button 3.
● IGNITion - Positive ignition connection Switch on the ignition. ON appears alongside IGNITion. ● SPEED - Speedometer connection Move the vehicle a short distance. If the system detects the presence of the speedometer signal it starts counting the pulses. 4 Press the ESC button = to return to the installation menu. You can start calibrating the device after the test. There are 2 options available to you for this.
INTRODUCTION NAVIGATION RADIO CD / MP3 CD CHANGER Manual device calibration You can also manually calibrate the device. You will be required to drive a route of at least 110 yards (100 metres) to 550 yards (500 metres) at a maximum speed of 18 mph (30 km/h). Please note that you must drive along a route that has been measured as precisely as possible. 1 SETUP APPENDIX ins=all TMC INST. TEST AUTO CALIB MAN. CALIB Mark and confirm the MANual CALIBration menu item.
Glossary TMC - Traffic Message Channel Corridor function TMC is an RDS data service that provides regional traffic news. New traffic reports can be updated without delay. The TravelPilot E1/E2 is capable of continuously receiving digital traffic reports free of charge from TMC stations. The corridor function allows the TravelPilot E1/E2 to provide driving instructions even when the navigation CD is not present in the drive. This applies to normal navigation as well as to dynamic navigation.
INTRODUCTION NAVIGATION RADIO CD / MP3 CD CHANGER Specifications CD Voltage supply Frequency response: Operating voltage: 10.8 - 14.4 V Current consumption: max. 10 A Power consumption for 30 minutes after switching off: 550 mA typical Standby current consumption: 12 mA Standby current consumption after 72 hours have elapsed: < 2 mA 4 channels: 2 V / 6 kΩ Telephone input: max. 4.8 V, eff. 3.
Country: Germany Austria Belgium Denmark Finland France Great Britain Greece Ireland Italy Luxembourg Netherlands Norway Portugal Spain Sweden Switzerland Czech. Rep.
TravelPilot E1/E2 An overview! NAV Short press: Navigation Long press: Traffic jam and route options FM·AM Short press: Radio mode, wavebands FM, MW and LW Long press: Travelstore function Radio/CD: Search upwards / Skip to the next track Navigation: Jump to the selection list CD·C CD mode, CD-changer mode Opening the release panel Rotate: Volume control Short press: Activate mute Long press: Switch on/off Rotate: 1 _ 6 Radio/CD: Search downwards / Skip to the previous track Navigation: Delet