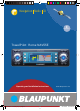
Navigation Radio CD E TravelPilot TravelPilot Rome NAV55E Operating and Installation Instructions ROMENAV55Eman_star_ois_eng.indd 1 www.blaupunkt.com 06.12.
Contents Contents About these instructions................3 For your safety ...............................3 Scope of delivery............................5 Device Overview .............................6 Controls ..........................................6 The most important display symbols ........................................7 The basic functions ........................8 Theft protection ...........................8 Detaching/attaching the control panel ............................................
For your safety Blaupunkt stands for technical know-how in mobile radio reception, for precise navigation systems and first-class sound. The blue dot made its debut in 1923 as a seal of quality that was assigned after rigourous functional – and it still applies today. At that time as well as today, the blue dot identifies products of extraordinary quality.
For your safety Observe the following! General • Do not open the device! The device contains a Class 1 laser that emits invisible laser radiation which can cause injuries to your eyes. Accessing the inside of the device voids the warranty.
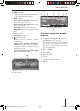
Scope of delivery Scope of delivery 1 1 1 1 1 1 1 2 2 1 1 2 Rome NAV55E Cloth bag for the control panel Navigation CD GPS antenna Device card with four-digit code number Operating instructions Support frame Disassembly bar Connecting cables for speedometer signal and reversing signal Guide pin Screwdriver Adhesive labels (security) 5 ROMENAV55Eman_star_ois_eng.indd 5 06.12.
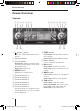
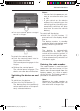
Device Overview Device Overview Controls 12 3 4 567 89 : ; < => ? @ 1 A button (Open) Open the control panel and remove the CD 2 Volume control 3 On/Off button 4 MENU button Calling the settings menu Function Function Function Function Function Function button button button button button button ; TRAF button Press short: Call up traffic information settings Press long: Display TMC messages < Menu button Short press: Switch on/mute traffic announcement/fading out the turnby-turn direction Press lon
Device Overview @ SRC button A B Toggle between CD/MP3/WMA player and optional CD changer A ESC button Press short in the menu: Change to the previous menu level Press long in the menu: Change to the top menu level Text input: Delete last character Navigation: Cancel destination guidance Scan: Cancel Travelstore: Cancel B button (Info) Display current location, dis play complete list Press short during destination guidance: Show current location and repeat last voice-prompted turnby-turn direction Pre
The basic functions The basic functions Theft protection To provide protection against theft, the device features • a four-digit code number (printed on the device card) • a detachable control panel (see below) CAUTION! Danger of theft! Without the code number and the control panel, the device is useless to a thief.
The basic functions Notes: • You can limit the power-on volume to a maximum value (see p. 18). • If you switch on the device without first switching on the vehicle ignition, the device automatically switches off after one hour to save the vehicle battery. ➜ Pull the control panel straight out of its hinges. To attach the control panel: ➜ Push the control panel into its hinges from the front. The control panel engages in the hinges. ➜ Fold up the control panel. The control panel engages.
The basic functions If the code entry appears on the display, the first digit is selected. Code 0 0 0 0 0K ➜ Turn the menu button < until the selected position shows the correct number. ➜ Press the OK button = to confirm the number. The next digit of the code number is selected. ➜ Repeat the two steps for the remaining digits of the code number. If you entered an incorrect number: ➜ Press the ESC BUTTON A. The number entered last is deleted.
The basic functions Adjusting the volume To change the volume of the currently playing source: ➜ Turn the volume control 2. The volume changes. The current volume is shown on the volume display and stored. 1 TMC Volume 2 NDR 2 3 Tune 16:13 4 FMT 4 92,8 Band 5 Optionen 6 Note: The device handles the volume of the different sources (music, voice output or phone) independent of each other. You only control the volume of the currently active audio source at any given time.
Operating the settings menu Operating the settings menu The settings menu allows you to adjust basic device functions, such as sound, power-on volume or display brightness and language, to your specific needs. This chapter provides information about: • The buttons used for navigation in the settings menu (see below), • An example to illustrate how to reach a specific menu item (see below), • The location of menu items in the settings menu (see p. 13).
Operating the settings menu The "Tuner" menu can be selected only if the radio is currently set to an FM station. The "Tuner" menu is displayed. The fi rst menu item, "RDS", is highlighted. Tuner RDS VAR Alternat. freq. Regional Sensitivity HighCut 0 Selecting a menu item ➜ Turn the menu button < until the "Sensitivity" menu item is highlighted. Tuner RDS VAR Alternat. freq. Regional Sensitivity HighCut 0 Changing and saving the setting of the menu item ➜ Press the OK button =.
ROMENAV55Eman_star_ois_eng.indd 14 Brightness day Brightness night (Day, Night, Auto) Display off Mode Vol.settings Display Language RDS VAR Alternat. freq. Regional On max. Nav difference Traffic min Gala Phone min. VAR FREQ FIX Speech output TMC voice 0 1 2 System On 12 05 Navigation Tuner System TRAVEL ARRIVAL CESKY, DANSK, DEUTSCH, ENGL.IMP, ENGL.
Basic settings before the trip Basic settings before the trip DANGER! Risk of an accident through distraction from traffic! If you change the settings while driving, you may be distracted from the traffic and cause an accident. ➜ Stop at a suitable location before changing the settings! During a traffic announcement or a telephone call, you cannot change bass and treble. To change bass or treble: ➜ In the "Audio" menu, select and confirm the desired menu item ("Bass" or "Treble").
Basic settings before the trip To change the loudness: ➜ In the "Audio" menu, select and confirm the "Loudness" menu item. The loudness control is displayed. 4 To change the balance: ➜ In the "Audio" menu, select and confirm the "Balance" menu item. The volume distribution is displayed. Loudn. 7 Balance 7 ➜ Change the loudness by turning ➜ Change the balance by turning the menu button < to the left or right. Try out different loudness settings at high and low volume until you find the desired sound.
Basic settings before the trip 7 Fader Note: The equalizer setting applies to all sources. The Equalizer is displayed. Equalizer Sub low ➜ Change the fader by turning the menu button < to the left or right. The front-rear volume distribution changes. The display shows the volume distribution. ➜ Press the OK button = to store this fader setting or press the ESC button A to return to the previous fader setting. Adjusting the equalizer Your device features a digital 5-band equalizer.
Basic settings before the trip • Mid High: 1600, 2000, 2500, 3200, 4000, 5000, 6300 Hz 8000, 10000, • High: 12500 Hz The selected frequency band and the corresponding setting are displayed. ➜ Change the setting by turning the menu button < to the left or right. You can raise or lower the selected frequency in ten increments. The volume of the selected frequency is changed. The bar on the left side of the display shows the change.
Basic settings before the trip • • • • When you switch on the device, it plays at the previously selected volume. However, if you adjusted the volume before switch-off to be higher than maximum poweron volume, the volume is automatically limited to the switchon volume when you switch it on again.
Basic settings before the trip ➜ Adjust the switch-on volume to a low value! ➜ Change the volume by turning the menu button < to the left or right and press the OK button =. The currently playing source is played with the selected volume. The volume control displays the volume.
Basic settings before the trip • the language of the voice-prompted turn-by-turn directions of the navigation system. Note: To change the language, the navigation CD must be in the drive. To change the language: ➜ In the "System" menu, select and confirm the "Language" menu item. The language menu appears. Language DEUTSCH ENGL. IMP ENGL. MET ESPANOL ➜ In the language menu, select and confirm the desired language. The language is changed.
Basic settings before the trip To set the clock: ➜ In the "System" menu, select and confirm the "Clock" menu item. The clock menu appears. The hours are highlighted. Set time 12 05 Displaying the station name Some FM radio stations use the RDS signal to transmit advertisement or other information instead of the station name. You can define which of this information is shown on the display as follows: ➜ In the settings menu, select and confirm the "Tuner" menu item. The "Tuner" menu appears.
Basic settings before the trip Enabling/disabling automatic changing to alternative frequencies (AF) The radio can automatically tune to the best receivable frequency of the selected station. To activate/deactivate this function: ➜ In the settings menu, select and confirm the "Tuner" menu item. The "Tuner" menu appears. Tuner RDS VAR Alternat. freq. Regional Sensitivity HighCut 0 ➜ In the "Tuner" menu, select the "Alternat. freq." menu item.
Basic settings before the trip Use the OK button = to change the response sensitivity of the HighCut function between "0", "1" and "2". • "0" means: The HighCut function is deactivated, • "1" means: The response sensitivity is low. • "2" means: The response sensitivity is high. Changing the seek tuning sensitivity The seek tuning sensitivity determines whether the automatic station seek tuning locates only strong stations or also weaker stations, which may be degraded by a high noise level.
Basic settings before the trip You can activate the speech output (check mark) or deactivate it (no check mark) with the OK button =. Adjusting the time display During destination guidance, the remaining travel time or the estimated arrival time can be displayed. To toggle between the times: ➜ In the settings menu, select and confi rm the "Navigation" menu item. The menu of the basic settings of navigation appears.
While driving ➜ In the menu of the navigation ba- sic settings, select the "Junction zoom" menu item. Navigation Speech output TMC Language Junction zoom Time TRAVEL You can activate the junction zoom (check mark) or deactivate it (no check mark) with the OK button =. While driving This chapter describes how to: • Select a certain audio source (see below), • play music (radio, CD, MP3 or CD changer, see p. 29), • putting through traffic announcements (TA) (see p. 31).
While driving The previously selected radio station is played. The radio display is shown. The radio display 1 TMC 2 BBC 3 Tune D E F 16:13 FMT 4 92,8 Band F G H J 6 Options K 5 L The CD display A B C G H I K L TMC symbol Listen symbol Traffic information symbol (TA) Time Memory bank Memory location for radio stations Station name Tuning menu Frequency band menu Option menu of the radio Reception frequency To tune, store and call up radio stations, see p. 35.
While driving The CD changer display D A B C TMC GH J K L A B C D E F G H I K L M N O P M N O MIX Options RPT MIX Browse TMC symbol Listen symbol Traffic information symbol (TA) Time "Reverse/Track backward" symbol "Forward/Track forward" symbol "MIX" symbol "Jump to next folder" symbol "Jump to previous folder" symbol ID3 track name or file name ID3 artist or folder name Browse menu Options menu of the MP3 player Playing time display "RPT" symbol CDs G H J K L P CDC 00:05 Track 01/20 Track
While driving Playing music "Random playback" means: Notes about the table: 00:22 MIX ALL tionen RPT RPT RPT The music playback starts autoCD matically as soon as you select an 4:01 audio source (see p. 26), provided 00:22 that a CD is inserted or a station MIX CD is tuned in. tionen Symbols are assigned to the function buttons 1 5 to 6 : which If "MIX CD" is displayed, the tracks are displayed on the left and right on the current audio CD are played side of the display.
While driving What do you want to do? Built-in CD player Built-in MP3 player Built-in CD changer Radio Forward Hold > pressed Hold > pressed Hold > pressed _ Reverse Hold < pressed Hold < pressed Hold < pressed _ Jump to the next track Press short > Press short > Press short > _ Jump to the previous track Press short < Press short < Press short < _ Change to the previous CD/folder _ ∧ ∧ _ Change to the next CD/folder _ ∨ ∨ _ Start/change/cancel random playback MIX Press
While driving CD 00:22 RPT 00:22 tionen CD 4:01 tionen RPT 4:01 If "MIX" is not displayed, the random playback is switched off. The tracks are played in the order in which they appear on the CD. If "RPT" is not displayed, the repeat mode is switched off. Nevertheless, an audio or MP3/WMA-CD is repeated after it has been played once.
While driving Your device is equipped with an RDS-EON receiving unit. EON means Enhanced Other Network. In case of a traffic announcement (TA), this receiving unit can automatically switch over from a nontraffic information station to a traffic information station of the same station chain. After the traffic announcement, the device automatically switches back to the previously played programme.
While driving If the TA symbol C flashes, the radio does not receive any traffic information station (e.g. because you left the frequency range with your vehicle). The radio then automatically searches for another traffic information station. Note: To change the volume of the traffic announcement, turn the volume control during the traffic announcement. To adjust the minimum volume for traffic announcements, see p. 18.
While driving If the TMC symbol flashes, the device does not receive any TMC data (e.g. because you left the frequency range with your vehicle). Dynamic destination guidance is not possible! The device automatically searches for a radio station which broadcasts TMC data. This search may take some time since the entire frequency band is being searched. Radio reception is not possible during this search.
Operating the radio Note: The device stores and processes TMC messages that refer to a perimeter of approx. 100 km around your vehicle. Operating the radio As soon as you select the radio as the audio source (see p. 26), the previously tuned in station is played and the radio display is shown. 1 TMC 2 BBC 3 FMT 4 16:13 92,8 Tune Band 5 6 Options Details about the radio display can be found under "Switching on the radio" (see p. 26).
Operating the radio Selecting the waveband/ memory bank The radio can receive the following wavebands: • FM: 3 memory banks (FM1, FM2, FMT) • MW: 1 memory bank • LW: 1 memory bank To toggle among the memory banks or wavebands: ➜ Press the TUN button ? repeatedly until the desired waveband or the desired memory bank is displayed. FM2 TUN FM1 FMT LW MW Or: ➜ In the radio display, select the "Band" menu.
Operating the radio To define the direction of the station seek tuning: ➜ Turn the menu button until one of the arrows D is highlighted. D Tune BBC I 92 I 93 I 94 I ➜ Press the OK button 3. The radio searches for the next station in the current frequency band in the selected direction. The setting in the "Sensitivity" menu (see p. 24) is taken into account. As soon as a station is located, the seek tuning stops and the located station is played.
Operating the radio the display of station names (see p. 22). You can now do the following: • Continue listening to the station by pressing the OK button =. To subsequently store this station, see p. 39, • return to the previous station by pressing the ESC button A, • search for additional stations by turning the menu button < to the left or right. You can now do the following: • Store this station, see p. 39, • search for additional stations by waiting for 10 seconds, • cancel the scan (see below).
Operating the radio Storing stations You can store 6 stations in each memory bank – either manually (memory banks FM1, FM2, MW and LW) or automatically (memory bank FMT). Storing stations manually ➜ Select the memory bank FM1 or FM2 first or one of the MW or LW wavebands (see p. 36). Note: Do not use the FMT memory bank because the stations in this memory bank are deleted whenever stations are stored automatically (see below). ➜ Tune into the desired station (see p. 36).
Operating the CD/MP3 player Cancelling automatic storing (Travelstore) To cancel automatic storing prematurely: ➜ Press the ESC button A. Or: ➜ In the Options menu of the radio, select and confirm the "Stop T-Store" menu item. Travelstore is cancelled. The radio plays the station in memory location 1 of the FMT level.
Operating the CD/MP3 player If you cannot play a CD-R: • Use CD-Rs from a different manufacturer or a different color, • burn CD-Rs at a lower speed. What characteristics do MP3 CDs have to have? The device can only play and display MP3 CDs with the following features: • The CD-ROM may contain only MP3 files as well as folders, but no other files, including no CD audio files • CD format: ISO 9660 (Level 1 or 2) or Joliet • Bit rate: max. 320 kbit/s • File extension: must be ".
Operating the CD/MP3 player Or: ➜ Switch off the device (see p. 9). The CD stops playing. The device is switched off. If you reselect the CD player as audio source, the playback automatically continues at the point where it was interrupted. If you play an audio CD in the built-in CD player, the CD display is shown. CD 14:01 00:22 Track 01/11 Tracks Options ➜ In the CD display, select and con- firm the "Tracks" menu. The list of tracks is displayed. ➜ Select and confirm the desired track.
Operating the CD/MP3 player Selecting MP3 tracks from an MP3 list If you play an MP3 CD, the MP3 display is shown. Tracks Track 01 Track 02 Track 03 Track 04 MIX ➜ Select and confirm the desired track. The selected track is played. To select a track on another CD in the CD changer: ➜ In the CD changer display, select and confirm the "CDs" menu. The list of CDs located in the CD changer is displayed. ➜ Select and confirm the desired CD. The CD changer changes the CD. This process may take a few seconds.
Operating the CD/MP3 player The advantage: If the name of a folder or MP3 file is too long, it is abbreviated. You can display the complete name by pressing the button B. To exit the Info display, press the ESC button A. Scanning tracks (SCAN) To scan and play all tracks of a CD or the current folder of an MP3 CD for 10 seconds: ➜ Press the OK button = for longer than 2 seconds. Or: ➜ Select and confirm "Start scan" menu item in the Options menu of the CD player, CD changer or MP3 player.
Operating the CD/MP3 player Displaying ID3 tags/file names ➜ In the Options menu of the MP3 During the MP3 playback, the MP3 display shows either the name of the MP3 file or the information from ID3 tags. Options MP3 info Start scan ID3 Scroll To toggle between both displays: ➜ In the Options menu of the MP3 player, select the "ID3" menu item. Use the OK button = to toggle the display: • The check mark means: If ID3 tags are featured on the MP3 CD, they are displayed.
Operating the navigation system Operating the navigation system The operating principle Entering a destination You no longer need a street map to find a specific destination. Instead, you enter your destination in the navigation system using the text input (see p. 52). Positioning The current vehicle position is determined by means of GPS satellite signals, the speedometer signal and a gyroscope.
Operating the navigation system The surroundings function CAUTION! If no destination guidance is active, the navigation system automatically loads the digital map material of a certain area surrounding the vehicle position into its memory. Within this area, you can specify and navigate to destinations without having to insert the navigation CD.
Operating the navigation system • is disconnected from the operating voltage. Note: Similar to a printed street map, the map material is no longer up to date after some time. This may result in incorrect turn-by-turn directions. For this reason, replace your navigation CD as soon as a new version is available (see www.blaupunkt.com). The navigation display To display the navigation display: ➜ Press the NAVI button >. The navigation display appears.
Operating the navigation system The three menus of the navigation system The three menus "Destination", "Memory" and "Options" are required to: • Enter a new destination for the navigation (see p. 54), • call and edit stored destinations (see p. 61), • block route areas ("Traffic ahead", see p. 67), display the calculated route in detail ("Route list", see p. 67) and define the "Route options" (see p. 68). The following illustrations provide an overview of the most important menu items.
Operating the navigation system NAVI Destination Destination CITY STREET TOWN CENTRE POINTS OF INTEREST COUNTRY City A City ABCDEFGHIJKLMNOPQRSTUVWXYZ 0123456789_,./- Text input List of cities Street Street A ABCDEFGHIJKLMNOPQRSTUVWXYZ 0123456789_,./- Text input List of streets Start destinati guidance Town Centre A Centre ABCDEFGHIJKLMNOPQRSTUVWXYZ 0123456789_,.
Operating the navigation system Destination Memory Memory Last 10 Destinations Waypoints Add Modify Set waypoint Last 10 Last 10 M1 2PA Manchester, Sir Matt B M1 3PA Manchester, Henry Gil MJ Junction Manchester Destinations M1 2PA Manchester, Sir Matt B M1 3PA Manchester, Henry Gil MJ Junction Manchester List of last 10 destinations Start destinat guidance List of stored destinations Start destinat guidance Date and time Start destinat guidance Select destinations from the list Start destin
Operating the navigation system Starting the navigation system To start the navigation system, the navigation software must be installed (see p. 47). ➜ Press the NAVI button >. The navigation display appears. 1 TMC 01:13 FM1 4 2 SIR MATT BUSBY WAY 3 Destn. Memory 5 7 Options 6 Overview of the destination entry You can either enter a new destination or call a stored destination (see p. 62). If you enter a new destination, you can either enter a new address (see p. 54) or a point of interest (see p.
Operating the navigation system B Destinations LONDON L ABCDEFGHIJKLMNOPQRSTUVWXYZ 0123456789_,./C Note: If the desired character does not appear in the character list C, see below. ➜ Press the OK button = to con- firm your selection. The selected character appears in the Text field A (in yellow colour). The character list C shows the characters in white which may be possible as the next character. Characters that are not possible as the next character appear in blue and cannot be selected.
Operating the navigation system Destinations A ABCDEFGHIJKLMNOPQRSTUVWXYZ 0123456789_,./C D ➜ Use the menu button < to select the Special character field D and press the OK button =. The bottom line of the character list C displays additional special characters. ➜ From the bottom line of the character list C, select the desired special character and press the OK button =. ➜ Use the menu button < to select the Special character field D again and press the OK button =.
Operating the navigation system 4. either the house number or an intersection (see p. 58) where your destination is located (not mandatory). Entering a country You have to enter the country only if it is not yet displayed in the "Destination" menu. To enter the country in which your destination is located: ➜ In the "Destination" menu, mark and confirm the "Country" menu item. Destination POINTS OF INTEREST COUNTRY The advantage: The postcode determines the destination faster and uniquely.
Operating the navigation system The destination entry via postcode is only possible if the corresponding data exist on the navigation CD. Postcodes and P.O. boxes cannot be used in the destination entry. You can now do the following: • Enter a street via the "Street" menu item (see below), or • enter a city centre or a centre of a part of a city via the "Centre" menu item (see below), or • enter a point of interest in the city via the "Point of interest" menu item (see p. 57).
Operating the navigation system The names of all parts of a city are displayed in a list. Note: If the city was selected by entering the postcode, the list displays only the centres in reference to the postcode entered. ➜ Select the desired centre from Example: For example, if you are looking for a hotel, select "Hotel". The text input or a list appears. ➜ Enter the name of the point of interest in the text input (see p. 52) or select the name of the point of interest from the list.
Operating the navigation system Destination HOUSE NUMBER JUNCTION CONTINUE The text input or a list appears. ➜ Enter the house number in the text input (see p. 52) or select the house number from the list. ➜ Press the OK button =. The destination guidance starts (see p. 62). You can now do the following at any time: • Change the route options (see p. 68), • store the destination (see p. 59), • cancel the destination guidance (see p. 66).
Operating the navigation system Destn. POINTS OF INTEREST COUNTRY Note: The "Destination" menu displays different menu items, depending upon which address information you have already entered. ➜ In the "Destination" menu, select and confirm the "Points of interest" menu item. The point of interest areas "Position area", "Destination area" and "Suprareg. destinations" are displayed. Note: The "Position area" menu item is displayed only if the navigation system can determine the current position.
Operating the navigation system The last 10 destinations are automatically stored here in the chronological order in which they were entered. If you entered more than 10 destinations, old destinations are automatically deleted. • "Destinations": Up to 24 destinations entered are stored here in alphabetical order. If this memory is full, you must manually delete destinations from this memory before you can store new destinations.
Operating the navigation system ➜ Mark and select the waypoint to be saved as a destination in the list. The waypoint is saved as a destination. To enter and save a new destination: ➜ In the "Add" menu, mark and confirm the "New destn." menu item. The destination entry starts (see p. 54). As soon as the destination has been clearly entered, it is automatically saved.
Operating the navigation system The three memories "Last 10", "Destinations" or "Waypoints" appear. ➜ Mark and confi rm the memory from which you want to delete all destinations. The confirmation dialogue "Delete memory completely?" is displayed. ➜ Mark and confirm "Yes" to delete all destinations from the memory. To rename saved destinations: ➜ In the "Edit" menu, mark and confirm the "Rename destn." menu item. Modify Delete destn. Clear memory Rename destn.
Operating the navigation system Destination guidance is starting Calculating route Change Calculating route Short Dynamic Change Continue Route calculation Change: Set route options 10 sec. TMC FM1 4 16:13 2:37 2 5 km 137 7 BBC 3 SIR MATT BUSBY WAY 6 1 Destination ESC Navigation Do you really want to cancel route guidance? Yes Short Dynamic No You can perform the following at any time during destination guidance: • Display the complete route (see p. 67), • change the route, e.g.
Operating the navigation system Note: If you leave the corridor while driving, you hear a request to reinsert the navigation CD. If you do not insert the navigation CD, you hear a corresponding note and no additional turn-by-turn directions follow. If the vehicle is located on a street that is recognised by the software ("digitised street"), the destination guidance starts via voice-prompted and visual turn-by-turn directions.
Operating the navigation system Before you have to turn, you hear a voice-prompted turn-by-turn direction and the following is displayed: A B C D 1 SIR MATT BUSBY WAY 2 KM 3 0,3 2:10 122 BBC 5 5 6 (shows the direction in which you must turn shortly) B Name of the street to which you must turn C Symbolic display of the distance to the turning point D Display of the distance to the turning point in kilometres Shortly before you have to turn, the junction zoom may be displayed, provided that you swi
Operating the navigation system As soon as you are once again travelling on a "digitised street", you receive voice-prompted and visual turn-by-turn directions. If you do not follow the turn-byturn directions No problem: If you deviate from the recommended route, the system automatically calculates a new route from the current vehicle position to the destination. You may be prompted to insert the navigation CD.
Operating the navigation system Navigation Do you really want to cancel route guidance? Yes No ➜ Select and confirm "Yes" to can- cel the destination guidance. The current position is shown on the navigation display. You do not receive any additional turn-byturn directions. The route list appears. The route segments that remain to be driven are displayed. If a route segment features traffic obstructions, this section is identified by a warning triangle.
Operating the navigation system ➜ In the "Options" menu, mark and confirm the "Traffic ahead" menu item. The distance display appears. Traffic ahead 47,96 km ➜ Use the menu button < to set the length of the blocked distance, starting with the vehicle position. ➜ Press the OK button =. The route is recalculated so that you evade the blocked section. The navigation system saves this blocked section until it is switched off for longer than 30 minutes.
Operating the navigation system Defining the route type To define the route type: Route options Optimum Fast Short Dynamic Enable Adjust optimum of a time-optimised to distanceoptimised route (see p. 70). Note: The route types "Fast", "Short" and "Optimum" are mutually exclusive. If one of these route types is activated, the other two are automatically deactivated. ➜ In the "Route options" menu, mark and confirm the desired menu item.
Operating the navigation system • "Ferry": Here you can allow or disallow ferries. • "Seasonal": Here you can allow or disallow roads which are blocked in certain seasons, such as Alpine passes. • "Tunnel": Here you can allow or disallow tunnels. Note: If you exclude a certain type of road from the route calculation which would result in long detours, this setting is ignored during the route calculation.
Operating the navigation system If a TMC station is received, the display shows the TMC symbol B. If no TMC station is received, the TMC symbol B flashes. Note: The dynamic destination guidance requires that a TMC station is set during the entire destination guidance. If no TMC station is set, the dynamic destination guidance does not work. For this reason, switch on the automatic tuning to TMC stations (see p. 33).
Installation instructions Displaying the current destination If the destination guidance is active, you can display the current destination as follows: ➜ Press the button B. The Info display appears. ➜ In the Info display, select and confirm the "Destn. Info" menu. The destination is displayed. Installation instructions These installation instructions apply to most types of vehicles. Your vehicle may differ depending upon the model.
Installation instructions • Read and observe the operating instructions for your vehicle as well as the operating instructions for devices to be connected to this device (e.g. antennas, loudspeakers, etc.)! Connection assignments Overview of the connections C-1 C-3 7 10 13 16 19 6 9 12 15 18 11 14 17 20 8 5 C 8 10 3 2 6 7 3 5 D 1 • Disconnect the negative pole of the battery! Observe the safety notes of the vehicle manufacturer.
Installation instructions Chamber C1 (Equaliser/Amplifier) 1 Line out LR 2 Line out RR 3 Line out GND 4 Line out LF 5 Line out RF 6 +12 V switched* 5 12V Chamber C2 (car phone/optional IR remote control RC 10) 7 Telephone IN+ 8 Telephone IN- 9 10 Connections in chamber A Relais A 7 KL.
Installation instructions CAUTION! If the radio connection is protected by a 10-A fuse: ➜ Do not connect the power cable to terminal 15 (switched positive) or terminal 30 (continuous positive)! 6 Illumination connection For vehicles with adjustable instrument lighting (positive controlled) 7 Positive connection switched via ignition CAUTION! ➜ This connection must be connected as switched via ignition (terminal 15, +12 V)! CAUTION! Risk of damage to the device! If you connect vehicle connectors directl
Installation instructions ➜ Do not lay the wires parallel to wire harnesses. Connecting the loudspeakers If passively pre-equipped with 4-ohm loudspeakers: ➜ Adapt the ISO connector 7 of the vehicle to the plug assignment shown in the illustration below. ➜ If required, connect an ISO extension cable (order no. 7 607 647 093). ➜ Plug the connector into chamber B 6 of the device. er cable (order no. 7 607 621 129) from your specialist dealer.
Installation instructions is applied to the connection if the vehicle is in reverse gear. ➜ If the connection to the reversing light is not possible, connect pin 3 to ground. Note: If you do not connect the reversing light signal, the device does not detect a reverse travel. If the GPS signal is missing, it may impact the accuracy of the navigation. Connecting the speedometer signal You can navigate with or without speedometer signal.
Installation instructions ➜ Bend over as many tabs as pos- sible using a screwdriver. Note: The maximum setting range is between –10° and +30°. ➜ Retighten the screw 1. Installing the device in the tray ➜ Ensure that all connectors are correctly inserted and the lateral latching tabs are engaged. CAUTION! ➜ Insert the device into the tray to one-third of its length. ➜ Loosen the screw 1 above the gyroscope 2 on the right side of the device.
Installation instructions Switching the speedometer signal on/off After you connected the speedometer signal, you must switch on the analysis of the speedometer signal as follows: ➜ In the "Installation" menu, select and confirm the "Speed signal" menu item as described under "Operating the menu" on p. 12. Installation Auto calib. Manual calib. Sensor test Speedsignal Use the menu button < to switch on the analysis of the speedometer signal (check mark) or switch it off (no check mark).
Installation instructions You can calibrate the navigation system either automatically on a longer calibration trip (5 to 15 km) or manually on an exactly measured distance (100 to 500 m) (see below). To calibrate the device: ➜ Switch on the vehicle ignition. ➜ Install the navigation software (see p. 47). ➜ Keep the navigation CD in the CD drive. ➜ In the Settings menu, select and confirm the "Installation" menu item as described under "Operating the menu" on p. 12. The "Installation" menu is displayed.
Installation instructions Cancelling the calibration Manual calib. Distance 200 Metres The distance for the calibration travel is displayed. ➜ Change the distance of the calibration travel, if required, by turning the menu button < . Next, press the OK button =. Note: The distance must measure between 100 and 500 metres. The adjusted distance must exactly match the measured distance! ➜ Press the OK button = to start the manual calibration.
Warranty Warranty We provide a manufacturer's warranty for our products purchased within the European Union. For devices purchased outside the European Union, the warranty terms issued by our respective responsible domestic agency are valid. The warranty terms can be called up under www.blaupunkt.com or requested directly from: Blaupunkt GmbH Hotline Robert-Bosch-Str. 200 D-31139 Hildesheim Specifications Specifications Voltage supply Operating voltage: 10.5–14.4 V Current consumption Operating: max.
Glossary Glossary turn-by-turn directions even if no navigation CD is inserted. Digital equaliser Digital sound control for adapting the frequency response. An equaliser consists of several filters which allow for improving the sound or adjusting it to personal preferences. Optimum route Combination of fast and short route. The relationship of the two route components can be adjusted (see "Setting the optimum route" on p. 70).
Index If you switch the device back on after the standby time has expired, it takes longer for the device to be operational again since the device software must be reloaded. Travelstore Automatic searching and storing of the six strongest radio stations received of the region (see p. 39). Surroundings function If no destination guidance is active, the navigation system uses its free memory to load digital map material surrounding the vehicle position from the navigation CD.
Index D Destination guidance cancel 66 displaying estimated arrival time 25 displaying remaining travel time 25 displaying the junction zoom 25 dynamic 70 wind rose 65 Device card 4 Display adjust automatically to light conditions 20 brightness day 20 brightness night 20 setting the Language 20 switch off 20 Disposal 4 E EON 83 Equaliser 83 Equalizer 17 F Fader adjust 16 G GPS 83 H HICUT 23, 83 I Installation test 79 J Junction zoom 25 L Loudness 15 M operate 12 overview 13 MP3 player browse menu
Index R Radio alternative frequencies 22 basic settings in the menu 22 cancelling an automatic station seek tuning 37 changing the seek tuning sensitivity 24 displaying the station name 22 improved reception (HICUT) 23 limit reception to regional stations 23 quitting Travelstore 40 scanning stations 38 selecting stored stations 40 selecting the memory bank (FM1, FM2, FMT) 36 selecting the waveband (FM, MW, LW) 36 setting the TMC station automatically 33 starting an automatic station seek tuning 36 starting
Country: Germany (D) Phone: Fax: 0180-5000225 05121-49 4002 Austria (A) 01-610 39 0 01-610 39 391 Belgium (B) 02-525 5444 02-525 5263 Denmark (DK) 44-898 360 44-898 644 Finland (FIN) 09-435 991 09-435 99236 France (F) 01-4010 7007 01-4010 7320 Great Britain (GB) 01-89583 8880 01-89583 8394 Greece (GR) 210 94 27 337 210 94 12 711 Ireland (IRL) 01-46 66 700 01-46 66 706 Italy (I) 02-369 62331 02-369 62464 Luxembourg (L) 40 4078 40 2085 Netherlands (NL) 0800 400
At a glance! TravelPilot Rome NAV55E Open the control panel and remove the CD Turn: volume control Press short: Switch on/mute traffic announcement/fading out the turn-by-turn direction Press long: Switch off MENU Calling the settings menu Function buttons 1-6 (the functions assigned to these function buttons are shown on the display) TRAF OK Press short: Call up traffic information settings Press long: Display TMC messages Turn: Select menu item/character OK button Press short: Confirm selection Press lo