Radio / DAB / CD / MMC / MP3 Woodstock DAB54 7 644 708 310 Operating instructions PocketDAB 2004 http://www.blaupunkt.
Bitte aufklappen Open here Ouvrir s.v.p. Aprite la pagina Hier openslaan a.u.b.
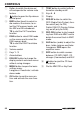
ESPAÑOL SVENSKA 18 NEDERLANDS 17 PORTUGUÊS FRANÇAIS ENGLISH 2 3 4 5 16 15 14 6 13 12 11 8 10 9 ITALIANO 7 19 DANSK 1 3 DEUTSCH
CONTROLS 1 2 3 4 5 6 7 8 9 : 68 Button to switch the device on/ off and operate the volume mute feature button to open the flip-release control panel BND button (band) to select radio mode as the source, to select the FM memory banks and the MW and LW wavebands TS to start the FM Travelstore function DAB button to select DAB mode as the source and to select the DAB memory bank.
Switching to DAB mode ................ 79 Switching DAB TA-REG on/off ...... 81 Selecting the memory bank ........... 81 Tuning into ensembles ................... 82 Selecting programmes .................. 82 Scanning receivable DAB programmes (DAB-SCAN) ................. 82 Storing programmes ...................... 83 Accessing stored programmes ...... 83 DAB programme type (PTY) .......... 83 Setting the DAB waveband ............ 84 Switching between DAB and FM ... 85 DAB Service following ...............
CONTENTS MP3 mode ............................ 100 Preparing an MP3-CD ................. 100 Switching to MP3 mode .............. 101 Configuring the display ................ 101 Selecting a directory .................... 102 Selecting tracks .......................... 102 Fast searching (not in MP3 browse mode) .......... 103 Random track play – MIX (not in MP3 browse mode) .......... 103 Scanning tracks – SCAN (not in MP3 browse mode) ..........
Accessories Only use accessories approved by Blaupunkt. DAB antenna You need a special DAB antenna in order to operate the Woodstock DAB 54. This can either be a separate DAB roof antenna or a DAB/AM/FM combination antenna. You can obtain further information from your Blaupunkt dealer. Remote control The optional RC08 or RC10 remote control allows you to access the most important functions of your car sound system safely and conveniently from your steering wheel.
NOTES AND ACCESSORIES Amplifiers You can use all Blaupunkt and Velocity amplifiers. CD changers You can connect the following Blaupunkt CD changers: CDC A 08, IDC A 09 and CDC A 03. Compact Drive MP3 You can connect the Compact Drive MP3 instead of a CD-changer in order to play MP3 music tracks. If you decide to connect a Compact Drive MP3, you will first need to use a computer to store the MP3 music tracks on the Microdrive™ hard disk that is inside the Compact Drive MP3.
CONTROL PANEL/KEYCARD DEUTSCH Detaching the control panel ➮ Press button 2. vice’s guides that are positioned on the left and right at the lower edge of the housing. Push the control panel carefully into the bracket until it clicks into place. ➮ Flip up the control panel and carefully press it into the device until it clicks into place. Notes: ● Keep the car KeyCard in a safe place but never in the vehicle.
CONTROL PANEL/KEYCARD ● If you go on a longer trip, take your KeyCard with you so that you can reactivate your car radio if it is ever disconnected from the vehicle’s power supply. The KeyCard has been designed to be easy to use and carry around. Inserting the KeyCard To insert the KeyCard in the device, ➮ Carefully pull the KeyCard out of the slot. ➮ Attach the control panel again as described in “Attaching the control panel”. Note: ● Never store the KeyCard in the vehicle.
have not used in the device before. ➮ Close the control panel. ➮ Switch off the device if it is not already turned off. ➮ Simultaneously press and hold down the BND•TS button 3 and the 1 SCL button 6. ➮ Switch on the device by pressing button 1. “0000 MASTERCODE” appears in the display. Enter the four-digit master code that is printed on the car radio passport as follows: Looking after the KeyCard Keeping the contacts free from dirt and other particles will ensure that the KeyCard functions properly.
SWITCHING ON/OFF ADJUSTING THE VOLUME Switching on/off Adjusting the volume There are various ways of switching the device on/off: You can adjust the volume in steps from 0 (off) to 50 (maximum). To increase the volume, Switching on/off using the vehicle ignition The device will switch on/off simultaneously with the ignition if the device is correctly connected to the vehicle’s ignition and you did not switch the device off by pressing button 1.
➮ Briefly press button 1. “MUTE” appears in the display. Cancelling mute To return to your previously set volume level, ➮ briefly press button 1 again. Telephone audio / navigation audio If your car sound system is connected to a mobile telephone or a navigation system, the sound system’s volume will be muted as soon as you “pick up” the phone or as soon as a navigation announcement is made.
ADJUSTING THE VOLUME Note: ● You can use the volume control 5 to adjust the volume of telephone calls and navigation announcements whilst you are listening to them. Setting the volume of the confirmation beep The system will output a confirmation beep for some functions if you keep a button pressed down for longer than two seconds, for instance, when assigning a radio station to a station preset button. You can adjust the volume of this beep. ➮ Press the MENU button 9.
If you are in radio, CD/MP3, MMC/SD, CD-changer, Microdrive™ or AUX mode, ➮ press the DAB•TS button 4. In contrast with standard radio broadcasting, several programmes are always broadcast over the same frequency for DAB. These programmes are arranged in “ensembles”. An ensemble always contains several programmes. In turn, a programme can additionally contain up to twelve sub-programmes. In the case of a sports station, for instance, various sports events can be broadcast simultaneously as sub-programmes.
DAB MODE WEATHER Weather reports (WEATHER) are provided in addition to the traffic announcements. If you wish, you can allow the weather reports to be played. If the “WEATHER ON” setting is activated, the current programme will be interrupted when a weather report arrives, and the report will be played. At the end of the weather report, the radio returns to the programme that you were listening to before. ➮ Press the MENU button 9. ➮ Press the button 7 repeatedly until “DAB MENU” appears in the display.
the DAB menu. or button 7 repeatedly until “DAB TREG OFF” or “DAB TREG ON” appears in the display. If you want to receive announcements that apply to specific regions, select “DAB TREG ON”. If you only want to receive non-regional announcements, select “DAB TREG OFF”. ➮ Select the setting that you want usbuttons 7. ing the When you have finished making your changes, ➮ press the MENU button 9.
DAB MODE Tuning into ensembles With DAB, several programmes broadcasted over the same frequency are always combined into an “ensemble”. Note: ● Since various programmes from different ensembles are stored automatically in the DABT memory bank, you cannot use the functions described here for tuning into an ensemble whilst the DABT memory bank is activated. Selecting an ensemble You can directly select ensembles that you have received once already (for this to work, the ensemble must be receivable).
want. ➮ Tune into the ensemble that you want. ➮ Select the programme that you want to store. ➮ Press and hold down one of the station buttons 1 - 3 6 or 4 - 5 < for longer than two seconds to assign the programme to that button. Storing programmes automatically (Travelstore) The Travelstore function stores the first five receivable programmes in alphabetical order and you can access them directly using the station buttons.
DAB MODE You can use the PTY function to select stations of a particular programme type. Switching DAB-PTY on/off ➮ Press the MENU button 9. ➮ Press the button 7 repeatedly until “DAB MENU” appears in the display. ➮ Press the OK button : to display the DAB menu. ➮ Press the or button 7 repeatedly until “DAB PTY ON” or “DAB PTY OFF” appears in the display. ➮ Press the or button 7 to switch DAB-PTY ON or OFF. When you have finished making your changes, ➮ press the MENU button 9.
or button 7 to switch between the settings. When you have finished making your changes, ➮ press the MENU button 9. ➮ Press the ENGLISH or button 7 repeatedly until “DAB-FM AUTO”, “DABFM MANUAL” or “DAB-FM OFF” appears in the display. FRANÇAIS the DAB menu. ➮ Press the ITALIANO ➮ Press the OK button : to display Switching service following on/off To use service following, ➮ briefly press the RDS•SF > button in DAB mode.
DAB MODE DAB sub-programmes DAB radio text Some DAB programmes contain subprogrammes. Programmes that contain sub-programmes are marked with a “✶” in front of the programme name. If a programme contains sub-programmes, you can tune into them. In addition to their programmes, some stations broadcast additional information (e.g. news) as scrolling text in the display. The DAB radio text function is activated at the factory by default.
NEDERLANDS ➮ Press the OK button : to display ENGLISH You can choose from various display options in DAB mode: ● “NORMAL MODE”: First line: Programme name and, if applicable, memory location. Second line: Ensemble name. ● “CLOCK MODE”: First line: Programme name and, if applicable, memory location. Second line: Frequency of the ensemble, clock time. ● “MINIMAL MODE”: The programme name is displayed on both lines.
RADIO MODE Radio mode This device is equipped with an RDS radio receiver. Many of the receivable FM stations broadcast a signal that not only carries the programme but also additional information such as the station name and programme type (PTY). The station name appears in the display as soon as the tuner receives it. Switching to radio mode If you are in CD/MP3, MMC, DAB, CDchanger or AUX mode, ➮ press the BND•TS button 3. or Switching REGIONAL on/off ➮ Press the MENU button 9.
button 7. The radio tunes into the next receivable station. Tuning into stations manually You can also tune into stations manually. Note: ● You can only tune into stations manually if the RDS function is deactivated. ➮ Press the or button 7. Browsing through broadcasting networks (only FM) If a radio station provides several programmes, you have the option of browsing through its so-called “broadcasting network”. Note: ● The RDS function must be activated before you can use this feature.
RADIO MODE Storing stations Storing stations manually ➮ Select the memory bank that you want (FM1, FM2, FMT) or one of the wavebands (MW or LW). ➮ Tune into the station that you want. ➮ Press and hold down one of the station buttons 1 - 3 6 or 4 - 5 < for longer than two seconds to assign the station to that button. Storing stations automatically (Travelstore) You can automatically store the five stations offering the strongest reception in the region (only FM).
Note: ● The scanning time that you set is also applied by the system to scanning carried out in CD/MP3, MMC, DAB and CD-changer mode. Note: ● If the tuner does not find a station that corresponds to the selected programme type, you will hear a beep and “NO PTY” appears briefly in the display. The radio will then retune to the station that it received last.
RADIO MODE The radio will then tune into the next station that it finds that corresponds to your selected programme type. Assigning a programme type to a station button ➮ Select a programme type using the or button 7. ➮ Press and hold down the station “HICUT 0” means that no automatic reduction of the interference level will be made; “HICUT 2” means that a maximum reduction will be made. ➮ Press the MENU button 9.
This device allows you to give stored radio stations their own name. The name can be up to eight characters long. This name is displayed in the second line of the display beneath the frequency. You can only give stations a name that you have stored together with their frequency and which do not already have their own RDS name. ➮ Press the MENU button 9. “TUNER MENU” appears in the display. ➮ Press the OK button : to display the tuner menu.
TRAFFIC INFORMATION Traffic information Your device is equipped with an RDSEON receiver. EON stands for Enhanced Other Network. Whenever a traffic announcement (TA) is broadcast, the system switches automatically from a station that does not provide traffic reports to the appropriate traffic information station within the broadcasting network that does. Once the traffic report has been played, the system will switch back to the programme that you were listening to before.
➮ Adjust the volume using the Risk of severe damage to the CD drive! CD singles with a diameter of 8 cm and non-circular contoured CDs (shape CDs) must not be used. We accept no responsibility for any damage to the CD drive that may occur as a result of the use of unsuitable CDs. buttons 7. When you have finished making your changes, ➮ press the MENU button 9. Note: ● Using the volume control 5, you can also adjust the volume during a traffic announcement for the duration of that announcement.
CD MODE ➮ Gently close the control panel whilst exerting a little pressure until you feel it click into place. The CD starts playing. ● If a CD is already inserted in the drive, ➮ press the SRC button A repeatedly until “CD” appears in the display. Playback begins from the point at which it was last interrupted. Selecting tracks ➮ Press one of the arrow buttons 7 to select the next or previous track. If you press the or button 7 once, the player will play the current track again from the beginning.
“RPT TRK OFF” appears briefly in the display and the RPT symbol disappears. Normal playback is then resumed. Changing the display You can choose from various display options in CD mode: ● “NORMAL MODE”: First line: Track number Second line: Playing time ● “INFO MODE”: First line: Track number and playing time. Second line: CD text or CD name ● “CLOCK MODE”: First line: Track number and playing time.
CD MODE Switching CD text on/off Entering/editing CD names ➮ Press the MENU button 9. ➮ Press the or button 7 repeat- ➮ Listen to the CD that you want. ➮ Press the MENU button 9. ➮ Press the or button 7 repeat- edly until “VARIOUS MENU” appears in the display. ➮ Press the OK button :. ➮ Press the or button 7 repeatedly until “CD TEXT” or “CD NAME” appears in the display. buttons 7 to switch between the “CD TEXT” and “CD NAME” options.
pressing the MENU button 9. Deleting all CD names You can delete all the CD names stored in the car sound system. ➮ Listen to a CD. ➮ Press the MENU button 9. ➮ Press the or button 7 repeatedly until “VARIOUS MENU” appears in the display. ➮ Press the OK button :. ➮ Press the or button 7 repeatedly until “CD NAME EDIT” appears in the display. ➮ Press the OK button :. ➮ Press and hold down the MENU Ejecting a CD ➮ Press the button 2. The flip-release panel opens out towards you.
MP3 MODE MP3 mode You can also use this car sound system to play CD-Rs and CD-RWs that contain MP3 music files. MP3 is a process developed by the Fraunhofer Institute for compressing CD audio data. Compression allows data to be reduced to around 10% of their original size without a noticeable loss in quality (at a bit rate of 128 kbit/s). If a lower bit rate is used to convert CD audio data to MP3, you will be able to create smaller files but this will be accompanied by a loss in audio quality.
Configuring the default display You can display various types of information on the current track: 1. “NORMAL MODE”: First line: Track name Second line: Directory name 2. “INFO MODE”: First line: Track name. Second line: MP3-ID TAG (if available and activated, see “Selecting MP3 info”). Note: ● The system can display MP3-ID tags (version 1) if they have been saved with the MP3 files (for further information, please read the instructions that came with your PC’s MP3 software or burner software). 3.
MP3 MODE Note: ● You can use MP3 browse mode to find MP3 files on your CD quickly and conveniently. You cannot use the fast search, MIX, SCAN or REPEAT functions whilst in MP3 browse mode. 4. “TRACK AND DIR MODE”: First line: Track number and playing time. Second line: Directory number 5. “CLOCK MODE”: First line: Directory number and track number. Second line: CD text or CD name and clock time To switch between the different display options, ➮ press the DIS•ESC button 8.
displayed track, press the OK button :. Fast searching (not in MP3 browse mode) To fast search backwards or forwards, ➮ press and hold down the or button 7 until fast searching backwards / forwards begins. Random track play – MIX (not in MP3 browse mode) To play the tracks in the current directory in random order, ➮ Press and hold down the OK button : for longer than two seconds. The next track will then be scanned.
MP3 MODE Repeating individual tracks or whole directories – REPEAT (not in MP3 browse mode) To play the current track repeatedly, ➮ briefly press the 5 RPT button <. “REPEAT TRACK” appears briefly in the display and RPT lights up. To repeat the whole directory, ➮ press the 5 RPT button < again. “REPEAT DIR” appears briefly in the display.
MP3 MODE ➮ Listen to the track that you want to delete from the list. ➮ Press the or button 7. ➮ Press and hold down the 3 CLR button 6 for longer than two and less than four seconds until you hear a confirmation beep. Inserting/removing MMCs/SDs Deleting all the lists for all CDs You can delete all the stored tracks for all the CDs. The MMC/SD slot is located on the left below the CD compartment. To insert/ remove an MMC, you must first detach the flip-release panel.
MMC/SD MODE Removing an MMC/SD ➮ Detach the flip-release panel. ➮ Carefully push the MMC/SD into the device until you feel a slight resistance. The MMC/SD is now unlatched. ➮ Carefully pull the MMC/SD out of the slot. ➮ Attach the flip-release panel again. Switching to MMC/SD mode ➮ Press the SRC button A repeatedly until “MMC” appears in the display. Playback begins with the first track that the device detects.
➮ During MP3 playback, press the ➮ During MP3 playback, repeatedly press the DIS•ESC button 8 until “MP3 BROWSE MODE” is displayed. DIS•ESC button 8 repeatedly until “MP3 BROWSE MODE” appears in the display. ➮ Press the or button 7 to display the directories on the CD. ➮ If you want to select the currently ➮ If you want to select a directory, press one of the / buttons 7 repeatedly until the directory is shown in the top line of the display and then press the OK button :.
MMC/SD MODE Random track play – MIX (not in MP3 browse mode) To play the tracks in the current directory in random order, ➮ briefly press the 4 MIX button <. “MIX DIR” appears in the display and the MIX symbol lights up. To play the tracks contained in all the directories on the inserted MP3-CD in random order, ➮ press the 4 MIX button < again. “MIX CD” appears in the display and the MIX symbol lights up.
Displaying scrolling text The selected information (track, album or file name and directory name) is displayed once as scrolling text when the track changes. To display the information again as scrolling text, ➮ briefly press the 1 SCL button 6. Recording DAB programmes onto MMCs/SDs You can use this device to record a DAB programme onto an inserted MMC/SD card. The DAB data stream is then stored as an MPEG file on the MMC/ SD (MPEG 1, Layer 2). There are numerous MMCs/SDs available on the market.
MMC/SD MODE please read the “DAB mode” chapter. ➮ Press the REC•DEL button ? when you want to start recording. Notes: ● You cannot start recording during the first 15 seconds after switching to DAB mode or after switching on the radio with DAB mode activated. This also applies even if you pressed the REC•DEL button ? and “RECORDING” appears in the display. ● To avoid damaging the MMC/SD, you should never start the engine whilst recording.
buttons 7. ➮ press the OK button :. down the REC•DEL button ? for longer than two seconds. The MMC record menu is displayed. “MMC REC ON” or “MMC REC OFF” appears in the display. The hours behind “TIMER 1” begin to flash. or button 7 to switch between the settings “MMC REC ON” and “MMC REC OFF”. ➮ Press the Setting the timer and recording duration You can programme two recording timers.
MMC/SD MODE The settings are saved. To close the MMC-RECORD menu, ➮ Press and hold down the REC•DEL button ? for longer than two seconds. Playing recordings using the device You can listen to the recording by selecting its corresponding file name in the “DAB_DIR” directory on the MMC/SD. For further details on this, please read the sections entitled “Selecting a directory” and “Selecting tracks” at the start of the chapter.
or button 7. ➮ Press the OK button : to format the card. Configuring the display You can choose between various display options. For further details on this, please read the section entitled “Configuring the display” in the “MP3 mode” chapter. Programming your favourite tracks for an MMC/SD Using the TPM function (Track Program Memory), you can program and play your favourite tracks for an MMC/SD.
CD CHANGER MODE CD-changer mode Changing the display Note: ● Information on handling CDs, inserting CDs and operating the CD changer can be found in the operating instructions supplied with your CD changer. You can choose from various display options in CD-changer mode: ● “NORMAL MODE”: First line: Track number Second line: CD number / CD name and playing time ● “CLOCK MODE”: First line: Track number. Second line: CD number / CD name and clock time ● “MINIMAL MODE”: First and second line: Track number.
“REPEAT CD” appears briefly and RPT lights up in the display. Cancelling REPEAT To stop the current track or current CD from being repeated, ➮ repeatedly press button 5 RPT < Stopping SCAN To stop scanning, ➮ briefly press the OK button :. The currently scanned track will then continue to be played normally. To play the tracks on the current CD in random order, Note: ● You can set the scanning time.
CD CHANGER MODE ➮ Press the OK button :. ➮ Press the or button 7 repeatedly until “CD NAME EDIT” appears in the display. ➮ Press the OK button :. You will now enter editing mode. If your CD does not have a name yet, “ABCDEFG” appears in the display. The currently active text input position flashes. / buttons 7 to select the character that you want. If you want an empty space, simply select the underscore. ➮ Use the or button 7 to move from one text input position to another.
➮ Press the OK button :. ➮ Press the or button 7 repeatedly until “CLOCK AUTO” or “CLOCK MANUAL” appears in the display. ➮ Select the “CLOCK AUTO” setting or button 7. ➮ Press the MENU button 9. The menu appears again. Setting the clock manually To set the clock time manually, ➮ press the MENU button 9. ➮ Press the or button 7 repeatedly until “CLOCK MENU” appears in the display. button 7. The minutes flash. ➮ Set the minutes using the ENGLISH FRANÇAIS ➮ press the / buttons 7.
SOUND CLOCK TIME Displaying the time continuously when the device is off and the ignition is on To display the time when the device is off and the vehicle ignition is on, ➮ press the MENU button 9. ➮ Press the or button 7 repeatedly until “CLOCK MENU” appears in the display. ➮ Press the OK button :. ➮ Press the or button 7 repeatedly until “OFF CLOCK OFF” or “OFF CLOCK ON” appears in the display. or button 7 to switch between the ON/OFF settings.
➮ Press the OK button :. The X-Bass menu is displayed. The frequency flashes. or button 7 to set the frequency that you want. ➮ Press the ➮ Press the button 7. The boost level flashes. or button 7 to set the boost level that you want. When you have finished making your changes, ➮ Press the ➮ press the AUD•DEQ button @. ENGLISH FRANÇAIS ITALIANO or button 7 repeatedly until “X-BASS” appears in the display. ➮ Press the NEDERLANDS ➮ Press the AUD•DEQ button @. “BASS” appears in the display.
EQUALIZER Equalizer To deactivate the equalizer, The device is equipped with a DEQ+. This means you have three 5-band equalizers, six sound presets and seven vehicle presets at your disposal. You can configure the EQ1 - EQ3 equalizers manually. When doing so you can adjust (boost or reduce) one frequency of an equalizer band as well as the quality factor, i.e. the width of the filter. Furthermore, you can calibrate one equalizer automatically.
➮ Press the OK button :. ➮ Press the or button 7 repeatedly until the vehicle type that you want is displayed. ➮ Press the AUD•DEQ @ button. The settings are saved. Automatically calibrating the equalizer You can electronically calibrate and store values for one of the three equalizers (“EQ1”, “EQ2” or “EQ3”), e.g.
EQUALIZER or button 7 repeatedly until “MANUAL EQ” appears in the display. ➮ Press the ➮ Press the OK button :. ➮ Press the or button 7 repeatedly until the equalizer that you want to calibrate (“USER EQ1”, “USER EQ2” or “USER EQ3”) appears in the display. ➮ Press the OK button :. ➮ Press the ESC button 8 twice. ➮ Press the or button 7 repeatedly until “AUTO EQ” appears in the display. ➮ Press the OK button :. A countdown is shown in the display.
➮ press the or button 7. To adjust the quality factor, ➮ Press the button 7. The quality factor setting flashes. or button 7 repeatedly until the setting that you want is displayed. ➮ Press the OK button : and then the DIS•ESC button 8. The settings are saved. ITALIANO FRANÇAIS ➮ Press the Note: Please note that you can boost or reduce one frequency in each equalizer band. Proceed in the way described above with all the equalizer bands that you want to adjust.
ADJUSTING THE DISPLAY SETTINGS Adjusting the display settings Switching the bar graph on/off ➮ Press the OK button :. ➮ Press the or button 7 repeatedly until “PWR METER” appears in the display alongside the current setting (“ON” or “OFF”). You also have the option of switching off the bar graph in the bottom line of the display. ➮ Press the ➮ Press the MENU button 9. ➮ Press the or button 7 repeat- ➮ Press the MENU button 9. edly until “VARIOUS MENU” appears in the display. ➮ Press the OK button :.
edly until “DISPLAY MENU” appears in the display. edly until the colour that you want is displayed. When you have finished making your changes, or button 7 to adjust the viewing angle. When you have finished making your changes, ➮ Press the ➮ press the MENU button 9. Setting the display illumination colour When setting the display illumination, you can choose one of four preset colours or you can mix a colour yourself from the RGB spectrum (red-greenblue) or you can select a colour during a colour scan.
ADJUSTING THE DISPLAY SETTINGS or button 7 repeatedly until the setting that you want is displayed. ➮ Press the or button 7 to move the selection marker to the position after the other colours. ➮ Press the ➮ Adjust the other colour components to suit your preferences. When you have finished making your changes, ➮ press the OK : button and then the MENU button 9. The settings are saved.
FRANÇAIS Note: ● If the AUX input is switched on, you can select it by pressing the SRC button A. ENGLISH ➮ press the MENU button 9. ITALIANO In addition to the CD changer, you can also connect another external audio source equipped with a line output. If no CD changer is connected to the device, you can connect two external audio sources. Audio sources can, for example, be portable CD players, MiniDisc players or MP3 players. The AUX input must be activated in the menu.
AMPLIFIER Amplifier The car sound system provides connections that allow you to connect external amplifiers. We recommend you use well-matched products from the Blaupunkt or Velocity product ranges. Switching the internal amplifier on/off If you are using external amplifiers, you can switch off the device’s internal amplifier (“INT AMP OFF” setting). Note: ● Please check this setting if the loudspeakers do not emit any sound. ➮ Press the MENU button 9.
Specifications CD Amplifier Frequency response: 20 - 20,000 Hz 4 channels: ENGLISH Pre-amp out 3V Input sensitivity FRANÇAIS 4 x 18 watts sine at 14.4 V and 1% distortion factor at 4 ohms. 4 x 26 watts sine in accordance with DIN 45324 at 14.4 V at 4 ohms. 4 x 50 watts max. power AUX input: 2 V / 6 kΩ Tel./Navi input: 10 V / 1 kΩ ITALIANO Output power: DEUTSCH SPECIFICATIONS Tuner 87.
PocketDAB 2004 Operating and installation instructions http://www.blaupunkt.
7. Known Issues ............... 32 ENGLISH Status bar ........................... 24 Audio service list ................. 25 Data service list ................... 26 DLS box .............................. 27 Menu bar ............................ 27 PocketDAB Menu ............... 27 Customize Menu ................. 27 View Menu .......................... 28 Help Menu .......................... 31 FRANÇAIS 6.1 6.2 6.3 6.4 6.5 6.5.1 6.5.2 6.5.3 6.5.4 ITALIANO PocketDAB Application . 23 Main Screen .....
INTRODUCTION ABBREVIATIONS 1. Introduction 2. Abbreviations Digital Audio Broadcasting (DAB) is gaining popularity among listeners due to the superior audio quality. However, DAB is also multimedia enabled with a variety of data being transmitted by the service provider to the receiver. The PocketDAB 2004 software combined with the Woodstock DAB54 allows the user to access these data services. This software was developed in the Research and Development department of Bosch in Hildesheim.
4.2 PocketDAB Installation Before installation of the PocketDAB software, ensure that the PDA and the PC are connected using ActiveSync. Start the installation program and the setup will guide you automatically through the installation. After the setup is completed, you can start the program from the Program Menu of the PDA. 4.3 Bluetooth Setup Before setting up the Bluetooth (BT) connection, switch on the Woodstock and the BT adapter will be switched on as well.
INSTALLATION AND SETUP The following steps are for the HP H2210 PDA with the PocketPC 2003 operating system. Switch on the BT on your PDA. To do this tap on the BT-symbol in the lower right corner and then on the menu entry “Bluetooth ON” from the appearing menu (see Picture 1). Now the blue light on the top part of the PDA will start flashing.
23 DEUTSCH ENGLISH FRANÇAIS ITALIANO NEDERLANDS SVENSKA The PocketDAB program gives you more access to the DAB part of the Woodstock radio. So all the features not available in the Woodstock radio due to display and memory limitations can be accessed using the PocketDAB application. The application shows the complete list of all audio programmes in a DAB ensemble with their full names. Additionally a list of data services is displayed.
POCKETDAB APPLICATION The TopNews is comparable to the teletext from the televison. But instead of text pages audio objects are transmitted. This application is still experimental. As a special feature, the automatic energy saving switch off of the PDA is disabled while the program is running. If you close the PocketDAB application it is activated again. Please take care if your battery is low and close the PocketDAB application in time. Otherwise all data in you memory might be lost. MAIN SCREEN 6.
1 - Bad signal 2 - Acceptable signal 3 - Good signal 4 - Very good signal In the bottom of the status bar a progress indicator is displayed. It indicates if the PocketDAB software decodes a data service. ENGLISH FRANÇAIS ITALIANO NEDERLANDS 0 - Very bad signal (no sync) SVENSKA Not connected with the radio This service list displays all the audio services of the current ensemble. The currently selected audio service is marked as shown in Picture 5 with “DeutschlandRadio”.
MAIN SCREEN Icon Data Service No service available SLS available BWS available, but not the home page you can use the up/down scroll buttons on the right to scroll to the remaining services. On the left side of every data service label, icons indicating the type of the data service are displayed. Icon Data Service No service available BWS and the home page are available The displaying of the SLS data service can be started and stopped in the View menu (see chapter 6.5.3).
Picture 7 PocketDAB main screen DLS box Customize -> Options On tapping this menu item, the Options screen is displayed. Please see section 6.5.2.2. NEDERLANDS ITALIANO 6.5.2.1 Skins Screen SVENSKA 6.5 Menu bar Picture 8 PocketDAB main screen menu bar Picture 9 PocketDAB skins screen In the Skins screen you can select a different skin to change the look in feel of the PocketDAB application. To select a skin and apply it, tap on the skin and then tap on the “Apply” button.
MAIN SCREEN To exit this screen, tap on OK in the top right corner. 6.5.2.2 Options Screen Picture 10 PocketDAB options screen In the Options screen, you can change the behaviour of the PocketDAB application. Using the “General / COM Port” dropdown list, you can select the serial port for communication between the PDA and the Woodstock. The setting will be applied after a restart of PocketDAB. By default, “Serial” (COM1) is selected for communication with a serial cable.
MAIN SCREEN ENGLISH DEUTSCH 6.5.3.1 TopNews Screen ITALIANO NEDERLANDS 29 SVENSKA In the TopNews screen, you can select one of the listed services to start TopNews. At a time, 9 services are displayed and the up/down scroll buttons can be used to scroll to the remaining entries. On tapping a service, the TopNews player is started. If the TopNews parameter file is not available, a warning message will be displayed below the service list.
MAIN SCREEN service provider transmits a specific “TopNews.ini” file along with the audio objects so that this TopNews player can interpret the service. If this parameter file is not found under the decoded objects the TopNews player cannot be started. pause button to pause every playing. The moving bar is for the volume control. The four buttons on the lower right part of the screen showing the four directions are used to step manually through this service. TopNews is structured like this 6.5.3.1.
6.5.4 Help Menu Help -> About On tapping this menu item, the About screen is displayed. The screen also shows the current software version. ENGLISH FRANÇAIS ITALIANO NEDERLANDS SVENSKA Note: If BWS decoding was started in the main screen it will continue to decode in the background. The currently selected data service cannot be deleted. ESPAÑOL of already decoded objects according to the total number of objects.
KNOWN ISSUES 7. Known Issues Bluetooth: • If the connection between the PDA and the Bluetooth adapter is disconnected you have to close and restart the PocketDAB application to connect again. • If the PocketDAB tries to establish a BT connection while the PDA BT is not switched on, the system will hang and a soft reset must be performed. • If you switch off the PDA while the BT connection is established and the PocketDAB software communicates with the radio, the PDA cannot be switched on again.
ENGLISH TopNews: • Experimental implementation that needs a special TopNews parameter object from the service provider. SLS: • According to the DAB specification, the SLS images should be displayed in 1/4 VGA landscape. This is ignored and all images are resized to fit to 240x200. • The MOT parameter TriggerTime is ignored and the default value of “NOW” is assumed. FRANÇAIS • If you select the SD/MMC-Card as cache path the software may disconnect and the system may hang on some PDA models.
Service-Nummern / Service numbers / Numéros du service aprèsvente / Numeri del servizio di assistenza / Servicenummers / Telefonnummer för service / Números de servicio / Número de serviço / Servicenumre Country: Phone: Fax: WWW: http://www.blaupunkt.