Outdoor Refrigerator Be sure unit is standing upright 24 hours prior to plug-in.
IMPORTANT SAFEGUARDS Read all instructions before using this appliance. Use this appliance only for its intended purpose as described in this instruction manual. Always exercise basic safety precautions, as described below. After reading the instruction manual, store it in an accessible place where the user(s) of this product can easily find it.
lightning rod. It cannot be replaced with the neutral wire of single-phase power. In addition to the ground wire, an electrical leakage circuit breaker is also required. 8. Use an electrician installed ground fault circuit interrupter (GFCI) electrical outlet. If no GFCI is installed, electrical shock could result. 9. Never climb onto the unit. The unit could tip over or fall and cause material damage or personal injury. 10.
10. Condenser water from evaporator drains into a hole in the floor of the storage compartment and is channeled into a drain pan located at the back of the unit on the compressor. Heat transferred from the compressor evaporates any water that has collected in the pan. Be sure the drain hole in the floor of the unit is clear and unobstructed. 11.
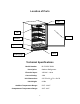
Location of Parts Light Fan Door Shelves Light switch Vents Leveling legs Vents Vents Vents Fan Technical Specifications Model Number: BLZ-SSRF-50DH Description: Outdoor Refrigerator Electrical Input: 115VAC ~ 60Hz Current Rating: 1.
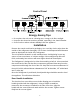
Control Panel F C F C Energy-Saving Tips Do not place the unit next to a heating vent, a range or in direct sunlight. Keep the door closed as much as possible, especially in hot, humid weather. Cover foods to reduce moisture buildup inside the appliance. Installation Remove the exterior and interior packaging. Use a soft dry cloth to wipe down the outside of the refrigerator thoroughly. Use a clean cloth dampened with lukewarm water to wipe down the inside of the refrigerator.
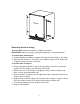
Reversing the Door Swing Tools needed: Flathead screwdriver, Phillips screwdriver IMPORTANT: Before you begin, unplug the refrigerator or disconnect power. To remove door from hinges: 1. Using a flathead screwdriver, separate the hinge axis from Hinge 1. Set aside. 2. Open the door about 20°around the axis of Bottom Hinge 2, then lift the door off Bottom Hinge 2 and set door aside. To replace door on hinges: 3.
See Figure below. Electrical Connection Important! For your personal safety, this appliance must be properly grounded. In the event of an electrical short circuit, grounding reduces the risk of shock by providing an escape wire for the electric current. This appliance is equipped with a cord having a grounding wire with a grounding plug. The plug must be inserted into an outlet that is properly grounded and installed.
Operating Your Refrigerator IMPORTANT: Do not plug in the Refrigerator for 24 hours after unit is set in place. Failure to do so may result in the unit working improperly. Compartment Design This Blaze Refrigerator has a capacity of 175 cans. The unit has 3 adjustable chrome-plated flat wire shelves to hold cans and bottles of beverages such as beer, water and soft drinks. The control panel also allows you to set a different temperature for Refrigerator or wine cellar.
the unit will now appear in the window. This temperature will vary depending on the number of bottles stored and how frequently the door is opened. Please note: The temperature sensor records the average temperature of the unit. Cold air falls and warmer air rises, and there will be a temperature variation from the bottom to the top of the unit. The temperature at the bottom of the unit will always be slightly colder. The controller only controls the average temperature of the unit.
In ALARM mode, the unit will make a beeping sound and display an alarm message. If the control panel displays any of the following messages: EI, HI or LI, consult the Troubleshooting section of this manual. Interior Light The interior light can be turned On or Off automatically with the opening or closing of the door. The white light is factory setting, it also can be changed to a blue color.
Extended Non-Use VACATION/HOLIDAY, PROLONGED SHUTDOWN The following steps are recommended for periods of extended non-use: 1. Remove all customable content from the unit. 2. Disconnect the power cord from its outlet/socket and leave it disconnected until the unit is returned to service. 3. If ice is on the evaporator, allow ice to thaw naturally. 4. Clean and dry the interior of the unit. Ensure all water has been removed from the unit. 5. The door must remain open to prevent formation of mold and mildew.
Temperature Window displays “LI” This message is an ALARM MODE indication. It indicates that the actual temperature is much lower than your set temperature. Temperature Window displays “HI” This message is an ALARM MODE indication. It indicates that the actual temperature is much higher than your set temperature. Possible causes are: The door might not be fully closed. The refrigerant may have leaked. The unit may have been recently loaded with room temperature product.
Limited Warranty Manufacturer warrants to the original purchaser at the original site of delivery with proof of purchase of each Refrigerator that when subject to normal residential use, it is free from defects in workmanship and material for the periods specified below. This warranty excludes refrigerators used in rental or commercial applications. It does not cover labor or labor related charges. There will be shipping and handling charge for the delivery of the warranty part(s).