
Grill Cart Assembly


BLAZE GRILL CART ASSEMBLY
CALIFORNIA PROPOSITION 65 WARNING
WARNING: This product can expose you to chemicals including Chromium (hexavalent compounds),
which are known to the State of California to cause cancer and birth defects or other reproductive harm.
For more information go to: www.P65Warnings.ca.gov
Tools Needed: #2 Phillips Head Screw Driver – “Not Included”
WARNING:
Do not use power tools to assemble. Only use hand tools, as power tools can damage or loosen the nutsert.
Before getting started:
Unpack and lay out all of the included parts. Most of the stainless steel pieces come with a white
protective film. Remove all of the white plastic film and pay no attention to the print on the film as it
has nothing to do with the assembly instructions.
Take caution with the stainless steel components as to not scratch them during the assembly process.
Use a non-aggressive surface and protect the stainless steel as best as possible.
All of the screws in the hardware pack are the same. 16 M5x12 screw will be paired with a M5 lock
washer first, and then a M5 flat washer for installing the casters to the base. All other connections will
be made with a screw only.
Only the screws for the door handles are different and those are packaged with the handles them self.
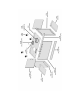
The parts diagram has the parts labeled in the order in which they are used. Use the diagram as a
reference, while following the steps below.
1. Bottom Cart Panel - Flip the panel upside down on a protected surface exposing the four
locations where the casters attach. There are two runners on the bottom cart panel bottom with
4 nutserts (female threaded posts which a screw goes into) on each end of each runner. This is
the location where the casters install.
2. Attach the four casters - Use the locations described above and tighten completely. Once
complete, lock the locking casters and then turn the bottom panel right side up.
3. Attach the LP tank Support - This piece gets installed on the underneath side of the cart with
the two screws going into it from the top of the bottom cart panel. The large bolt on the LP tank
support threads into the LP tank’s lower ring to hold it firmly onto the cart bottom. Install the LP
tank support with two screws and tighten.
4. Attach the Tank Interference Bracket - (Not included for a 3 burner cart model). This pieces are
intended interfere with a second LP tank being stored inside the grill cart which is not permitted.