
Use & Care Manual
Blaze Outdoor Products Instructional Book
Page | 33
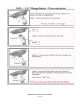
1. To install the optional infrared burner, begin by removing the far left cooking grid, flame stabilizing grid
and zone divider.
2. Remove conventional burner by first removing the cotter pins that hold it in place
(unless they were
removed prior to installation)
, located on the
bottom rear of the burner and accessible from the rear
outside of the grill body. With the cotter pins removed, remove the conventional burner.
3. Place the infrared burner in place, leaving off the flame tamer. Ensure the burner is seated appropriately
around the valve so that gas flows into the burner.
4. Replace the heat zone divider and cooking grid. Do not use this burner with the flamer tamer
reinstalled above the burner.
Note: It is critical that the end of the infrared burner is installed appropriately onto the gas valve to ensure gas
flows safely into the burner. For additional information, contact us at 866-976-9510 or go to Blazegrills.com.
Preheating the Infrared Burner
Always preheat the entire appliance before cooking. If the appliance is already hot from cooking, you should still
preheat the infrared burner for 3 minutes with the lid open. Never place food over the burner until it is fully
preheated to avoid
clogging the tiny ports and damaging the burner from grease drippings and food particles.
Infrared Burner Cleaning
To keep your infrared burner operating at maximum performance after each use, turn it on HIGH for 5-7 minutes
with the hood open. This allows any food particles or grease drippings to burn away. Once your appliance has
cooled completely, use a soft brush or vacuum to remove any ash accumulation on the burner if necessary.