
Instruction Manual

Roller Shade (Chain Operated Clutch)
Installaon Instrucons
Please follow these Installaon Instrucons
You will need a pencil, tape measure, drill, screwdriver, pliers, and appropriate fasteners.
Step 1: Choose the Correct Fastener
Step 2: Mark the Bracket Locaons
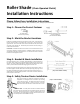
Step 3: Bracket & Shade Installaon
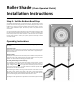
Step 4: Safety Tension Device Installaon
1 ½” #8 Hex Head
Wood Screws (Included)
Alternave fasteners should be used for aluminum or
concrete installaons
(Not Included with Blinds)
Safety Tension Devices are designed to minimize the hazards of
strangulaon and entanglement of small children by restricng
access to the chain control. The safety tension device is sent from
the factory already aached to each chain control. Screw the
safety tension device into the wall or window frame with a screw.
Crical Note: The safety device should be installed so that the
bead chain and bead stop balls move smoothly through the opening of
the device. Removal of this device or failure to properly install it, can
cause damage to the clutch liing mechanism and will result in the void-
ance of the product’s limited lifeme warranty.
Screw the brackets in place. For regular roll shades (fabric is rolled o the back of
the roller), li the shade up to the brackets with the fabric hanging closest to the
window. For reverse roller shades (fabric is rolled o the front of the roller), li the
shade up to the brackets with the fabric hanging closest into the room.
Push the spring plunger (side opposite of the chain) into it the bracket as shown in
the above diagram. Push the shade into the bracket, depressing the plunger. With
the clutch hook poinng downward, place the hook into the vercal part of the “+”
shaped hold in the bracket Slightly pull down on the shade so that the clutch hook
locks into place in the bracket.
Posion the installaon brackets at each end of the roller shade. In the diagram to
the le, bracket posions are illustrated for a shade with a chain control on the
right hand side. For a shade with a chain control on the le hand side, the brackets
should be at the opposite end. Brackets may be mounted to the wall, ceiling, or
inside of the window frame.
Crical Note: Installaon brackets must be level to ensure that the fabric will roll
up properly, allowing for smooth operaon. Installaon brackets must be placed
such that the outer edge of the brackets are 1 ¼” wider than the fabric. Mark the
brackets for mounng hole locaons.
(Step 3: Shade Installaon)
(Step 2: Mark Bracket Locaons)