OneTouch Aluminum Blind owner's handbook
INSTALLATION INSTRUCTIONS Step 1. Check Package Contents Missing part? Call 800-264-1190 Mounting hardware kit includes the following: Part Quantity a Mounting Bracket 2 (shades up to 36” wide) 3 (shades 36” to 54” wide) 4 (shades 54” to 72” wide) b 2 per bracket 11/8” Screws [Note: one extra screw of each noted size is included for convenience] Step 2. Tools Required Screwdriver, tape measure, pencil, drill, step ladder, scissor. Note: use #6 plastic anchors for dry wall or plaster mounting.
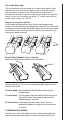
For Inside Mounting: Clip the brackets onto the head rail as described above. Hold the blind in place and make a pencil mark at the rear of each bracket where it contacts the inside of the window frame. Remove the brackets from the head rail and align them with the marks. Attach each bracket using the 11/8” screws, pre-drill the screw holes using a 5/64" drill bit. Step 4.
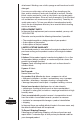
attachment. Washing: use a cloth, sponge or soft brush and a mild detergent. Use warm or cold water, not hot water. Place toweling on the floor and/or window sill and wash the blind in sections. Smaller blinds can be washed in a sink or tub; blinds can also be gently hose washed outdoors. Rinse off suds thoroughly. Drain the head rail and bottom rail; remove end caps if necessary. Towel dry to avoid water marks.
To Obtain Service: If you suspect this product has a manufacturing defect in materials or workmanship: 1. Locate the sales receipt 2. Call place of purchase. Any unauthorized returns will not be accepted. Warranty Remedy: THIS SHALL BE YOUR SOLE REMEDY UNDER THIS LIMITED WARRANTY.