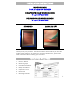
INSTALLATION INSTRUCTIONS WOOD BLINDS 1-3/8”, 2” and 2-3/8” SLAT SIZES COMPOSITE FAUX WOOD BLINDS 2” and 2-1/2” SLAT SIZES POLYMER FAUX WOOD BLINDS 2” and 2-1/2” SLAT SIZES STANDARD CORDLESS LIFT Thank you for your purchase. This blind has been custom built for you from the highest quality materials. To avoid errors and save valuable time, please read these instructions before installing your new blind. TOOLS YOU WILL NEED 1. Pencil or Marker 2. Measuring Tape 3. Flat-Head Screwdriver 4.
TABLE OF CONTENTS Getting Started: Parts Check................................................. Page 2 STEP 1: Mounting The Brackets............................................. Page 3 – 5 STEP 2: Installing The Blind .................................................. Page 5 – 6 STEP 3: Installing Components ............................................. Page 6 STEP 4: Installing The Valance.............................................. Page 7 – 9 STEP 5: Operating The Blind .................................
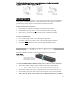
STEP 1: MOUNTING THE BRACKETS The installation brackets may be used for INSIDE, OUTSIDE or CEILING mounts. The brackets are stamped R.H. (right hand) and L.H. (left hand) for easy identification. Mounting the brackets level is essential for proper operation of the blind. Shim the brackets if necessary to achieve a level alignment. SPACER BLOCKS (3/8” standard for 2-3/8” & 2-1/2” slats): Spacer blocks will be attached to the end of each bracket.
Inside Mount Depth Requirements Slat Size Bracket Depth Flush To Valance Depth 1-3/8” 1-1/8” 3-1/2” 2” 1-1/8” 3-1/2” 2-3/8” 1-1/8” 3-7/8” 2-1/2” 1-1/8” 3-7/8” OUTSIDE MOUNTS: For outside mounts, ensure that a 1-3/4” high, flat vertical surface is available for securing the brackets. The brackets will be screwed through the back holes. MARK THE BRACKET POSITIONS: Mark where the ends of the headrail will be positioned.
Installation brackets and center support brackets are attached to extension brackets with the included screws and nuts. CEILING MOUNTS: For ceiling mounts, ensure that a 1-3/4” high, flat vertical surface is available for securing the installation brackets. The brackets will be normally be screwed in place through the top holes, but see optional attachments below. MARK THE BRACKET POSITIONS: Mark where the ends of the headrail will be positioned.
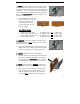
OPEN THE INSTALLATION BRACKET DOOR LATCHES: Press up on the bracket bottoms while lifting the bracket doors open. MOUNT THE HEADRAIL: Tilt the headrail slightly backwards to lower the back-side lip. Slide the headrail into the brackets and push it all the way back. The front lip of the headrail should hook to the center support lips. VERIFY HEADRAIL FIT: If the headrail moves left or right more than 1/8”, adjust... Using a flat head screwdriver, bend the end stiffener tabs out.
STEP 4: INSTALLING THE VALANCE Your valance comes with adjustable magnetic valance clips and also safety straps for quick and easy valance attachment and multi-position valance adjustment capabilities. The magnetic clips have two plastic stop lips tabs on the top. These tabs will be aligned to and rest on the top front lip of the headrail when installing the valance. IMPORTANT SAFETY NOTE: THERE ARE 2 VALANCE SAFETY STRAPS LOCATED INSIDE THE HEADRAIL AT EACH END.
DETAILED STEPS – INSTALLING THE VALANCE: 1. TWIST: Twist all magnetic clips into the backside valance route until straight. There are at least 2 clips and each should be positioned 10” in from the ends of the valance. (5 ½” in valances under 36”) Additional clips should be spaced evenly between the 2 end clips. Refer to the clip count chart below for magnetic clips and valance safety straps. TWIST UNTIL STRAIGHT Lay the valance face down with the back side up.
4. SECURE: Secure the valance safety straps. These should be out in front of the headrail per the instructions in STEP 3: INSTALLING THE BLIND. Pivot the valance by gently lifting the bottom of the valance up and out. There are 2 safety straps included with your blind located at each end of the headrail (just 1 strap for valances under 36” wide located in the center).
STEP 5: OPERATING THE BLIND Please refer to the ordered control system options below for instructions on how to properly operate your blind. STANDARD RECTANGULAR BLINDS: TO TILT THE SLATS: Pull on one of two tilt cords to rotate slats forwards or backwards. Rotate the wand tilter (if ordered) to rotate slats forwards and backwards. TO RAISE AND LOWER THE BLIND: Tilt the slats to the open position (flat and parallel to headrail).
CLEANING INSTRUCTIONS DUSTING: Like any piece of furniture, dust your blinds regularly. Use an ordinary soft, clean cloth, chemically treated dust cloth, dusting mitt or cylindrical dust brushes especially designed for blinds. Lower the blind to its full length, tilt the slats almost fully closed and dust. Then dust the reverse side of the slats in the same manner. In order to reach the dust where the slats overlap, it is best not to fully close the blind in either position.
WARRANTY INFORMATION Lifetime Limited Warranty covering our Custom Made Blinds We extend this lifetime limited warranty to the original purchaser. This warranty applies only to manually operated Custom Products properly installed in the window, door or interior area for which they were intended. Installation of the product must be in accordance with accompanying instructions. The product cannot be modified.