
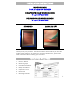
User guide


7
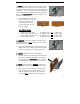
ALIGN &
PRESS
VALANCE GENTLY
FORWARD UNTIL
MAGNETS HOLD
PIVOT UP
VALANCE
& SECURE
SAFETY
STRAPS
TWIST MAGNETIC CLIPS
INTO VALANCE ROUTE
UNTIL STRAIGHT
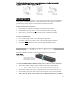
STEP 4: INSTALLING THE VALANCE
Your valance comes with adjustable magnetic valance clips and also safety straps
for quick and easy valance attachment and multi-position valance adjustment
capabilities. The magnetic clips have two plastic stop lips tabs on the top. These
tabs will be aligned to and rest on the top front lip of the headrail when installing
the valance.
IMPORTANT SAFETY NOTE
:
THERE ARE 2 VALANCE SAFETY STRAPS LOCATED INSIDE THE HEADRAIL AT
EACH END.
(ONLY 1 STRAP IN THE CENTER OF THE HEADRAIL FOR BLINDS UNDER 36” WIDE ).
THE VALANCE SAFETY STRAPS ARE LOOPED AND SECURED TO THE METAL TILT
ROD INSIDE THE HEADRAIL. EACH STRAP HAS A CLIP ATTACHED AT THE END.
DO NOT REMOVE THE VALANCE SAFETY STRAPS OR CLIPS.
THE CLIP END OF THE STRAP MUST BE TWISTED INTO THE BACKSIDE VALANCE
ROUTE. THIS STEP SHOULD BE PERFORMED AFTER THE VALANCE IS FIRST
ALIGNED AND PRESSED TO THE HEADRAIL (after quick steps 3 & 4 below).
QUICK STEPS - INSTALLING THE VALANCE:
1. TWIST the magnetic clips into the backside valance routes until straight.
2. PROJECT the magnetic clips outward to their widest projection (3 notches out).
3. ALIGN the valance to the headrail using the magnetic clip stop lip tabs.
4. PRESS the valance gently
forward until the magnets adhere to the headrail.
5. SECURE the safety straps by twisting into each end of valance routes.
6. ADJUST projection by pressing valance forward
(face flush or returns to wall).