
User Manual

Page 13
Flurry™ 5 User Manual Rev. A (c) 2013 Blizzard Lighting, LLC
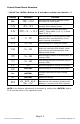
TO DISPLAY FIXTURE RUNNING HOURS:
1.) Press the <MENU> button until the display shows hour
2.) Press <ENTER>toconrmyourselection.
TO SET THE FIXTURE IN TEST MODE:
1.) Press the <MENU> button until the display shows TEST
2.) Press <ENTER>toconrmyourselection.
TO SET THE LED DISPLAY MENU ON/OFF AFTER 5 SECONDS:
1.) Press the <MENU> button until the display shows LED
2.) Use the <UP/DOWN> buttons to set to the desired position,
press <ENTER>toconrm.
TO SET THE STANDBY MODE OF THE FIXTURE (when not receiving DMX
signal):
1.) Press the <MENU> button until the display shows STbY
2.) Use the <UP/DOWN> buttons to set to the desired position,
press <ENTER>toconrm.
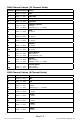
Stand-Alone Mode (Auto or Sound Active Mode):
Allows a single unit to run to a factory installed program.
1.) Press the <MENU> button until it shows AuTo orSouN and
press <ENTER>toconrm.
2.) Use the <UP/DOWN> buttons to set to the desired position,
press <ENTER>toconrm.
Master/Slave Mode (Auto or Sound Active):
Allows you to link up to 32 units together without a controller.
1.) Use standard DMX cables to daisy chain your units together via the DMX con-
nector on the rear of the units. It may be necessary to use a terminator at the
lastxture.Formoreinformationaboutterminators,seepage8.
2.) Choose a unit to function as the Master. Select NAST/SL 1 or SL 2 depending
uponwhichmaster/Slavemodeyouwant.Slave1modecausesallxturesto
reactthesame.Slave2modecausesthosexturestoreactinacomplimentary
waytothosesetasmaster/Slave1.Themasterunitmustbetherstunit.
Finally, chain the units together using DMX cable.
DMX Mode
Allows the unit to be controlled by any universal DMX controller. If you are unfamiliar with
DMX, please read the DMX Primer on page #17.
1.)ThedefaultmodeforthextureisDMX,whichappearsas
A001 on the LED
Readout.