
Specifications


Elec. Assem. - Vehicle Harness (Continued) 11
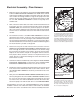
6. Plug the HEADLIGHT GROUND/RELAY (BLACK & GREEN/YELLOW)
CONNECTOR, from the vehicle wire harness, into the connector on
the main lighting harness. With the connection made, plug each
HEADLIGHT RELAY into the receptacles. Securely mount the recep-
tacles to the vehicle with the terminal wires facing down and the relays
facing up. Installing the relays in this position will allow moisture to
drain from the relay.
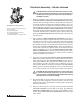
7. Next, remove the front directional light assembly on the driver’s side
of the vehicle. Feed the VIOLET, turn light wire and GRAY, run light wire
from the main lighting harness through the opening in the directional
light housing. At this point, use a test light or ohm meter to determine
the proper wires in the vehicle’s electrical system to splice into. Once
you have identified the proper wires, position one end of the turn or
run light wire into a SPLICE LOCK CONNECTOR provided. Attach
the vehicle wire to the opposite side of the splice lock connector.
Complete the splice by pinching both wires together and locking the
connector. Repeat the splice procedure for the remaining wire. The
passenger’s side directional light assembly requires the same instal-
lation; however, only one wire, the PINK, turn light, needs to be spliced.
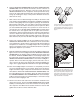
8. Connect the vehicle headlights to the main lighting harness using a
HEADLIGHT ADAPTER KIT. Due to differences in the construction
of the adapter kits, and the various make and model vehicles Blizzard
snowplows are installed on, a headlight adapter kit is not packaged
with your snowplow. Contact your local Blizzard dealer to obtain the
appropriate adapter for your vehicle.
9. Begin the adapter kit installation by removing the existing vehicle head-
light connector from the headlight. Attach the HEADLIGHT ADAPTER
CONNECTOR to the existing vehicle headlight connector. Next, plug
the BLACK, FIVE-PIN CONNECTOR on the headlight adapter into
the gray, five-pin connector on the vehicle wire harness. Lastly, plug the
HEADLIGHT ADAPTER CONNECTOR into the vehicle headlight re-
ceptacle.
Note: If more than one plug is present, match the colors of
each connector (ie gray to gray, black to black, Chevrolet daylight run-
ning is clear to gray).
Repeat the installation for the opposite headlight.
10. Once the headlight adapter connections are completed, proceed to
secure the braided harness to the vehicle. Safely route all harness
lengths around the engine components and attach them to the vehicle
with cable ties. Extend the PLOW HEADLIGHT CONNECTORS, from
the main lighting harness, through the grill of the vehicle and position
the HARNESS POWER PLUG and WEATHER CAP near the bumper.
Cable tie the power plug to the vehicle bumper or tow hook to keep
the harness from hanging too low.
11. Return to the driver’s side cab interior to install the remainder of the
vehicle wire harness. Connect the RED POWER WIRE (with 15 AMP
FUSE) to a switched power source with a minimum of 15 amps.
Note:
The red power wire MUST be fused and switched on and off with
ignition. Secure all loose wires under the dash.
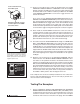
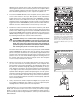
Snowplow Hitch Pin
& Hair Pin Cotter
In the event you should lose hydraulic power while
snowplowing, raise the snowplow into a pile of
snow and insert the emergency hitch pin provided
with your plow. The pin will lock the plow in a tem-
porary raised position until proper service can be
performed to restore hydraulic power. Note: For
clarity, the draw latch is not illustrated.
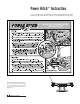
The vehicle wire harness is packaged with three
12V quick connect, sealed headlight relays. The
relays install into the black receptacles located on
the main lighting harness. Review the diagram on
page 28.