060 GAS DECK OVEN INSTALLATION - OPERATION - MAINTENANCE BLODGETT OVEN COMPANY www.blodgett.com 44 Lakeside Avenue, Burlington, Vermont 05401 USA Telephone: (802) 658-6600 Fax: (802)864-0183 PN 17969 Rev M (2/15) © 2015 - G.S.
Your Service Agency’s Address: Model Serial number Oven installed by Installation checked by
TABLE OF CONTENTS IMPORTANT WARNING: Improper installation, adjustment, alternation, service or maintenance can cause property damage, injury or death. Read the instllation, operation and maintenance instructions thoroughly before installing or servicing this equipment. INSTRUCTIONS TO BE FOLLOWED IN THE EVENT THE USER SMELLS GAS MUST BE POSTED IN A PROMINENT LOCATION. This information may be obtained by contacting your local gas supplier. INSTALLATION Oven Description and Specifications. . . . . . . . .
Installation Oven Description and Specifications Blodgett Deck ovens have set industry wide standards of excellence for baking characteristics, performance and reliability. They remain unsurpassed for product quality. Features include a full angle iron frame, all welded radius corners and stainless steel fronts and doors. Simplicity of design and quality construction throughout assure years of trouble free service when the equipment is properly installed and maintained.
Installation Delivery and Location Delivery and inspection It is essential that an adequate air supply to the oven be maintained to provide a sufficient flow of combustion and ventilation air. All Blodgett ovens are shipped in containers to prevent damage. Upon delivery of your new oven: • • Inspect the shipping container for external damage. Any evidence of damage should be noted on the delivery receipt which must be signed by the driver. Uncrate the oven and check for internal damage.
Installation Oven Assembly Packaging Leg Attachment Before beginning assembly and installation of the oven, check that all necessary components have been received. In addition to the oven itself, legs, the proper vent, and/or other accessories may be required. 1. Put the oven onto a genie lift with the bottom of the oven down. Be careful not to damage the louvered panel under the oven. 2. Each leg is attached by three bolts to the underside of the oven base frame.
Installation Oven Assembly Double Section Assembly 3 Piece Deflector Assembly 1. Fasten 12” (305 mm) legs to lower section. 1. Deflectors are shipped in place in the oven. No assembly is required. 2. Remove the sheet metal flue cover on bottom of UPPER SECTION FLUE ONLY and save the two screws. 2. Remove the shipping clip located in the back center of each deflector before inserting two-piece shelf assembly. 3. Fasten crown angle leg frame to upper sections. 4.
Installation Oven Assembly Deck Seal Leveling the Oven 1. Place the long lip of the deck seal in front of the shelf support angle. Place the shorter lip with the notches between the shelf support angle and the shelf. Ovens are equipped with NSF listed adjustable sanitary legs. 1. Level ovens side to side and front to back by placing spirit level on base frame of lower section. 2. Push seal down into place. 2. Adjust leg feet in or out as appropriate.
Installation Ventilation Canopy Type Exhaust Hood Blodgett gas deck ovens are direct fired. Heat and flue products from the burners are introduced directly into the baking compartment. As a result, improper venting can have a detrimental effect on the baking characteristics of the oven. A properly designed ventilation system will allow the oven to function properly, while removing unwanted vapors and products of combustion from the operating area.
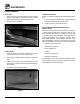
Installation Ventilation Direct Flue Arrangement Venting Problems When the installation of a mechanically driven exhaust hood is impractical the oven may be vented by a direct flue arrangement. Blodgett gas deck ovens use the natural principal of heat rising as the basic method of ventilation. If the venting of any deck oven is either restricted or forced in any way the baking characteristics of the oven will be adversely affected. WARNING!! It is essential that the direct flue be installed as follows.
Installation Utility Connections - Standards and Codes THE INSTALLATION INSTRUCTIONS CONTAINED HEREIN ARE FOR THE USE OF QUALIFIED INSTALLATION AND SERVICE PERSONNEL ONLY. INSTALLATION OR SERVICE BY OTHER THAN QUALIFIED PERSONNEL MAY RESULT IN DAMAGE TO THE OVEN AND/OR INJURY TO THE OPERATOR. U.S.
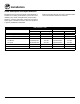
Installation Gas Connection Gas Piping Maximum Capacity of Iron Pipe in Cubic Feet of Natural Gas Per Hour A properly sized gas supply system is essential for maximum oven performance. Piping should be sized to provide a supply of gas sufficient to meet the maximum demand of all appliances on the line without loss of pressure at the equipment. (Pressure drop of 0.5 Inch W.C.
Installation Gas Connection Pressure Regulation and Testing Each oven is supplied with a regulator to maintain the proper gas pressure. The regulator is essential to the proper operation of the oven and must be installed. It is preset to provide the oven with 3.5” W.C. (0.87 kPa) for natural gas and 10.5” W.C. (2.50 kPa) for Propane at the manifold. Each section of the 1060-B series oven is rated at 85,000 BTU per hour (24.9 kW).
Installation Gas Connection Gas Hose Restraint WARNING!! If the oven is mounted on casters, a commercial flexible connector with a minimum of 3/4” (1.9 cm) inside diameter must be used along with a quick connect device. If the restraint is disconnected for any reason it must be reconnected when the oven is returned to its original position. The restraint, supplied with the oven, must be used to limit the movement of the unit so that no strain is placed upon the flexible connector.
Operation Initial Startup Adjustments associated with initial installation Each oven, and its component parts, have been thoroughly tested and inspected prior to shipment. However, it is often necessary to further test or adjust the oven as part of a normal and proper installation. These adjustments are the responsibility of the installer, or dealer. Since these adjustments are not considered defects in material or workmanship, they are not covered by the Original Equipment Warranty.
Operation Safety Information What to do in the event of a power failure: The information contained in this section is provided for the use of qualified operating personnel. Qualified operating personnel are those who have carefully read the information contained in this manual, are familiar with the functions of the oven and/or have had previous experience with the operation of the equipment described.
Operation Oven Control control description 1. automatic safety pilot valve - provides complete gas shut-off in the event of pilot failure. 2. manual control valve - provides manual control of gas flow to the main burner through the thermostat. 3. THERMOSTAT - Provides regulation of oven temperature at setting selected by the oven operator. operation The operation of the 1060 Oven is as simple as 1, 2, 3. Lighting, Preheating and Loading. Lighting 1. Turn the manual control valve (2) to OFF. 2.
Operation General Guidelines for Operating Personnel Cook Times and Temperatures baking tips Cook Temperatures • Scale dough for consistent product. Cook temperatures vary with different products. Experiment with the initial bakes until you find the ideal combination of time and temperature. • Proof dough to proper consistency. • Refrigerated dough or pies should be brought to room temperature before baking. Bubbles may occur when baking refrigerated product. Break bubbles if necessary.
Maintenance Cleaning and Preventative Maintenance cleaning the oven preventative maintenance Painted and stainless steel ovens may be kept clean and in good condition with a light oil. The best preventative maintenance measures are, the proper installation of the equipment and a program for routinely cleaning the ovens. 1. Saturate a cloth, and wipe the oven when it is cold.
Maintenance Troubleshooting Guide POSSIBLE CAUSE(S) SYMPTOM: Strong bottoms on the bakes • Too much bottom heat SUGGESTED REMEDY • Reduce cook temperature and increase time • High gas pressure • * • Faulty flue (strong direct vent) • * • Product left in the oven too long • Shorten cook time SYMPTOM: Uneven bakes • Poor ventilation • * • Oven doors left open too long • Do not open door unnecessarily • Improper scaling of dough • Scale dough consistently • Fluctuating gas pressure
Maintenance Troubleshooting Guide POSSIBLE CAUSE(S) SYMPTOM: Product dried out • Oven temperature too low SUGGESTED REMEDY • Increase cook temperature • Not using enough water in the mix • Increase water in product mix • Thermostat out of calibration • * • Faulty flue (strong direct vent) • * SYMPTOM: Extended baking times • Temperature setting too low • Increase cook time • Low gas pressure • * • Strong ventilation • * • Excessive door openings • Do not open door unnecessarily