BCT & BLCT COMBI OVENS INSTALLATION - OPERATION - MAINTENANCE BLODGETT OVEN COMPANY www.blodgett.com 44 Lakeside Avenue, Burlington, Vermont 05401 USA Telephone: (802) 658-6600 Fax: (802)864-0183 PN 61041 Rev J (11/15) © 2015 - G.S.
Your Service Agency’s Address: Model Serial number Oven installed by Installation checked by
TABLE OF CONTENTS IMPORTANT WARNING: Improper installation, adjustment, alternation, service or maintenance can cause property damage, injury or death. Read the instllation, operation and maintenance instructions thoroughly before installing or servicing this equipment. INSTRUCTIONS TO BE FOLLOWED IN THE EVENT THE USER SMELLS GAS MUST BE POSTED IN A PROMINENT LOCATION. This information may be obtained by contacting your local gas supplier.
Installation Utility Connections - Standards and Codes U.S. and Canadian installations THE INSTALLATION INSTRUCTIONS CONTAINED HEREIN ARE FOR THE USE OF QUALIFIED INSTALLATION AND SERVICE PERSONNEL ONLY. INSTALLATION OR SERVICE BY OTHER THAN QUALIFIED PERSONNEL MAY RESULT IN DAMAGE TO THE OVEN AND/OR INJURY TO THE OPERATOR. The installation must conform with local codes, or in the absence of local codes, with the National Fuel Gas Code, ANSI Z223.
Installation The Blodgett Combi-Oven/Steamer The Blodgett Combi-Oven/Steamer offers a completely new method of cooking. With the Oven/Steamer you have the choice of two cooking processes: Steam and Hot Air, either... You can also use two or three functions in sequence during one cooking process.
Installation Description of the Combi-Oven/Steamer ABOUT THE OVEN/STEAMER viding convenient working methods. The steam generator is completely automatic and protected from running dry. Blodgett Combis are quality produced using high-grade stainless steel with first class workmanship. OVEN/STEAMER OPERATION The multiple speed fan, which is guarded against accidental finger contact, is driven by a quiet and powerful motor. The condenser draws out excess steam from the appliance.
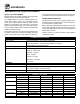
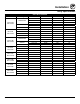
Installation Utility Specifications Model Voltage 208/230/240 BLCT-23E Mini Combi BLCT-6E Mini Combi 400/415 440/480 208 240 208 240 208/230/240 BLCT-10E Mini Combi BCT-61E BLCT-61E BCT-101E BLCT-101E BCT-102E BLCT-102E BCT-62E BLCT-62E BCT-202E BLCT-202E 400/415 440/480 208 240 480 208 240 480 208 240 480 208 240 480 208 240 480 ELECTRICAL RATINGS kW Hz 2.7/3.3/3.6 50/60 2.7/3.3/3.6 50/60 5.4/6.6/7.2 50/60 6.6/7.2 50/60 5.4/5.8 50/60 5.4/6.5 50/60 4.6 50/60 6.1 50/60 6.9 50/60 9.2 50/60 10.4/12.
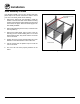
Installation Oven Assembly to Stand Your Blodgett COMBI oven has been shipped with black plastic caps on the corners of its base. In order to mount your oven to its stand, please do the following: Note difference in rail placement 1. Remove the stand from the packaging. Install the casters or feet into the base of the stand. If inserting casters ensure that the locking casters are at the front of the stand, see figure. Place the stand upright in an area readily available. 2.
Installation Oven Location and Leveling The well planned and proper placement of your oven will result in long term operator convenience and satisfactory performance. Strong sources of heat such as hotplates, tilting frying pans, deep fat fryers, etc. should not be placed near the oven, especially near its right side. An optional side heat shield is available. Certain minimum clearances must be maintained between the oven and any combustible or non-combustible construction.
Installation Plumbing Connections WATER CONNECTION To facilitate cleaning and servicing, the oven should be connected with an approved flexible 3/4” hose. Permanent installations should be fitted with a stop-tap and a non-return valve. Blodgett BCT/BLCT ovens have two water connections. Both are located at the back of the unit. BCT/BLCT-61, 62, 101, 102 and 202 models • 1 connection for raw water for the condensation jet. • 1 connection for steam generation and the Combi Wash jet in the oven chamber.
Installation Plumbing Connections CLEANING & DELIMING CHEMICAL 1. BCT/BLCT-61, 62, 101, 102 and 202 ovens only. The oven is supplied with a chemical bottle holder. The holder can be affixed to either side of the oven. Place it on the stand crossmember. 3. Insert the blue and red hoses into the proper bottles. Red is for detergent, blue is for rinse aid. 4. BCT only - The last line is for the delimer. This is the tan colored tube protroding from the bottom of the oven.
Installation Electrical Connection and Ventilation ELECTRICAL CONNECTION WARNING!! NOTE: Electrical connections must be performed by a qualified installer only. If the supply cord is damaged, it must be replaced by a special cord or assembly available from the manufacturer or its service agent. Before making any electrical connections to these appliances, check that the power supply is adequate for the voltage, amperage, and phase requirements stated on the rating name plate mounted on the appliance.
Installation Gas Connection GAS PIPING Maximum Capacity of Iron Pipe in Cubic Feet of Natural Gas Per Hour A properly sized gas supply system is essential for maximum oven performance. Piping should be sized to provide a supply of gas sufficient to meet the maximum demand of all appliances on the line without loss of pressure at the equipment. (Pressure drop of 0.5 Inch W.C.
Installation Gas Connection PRESSURE REGULATION AND TESTING The gas pressure to the appliance must be rated for each appliance while the burners are on. A sufficient gas pressure must be present at the inlet to satisfy these conditions. Refer to the table below for correct gas pressure. Prior to connecting the appliance, gas lines should be thoroughly purged of all metal filings, shavings, pipe dope, and other debris. After connection, the appliance must be checked for correct gas pressure.
Installation Gas Hose Restraint U.S. and Canadian installations If the appliance is mounted on casters, a commercial flexible connector with a minimum of 3/4” (1.9 cm) inside diameter must be used along with a quick connect device. The connector must comply with the Standard for Connectors for Movable Gas Appliances, ANSI Z21.69 or Connectors For Moveable Gas Appliances CAN/CGA6.16 and a quick disconnect device that complies with the Standard for Quick-Disconnect Devices for Use With Gas Fuel, ANSI Z21.
Installation Final Check Lists OVEN INTERIOR WARNING!! 1. Check that filter housing is mounted correctly Final check list must be performed by a qualified installer only. 2. Check interior light 3. Clean the oven OVEN EXTERIOR 1. Check that the oven has not been damaged in transit (dents, scratches, etc.) CONTROL 1. Check and adjust, if necessary, each of the preset values 2. Check/adjust the height and check that the oven is placed level (horizontally) 2.
Operation Safety Information for Gas Ovens What to do in the event of a power failure: The information contained in this section is provided for the use of qualified operating personnel. Qualified operating personnel are those who have carefully read the information contained in this manual, are familiar with the functions of the oven and/or have had previous experience with the operation of the equipment described.
Operation BCT Touchscreen Control Description BASIC OPERATIONS The BCT/BLCT ovens include the versatile Blodgett Combi Touchscreen control. The control features: • Multiple cooking modes include Hot Air, CombiSmart, CombiOptima, Retherm, Steam, Proofing, Cool Down, and PreHeat. • CombiOptima automatically measures and controls the humidity level in the oven, helping to retain the appearance and juiciness of the product.
Operation Main Menu MAIN MENU DESCRIPTION 1. KEY ICON - Press this key, then enter the code to change type of user. Choices include user, super user or technician. The super user code is 87 64 12. 5. MANUAL - Press to cook manually using Steam, Hot Air, CombiSmart, CombiOptima, or Retherm modes. Also press to access CombiWash. 2. GEAR ICON - Press to access the service and super user menus. 6. ADVANCED - Press to access Preheat, Cool Down, Advanced Rack Timer and Proofing modes.
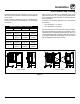
Operation Hot Air Mode Entering the Hot Air Mode For instant steam injection: 1. From the MAIN MENU, press the MANUAL key. 2. Select the HOT AIR mode. 1. Press and hold the STEAM key to distribute humidity throughout the oven cabinet. The steam stops when the steam key is released. Setting the Cook Time and Temperature Setting the Fan Speed 1. In the TEMPERATURE list, drag your finger up or down to select the desired cook temperature. The BCT has 9 fan speeds to choose from.
Operation Hot Air Mode Steam Injection Fan Speed Vent Position Steam Injection Timer Keypad Entry Figure 10 19 Setting the Fan Speed
Operation Steam Mode Steaming is the ideal cooking mode for foods that can be cooked in water. to bring up the keypad. Enter the desired cook time in hours and minutes. Press OK at the bottom of the screen to set the timer. NOTE: The temperature of the water in the steam generator is checked automatically. For sanitary reasons, if the water temperature is below 149°F (65°C) the tank is emptied, refilled and reheated. 3. When the cook time expires, the oven automatically shuts off. Press the CONT.
Operation Retherm Mode Retherm allows you to gently reheat previously prepared products. During operation a carefully calculated amount of humidity is added. This process helps maintain the appearance and flavor of the product. 4. The oven starts automatically three seconds after the cook time and temperature have been selected. Setting the Fan Speed The BCT has 9 fan speeds to choose from. You can set the fan before or during the cook cycle.
Operation CombiSmart Mode The CombiSmart mode allows you to set an oven temperature and select a preset humidity level. The oven produces a consistent level of humidity. There is no compensation for the moisture naturally found in the product. in hours and minutes. Press OK at the bottom of the screen to set the timer. 4. When the cook time expires, the oven automatically shuts off. Press the CONT. key if you want the oven to continue operating after the set time has elapsed.
Operation CombiOptima Mode 3. In the HOUR & MINUTES lists, drag your finger up or down to set the desired cook time. NOTE: Not available on mini ovens. CombiOptima allows you to set an oven temperature and add a specific percentage of humidity. Many products contain a large amount of water, increasing the humidity level during cooking. In the CombiOptima mode the oven automatically regulates the humidity to maintain the desired level.
Operation Using the Core Probe 3. Set the vent position if applicable. Refer to instructions on setting the vent position. All Blodgett BCT/BLCT ovens come standard with one core temperature probe. It is possible to run two core probes at the same time. An additional probe may be purchased from your Blodgett dealer. 4. Insert the core probe into the center of the product. Then plug the probe into the oven at the connector located in the upper corner of the right side panel.
Operation Using the Core Probe NORMAL CORE PROBE COOKING COOK & HOLD In the normal mode, the core probe will notify you when the product has reached the desired pull temperature. The cook temperature is constant in the normal mode. Cook & Hold is an extension of Delta-T cooking. The oven temperature adjusts relative to the actual core temperature of the product. When the desired core temperature is reached, the oven adjusts the cavity to maintain the core temperature, acting as a warming mode.
Operation SmartChef Automatic Cooking The SmartChef function provides a number of preset cooking functions for a variety of products. 3. The control displays COOKING ADJUSTMENT SLIDERS. Make any adjustments you wish to achieve the desired results. Entering the SmartChef Mode a. Grilling - Slide the button to the left for rare meat and to the right for well-done meat. 1. From the MAIN MENU, press the MANUAL key. 2. Select the SMART CHEF mode.
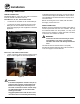
Operation SmartChef Automatic Cooking AVAILABLE ADJUSTMENTS Figure 18 BEEF PORK POULTRY LAMB VENISON FISH BREAD Grilling Grilling Grilling Grilling Grilling Grilling Baking Roasting Roasting Roasting Roasting Roasting Roasting Steaming Steaming Steaming Steaming Steaming Steaming Baking Small Size Breaded Breaded Breaded Breaded Breaded Breaded Browning Browning Browning Browning Braising Braising Browning Small Pieces Braising Braising Crispy Skin Braising Dark
Operation Using Rack Timing The rack timing function enables you to set one or more timers for each individual rack. This way you can cook different products on the same rack or on different racks as long as they can use the same cooking mode. The rack timer can be used in Hot Air, Combi, CombiOptima, Retherm and Steam modes. TO COOK USING RACK TIMING 1. From the MAIN MENU, press the MANUAL key. 2. Select the desired cooking mode. Set the cook temperature and humidity level if applicable. 3.
Operation Using Advanced Rack Timing The Advanced Rack Timer allows you to create groups of recipes with similar characteristics (cook temperature, humidity level, etc.). The advance rack timer cook screen lets you manage multiple recipes of the same group simultaneously on separate racks of the oven. Entering rack timer menus Name Bar 1. From the MAIN MENU, press ADVANCED. 2. Select RACK TIMER.
Operation Using Advanced Rack Timing Creating a Recipe Selecting a Group 1. Select the + key from the bottom of the SETUP GROUP screen. 1. From the RACK TIMER MENU screen, select the number of racks you’d like to use and the group with recipes you wish to use. Then select the right arrow ► key in the upper right hand corner to enter the RACK TIMER COOK screen. 2. Select the NAME BAR to edit the group name. Use the keypad to enter a recipe name.
Operation Using Advanced Rack Timing COOKING WITH RACK TIMER Remove Recipes – Drag and drop NOTE: The top portion of the RACK TIMER COOK screen contains the recipes in your group. If there are more than 6 recipes in your group you can browse the other recipes by swiping the screen from right to left in this portion of the screen. To return to the previous 6 recipes simply swipe in the reverse direction. The highlighted circle below the recipes indicates what page (of up to 3) you are currently on. 1.
Operation PreHeat, Cool Down and Proofing COOL DOWN The Advanced Menu gives you access to the PreHeat, CoolDown and Proofing functions. Use this function to quickly cool the oven cavity. For the best results, set the cool down temperature 68°F (20°C) lower than the desired cooking temperature. PREHEAT Use PreHeat to preheat the oven prior to cooking. 1. From the MAIN MENU, press the ADVANCED key. 1. From the MAIN MENU, press the ADVANCED key. 2. Select the COOL DOWN mode. 2. Select the PREHEAT mode.
Operation PreHeat, Cool Down and Proofing PROOFING NOTE: Prebaked products do not need proofing. 1. From the MAIN MENU, press the Advanced key. 2. Select the PROOFING mode. 3. The PROOFING TEMPERATURE list and timer are displayed. Drag your finger up or down to set the desired proofing temperature. To switch to keypad entry - Swipe your finger from right to left across the upper portion of TEMPERATURE scroll dial. Select the keypad icon from the center of the box to bring up the keypad.
Maintenance Cook to Perfection To set up Cook To Perfection (CTP) The cook to perfection function helps recipes compensate for temperature fluctuations. These can occur when transitioning between recipes with different temperatures, opening the door, or adding frozen products. The system makes real time adjustments to cook time ensuring quality cooking. 1. From the MAIN MENU select the GEAR ICON. 2. Select SUPER USER from the SETTINGS MENU. 3. Select SETTINGS from the SUPER USER MENU. 4.
Operation Programmed Cooking At the End of the Cook Cycle Programmed cooking is simple in the Blodgett BCT Combi. Choose from one of a wide variety of pre-programmed recipes or create your own. 1. When the cook time expires, an alarm sounds and the display reads “Recipe Done!. Use an Existing Program Recipe Press EXIT to end the cook cycle. 1. From the MAIN MENU, press the RECIPES key. The CATEGORIES menu is displayed. Press RESTART to continue the cook cycle. 2. Press the desired product category.
Operation Adding a New Recipe Program 1. From the MAIN MENU, press the RECIPES key. The CATEGORIES menu is displayed. 8. Choose the desired cook settings for the step. Press the right arrow key ► to save your settings. 2. To add a new recipe, press the + in the upper right corner of the screen. 9. Add as many steps as needed. 3. The CHOOSE CATEGORY screen is displayed. Drag your finger up or down to select the desired product category. Press the right arrow key ► to save and advance to the next screen.
Operation Favorites Using Favorites 1. From the MAIN MENU, press the FAVORITES key. 2. Press the desired recipe. The recipes are listed in alphabetical order. All the steps of the recipe, and the total cooking time are displayed. 3. Touch the START key, to start the oven. The oven starts the preheating process, and displays “load the oven”, when the oven is ready. Adding a Recipe to Favorites 1. From the MAIN MENU, press the RECIPES key. 2.
Operation USB To Export Recipes from the Oven to the USB The Blodgett BCT/BLCT comes standard with a USB port located underneath the control compartment. The USB will enable upload and download of product recipes as well as HACCP data. 1. Press Export Recipes. 2. Select either All Recipes or the appropriate product category. Select the recipes you wish to upload to the oven. To Access USB Menu 1. Insert the USB card into the slot below the control compartment.
Operation USB To Import and Export Groups and Recipe Files in Advance Rack Timer 3. In the RACK TIMER MENU screen select the BACKUP key from the bottom left hand corner of the screen. NOTE: Importing - you will be given the option to select the desired recipe file on the USB drive. Once a recipe set has been selected you will be given the option to overwrite the existing recipe file with those on the USB or append them to the current recipe library. 4.
Operation Timed Start 4. Select the desired product recipe. Timed Start makes it possible to start the oven using any programmed recipe before staff arrives. This way, the oven will be hot when you come in in the morning. 5. The display shows Single Timer with the recipe name in the top box and the start time in the second box. 1. From the MAIN MENU, press the ADVANCED key. You may edit either start time or recipe by touching either box. 2. Press the TIMED START key.
Maintenance HACCP Library The Blodgett BCP/BLCP comes standard with HACCP data recording. HACCP enables you to control and document production. Data recorded includes production time. production duration, preparation temperature and core temperature. To Backup HACCP Data The HACCP library can hold approximately 1000 log files. You will be notified when the memory is full so that you can empty the memory with the USB. If nothing is done, the computer will automatically start to overwrite the oldest files.
Maintenance Cleaning & Preventative Maintenance DAILY CLEANING Cleaning the Interior Daily cleaning of your Combi oven is essential for sanitation, and to ensure against operational difficulties. NOTE: DO NOT use corrosive cleaners not intended for oven cleaning on your Combi oven. Cleaning the Exterior Blodgett recommends the following products for cleaning and rinsing of your Blodgett Combi oven.
Maintenance Cleaning & Preventative Maintenance Run the CombiWash automatic cleaning cycle as follows: WEEKLY CLEANING In addition to the daily cleaning, it is necessary to clean the control filter and behind the fan guard on a weekly basis. This is necessary for proper functioning of the oven. Scale will build up on the fan and heat source leading to a less efficient oven. 1. Check the level of detergent and rinse aid in the containers. The red tube is for detergent and the blue tube is for rinse aid.
Maintenance Deliming - BCT only The control keeps track of boiler usage between deliming. When the oven has reached 95% of the time the control warns the operator that the oven needs to be delimed. This is a warning only, the oven can be used all day before deliming. Flushing the Boiler Deliming the Oven 2. The control displays the SETTINGS menu. Press the SUPER USER key. The boiler may be flushed to ensure there is no descaling agent is present. 1. From the MAIN Menu, press the GEAR ICON. 1.
Maintenance Deliming - BCT only Settings Menu Super User Screen Delime Screen Confirm the oven is empty Delime running screen Delime done screen Figure 33 45