
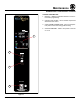
Owner's manual

13
Operation
OVEN STARTUP
1. Be sure the shutoff switch and/or circuit breaker
switch below the control panel are in the on position.
The display ashes OFF PRESS POWER KEY TO
START.
NOTE: If the real time clock and auto wake up func-
tions are enabled the display reads PRESS
POWER KEY TO START AUTO START.
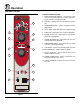
2. Press the POWER KEY (17). The display reads
PREHEAT and the oven heats to the last manual set
temperature in the hot air mode. The display ashes
READY / IDLE and the alarm beeps 5 times when the
oven is at temperature and ready to bake.
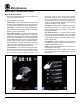
MANUAL COOKING
1. Turn the DIAL (5) until the display reads MANUAL.
2. Press the TIME KEY (7). Rotate the dial, or use the
alpha/numeric keypad to enter the desired bake time.
Press the center of the dial to set the bake time.
NOTE: Time is set in one minute increments using
the dial. To set time in less than one minute
increments use the alpha/numeric keypad.
3. Press the TEMP KEY (6). Rotate the dial, or use the
alpha/numeric keypad to enter the desired bake tem-
perature. Press the center of the dial to set the bake
temperature. The oven preheats to the new tempera-
ture.
NOTE: Temperature is set in 5 degree increments
using the dial. To set time in less than 5 de-
gree increments use the alpha/numeric key-
pad.
4. Press the desired mode key, Hydro or Hot Air.
If Hydro is selected, rotate the dial, or use the alpha/
numeric keypad to enter the desired percentage of
moisture.
5. When the display ashes READY / IDLE, open the
door. Load the product.
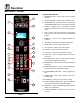
6. Press the START/STOP KEY (1) to begin the bake
cycle. The timer counts down and the display alter-
nates between the cooking mode and the name of
the product.
PROGRAMMED COOKING
1. Turn the DIAL (1) until the name of the product is
highlighted. Press the center of the dial to select. The
oven preheats to the programmed temperature in the
correct cooking mode. The display ashes READY /
IDLE and the alarm beeps 5 times when the oven is
at temperature and ready to bake.
2. Open the door. Load the product.
3. Press the START/STOP KEY (1) to begin the bake
cycle. The timer counts down and the display alter-
nates between the cooking mode and the name of
the product.
PROBE COOKING
1. Press the PROBE key (18) to select the probe mode.
The display reads CORE PROBE COOK & HOLD.
Turn the dial to select either YES or NO. Press the
center of the dial to select.
If YES is selected, Cook & Hold has been enabled.
In the Cook & Hold mode, the oven cavity lowers to
the product pull temperature as the product cooks.
If NO is selected, Cook & Hold has not been enabled
the cavity maintains the cook temperature.
2. Turn the DIAL to enter the desired product pull tem-
perature in the display. Press the center of the dial to
save the pull temperature.
3. Press the TEMP KEY (6). Rotate the dial, or use the
alpha/numeric keypad to enter the desired bake tem-
perature. Press the center of the dial to set the bake
temperature. The oven preheats to the new tempera-
ture.
NOTE: Temperature is set in 5 degree increments
using the dial. To set time in less than 5 de-
gree increments use the alpha/numeric key-
pad.
4. Press the desired mode key, Hydro or Hot Air.
If Hydro is selected, rotate the dial, or use the alpha/
numeric keypad to enter the desired percentage of
moisture.
5. Insert the core probe into the product. Load product
into the oven and close the door. Be sure that the
terminal end of the core probe is outside of the oven
and clear of the door.
MenuSelect™ Control