
Hydrovection Owners Manual


16
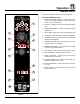
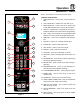
Operation
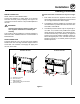
Standard Control
TIMER COOKING
1. Press the TIMER/PROBE KNOB (8) to select the tim-
er mode. The TIMER LED lights.
2. Turn the MODE SELECTOR Switch (1) to the desired
function.
3. Set the TEMPERATURE DIAL (3) to the desired cook
temperature.
4. When the oven has reached the cook temperature,
load the product.
5. Rotate knob to enter the desired cook time in the
display. You can clear the display by rotating counter
clockwise. The timer begins on its own.
6. The temperature, time, and mode can be altered at
any time during the cooking process.
7. When the timer reaches 00:00, the buzzer sounds.
Press or rotate the TIMER/PROBE KNOB (8) counter
clockwise to silence the buzzer. Remove the product.
PROBE COOKING
1. Press the TIMER/PROBE knob (8) to select the
probe setpoint mode. The PROBE SETPOINT LED
(7) lights.
2. Rotate the knob to enter the desired nal cook tem-
perature in the display.
3. Insert the core probe into the product. Load product
into the oven and close the door. Be sure that the
terminal end of the core probe is outside of the oven
and clear of the door.
4. Connect the core probe to the PROBE CONNEC-
TION (12) at the bottom of the control.
5. The display gives the actual core probe temperature
by pressing the TIMER/PROBE knob (8) again.
6. When the product reaches the nal cook temperature
the buzzer sounds.
COOL DOWN
NOTE: The unit can be cooled down rapidly.
1. To cool down the oven cavity, open the door and se-
lect Cool Down on the MODE SELECTOR Switch (1).