
Hydrovection Owners Manual


6
Installation
Leg Attachment
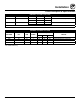
LEG OPTIONS
25” (635mm) Adjustable Leg
8-1/2” (216mm) Leg with
Casters, Adjustable Feet, or Seismic Feet
Figure 1
ATTACHMENT
1. Align the threaded stud on one of the front legs to the
bolt hole located in the bottom corner of the
appliance. Turn the leg clockwise and tighten to the
nearest full turn.
2. Align the leg plate holes with the bolt holes. Secure
with the two 1/2” bolts provided.
3. Repeat the above steps with the other front leg. If
casters are used, install them with the locking casters
in the front of the oven. The rear casters do not lock.
Ensure that the locks are set on the front casters.
4. Tip the oven up on the newly installed front legs. If
casters are used, check that the locks are set on
the front casters. Repeat the above steps for the
rear legs.
5. Level the oven by screwing the adjustable feet in or
out as necessary.
Figure 2